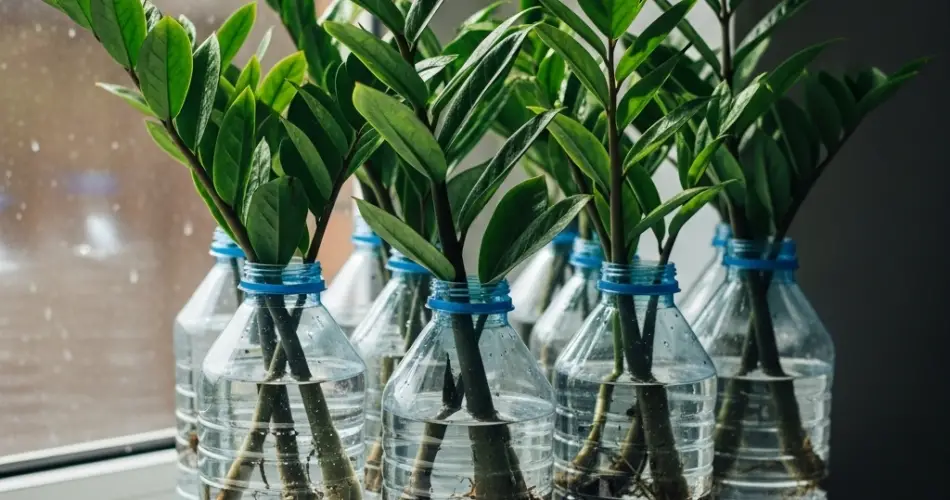
The ZZ plant (Zamioculcas zamiifolia) is a favorite among beginner gardeners and houseplant lovers for its low-maintenance nature, glossy green leaves, and ability to thrive in low-light conditions. It’s a resilient plant that stores water in its thick rhizomes, allowing it to survive drought and neglect. One of the most creative and eco-friendly ways to grow this hardy plant is in a recycled plastic bottle. This method is not only budget-friendly but also a great way to reduce plastic waste while adding greenery to your home.
In this guide, you’ll learn how to grow a ZZ plant in a bottle planter step by step—from choosing the right container to maintaining your plant with minimal effort.
Why ZZ Plants Are Ideal for Bottle Gardening
ZZ plants are slow-growing and have compact root systems, making them perfect candidates for small, confined containers like plastic bottles. Their ability to store water in their rhizomes means they don’t require frequent watering, reducing the risk of overwatering—a common mistake among new plant owners.
They also adapt well to various indoor conditions, including low light and fluctuating temperatures. All these traits make the ZZ plant an excellent choice for a bottle gardening project, especially for beginners looking for a low-fuss plant with high impact.
Choosing the Right Bottle
Start with a clear, sturdy plastic bottle—1-liter or 1.5-liter bottles from soda or mineral water work well. Wash the bottle thoroughly to remove any residue.
Cut the bottle about one-third from the top. You can use the bottom section as a basic planter or combine both halves to create a self-watering setup.
-
For a basic planter: Use the lower portion and make 3–4 small drainage holes at the bottom to allow excess water to escape.
-
For a self-watering system: Invert the top half and insert it into the bottom, with a cotton wick threaded through the cap. The wick will draw moisture from the reservoir below into the soil above, maintaining consistent hydration.
If you’re using a clear bottle, consider wrapping it in fabric, jute rope, or painting the outside to block light from reaching the roots and to prevent algae growth.
Preparing the Soil
ZZ plants prefer a well-draining soil mix to prevent root rot. A good option is a cactus or succulent mix, or you can create your own by combining:
-
2 parts regular potting soil
-
1 part perlite or coarse sand
-
1 part coconut coir or peat moss (optional for improved aeration)
Add a small layer of gravel or pebbles at the bottom of the bottle (especially if there are no drainage holes), followed by the soil mix.
Planting Your ZZ Plant
If you’re using a nursery plant, gently remove it from its container and shake off excess soil. If you’re using a cutting or rhizome, make sure it’s healthy and dry before planting.
-
Fill the bottle planter halfway with soil.
-
Place the ZZ plant or rhizome in the center.
-
Add more soil around it, making sure the roots are covered and the base is stable.
-
Water lightly to help the soil settle.
In a self-watering bottle, ensure the wick reaches from the reservoir to the root zone for consistent moisture.
Light and Placement
ZZ plants tolerate low light, making them ideal for indoor spaces like offices, bedrooms, or bathrooms. However, they grow best in bright, indirect light. Avoid direct sun, as it can scorch the leaves.
Place your bottle planter near a north- or east-facing window or under fluorescent lights if natural light is limited. If your ZZ plant starts leaning, rotate it occasionally to ensure even growth.
Watering and Care
ZZ plants need minimal watering. In a basic planter, water only when the top 2–3 inches of soil are dry. In a self-watering setup, refill the reservoir when it’s low and avoid letting water sit for too long without change.
Overwatering can lead to yellowing leaves and root rot, so always err on the dry side. These plants can go weeks without water and still look healthy.
Wipe the leaves with a damp cloth occasionally to remove dust and keep them glossy. No need to mist, as ZZ plants prefer dry air.
Fertilize sparingly—once every 2–3 months during the growing season (spring to early fall) with a diluted liquid houseplant fertilizer.
Repotting and Propagation
ZZ plants grow slowly and don’t need frequent repotting. However, if the roots or rhizomes begin to crowd the bottle, you can transplant it into a larger recycled container or regular pot.
Propagation is simple. You can grow new plants from leaf cuttings or by dividing the rhizomes. Let the cuttings dry and callous before placing them in water or soil.
A Green Start with Recycled Style
Growing a ZZ plant in a plastic bottle is a perfect project for beginner gardeners who want something low-maintenance and rewarding. It’s a creative way to reuse plastic, reduce waste, and bring life into your indoor space. With its hardy nature and stylish appearance, the ZZ plant offers both beauty and simplicity—making it an ideal candidate for your eco-friendly indoor garden


