The ZZ plant (Zamioculcas zamiifolia) is one of the most resilient and visually striking indoor plants. With its glossy green leaves and low-maintenance needs, it’s a favorite among beginners and experienced plant lovers alike. One of the most satisfying ways to multiply your ZZ plant collection is by propagating it—and you don’t need fancy pots or tools to do it. In fact, an empty plastic bottle is all it takes to get started.
This upcycled gardening project shows how you can use plastic bottles to root and grow ZZ plant cuttings. It’s a simple, sustainable, and space-efficient method that works beautifully in any indoor environment.
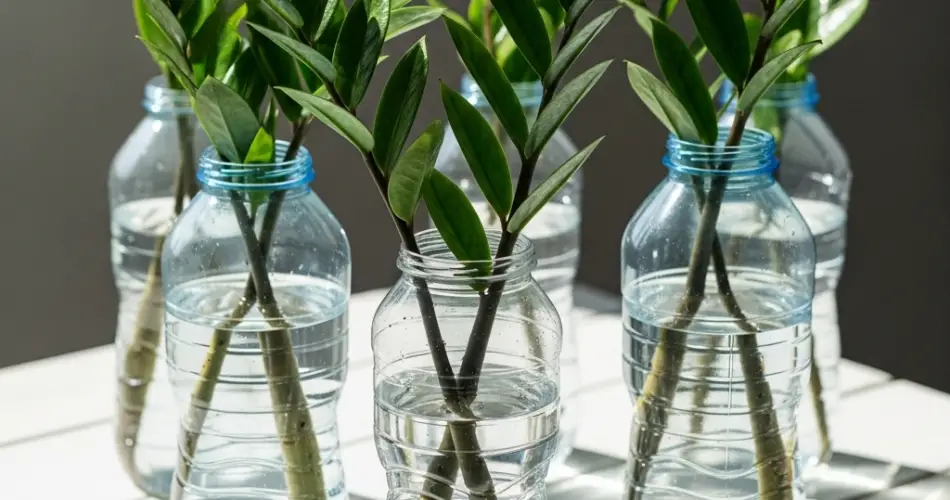
Why Use Bottles for ZZ Plant Propagation?
Plastic bottles make excellent rooting containers for ZZ plants, especially when you’re aiming for a budget-friendly, eco-conscious approach. Here’s why they work so well:
-
Recyclable and sustainable: Repurposes waste into a growing container.
-
Clear sides: Allow you to monitor root development.
-
Compact size: Fits easily on windowsills, desks, or countertops.
-
Customizable: Easy to cut, decorate, and modify to suit your space.
While ZZ plants are known for their slow growth, water propagation in bottles offers a clean, manageable way to observe their rooting process over time.
What You’ll Need
-
Healthy leaves or stems from a mature ZZ plant
-
A clear plastic bottle (500 ml to 1 liter)
-
Sharp, clean scissors or pruning shears
-
Room-temperature filtered or dechlorinated water
-
Optional: activated charcoal to prevent algae and bacteria
-
A well-lit indoor space
Step 1: Take a Healthy Cutting
ZZ plants can be propagated from two types of cuttings:
-
Leaf cuttings: Cut individual leaves from a healthy plant, leaving a small portion of the petiole (leaf stem) attached.
-
Stem cuttings: Cut a mature stalk near the base. These typically root and form rhizomes faster than single leaves.
Make sure your cuttings are free of pests, damage, or discoloration. Allow them to air-dry for a few hours so the cut ends can callous over and reduce the risk of rot.
Step 2: Prepare the Bottle
Choose a clean plastic bottle and remove any labels. Using scissors or a utility knife:
-
Cut off the top third of the bottle to create an open container.
-
Alternatively, use the full bottle by removing the cap and inserting cuttings through the neck.
-
Rinse the container thoroughly before use.
A transparent bottle is ideal for monitoring water clarity and root development, but if you prefer, you can decorate the outside with paint, fabric, or twine to give it a cleaner look.
Step 3: Fill with Water and Place the Cutting
-
Fill the bottle with room-temperature filtered or dechlorinated water, enough to submerge the cut ends of your leaf or stem cuttings.
-
Only the bottom part of the cutting (where roots will form) should be underwater. Avoid soaking the leaves or upper stem to prevent rot.
-
If you have activated charcoal, add a small pinch to the water to keep it fresh longer.
Step 4: Provide the Right Conditions
Place your bottle in a location with bright, indirect sunlight. Avoid direct sun, which can overheat the water and damage the cuttings.
Maintain a steady indoor temperature, ideally between 65–75°F (18–24°C). ZZ plants are tolerant, but they propagate best in warm, stable environments.
Step 5: Monitor Growth and Change the Water
Be patient—ZZ plants are known for slow propagation. Here’s how to care for your cuttings:
-
Change the water every 10–14 days, or sooner if it looks cloudy.
-
Rinse the cut ends gently when refreshing the water to prevent bacterial buildup.
-
Keep the water level consistent so the base of the cutting stays submerged.
Over the next few weeks (or months), you’ll notice white roots emerging from the submerged section. Eventually, small rhizomes (bulb-like structures that ZZ plants grow from) may begin to form as well.
Step 6: Transplant to Soil
Once your ZZ cuttings develop 2–3 inches of roots and possibly a small rhizome, they are ready to be transferred into soil.
-
Use a well-draining soil mix, such as cactus or succulent soil with perlite.
-
Gently plant the rooted cuttings in small pots or containers.
-
Water lightly and place in a location with indirect light.
Allow the plant time to adjust after transplanting, and avoid overwatering while it settles in.
Tips for Success
-
Don’t rush the process. ZZ plant propagation takes time—often several months before strong roots appear.
-
Use clean tools and containers to avoid introducing harmful bacteria.
-
Propagate multiple cuttings at once for better odds and a fuller plant later.
-
Label your bottles with the date the cuttings were placed to track progress.
Final Thoughts
Upcycling plastic bottles into propagation vessels for ZZ plants is a rewarding and eco-friendly project that brings greenery into your space with minimal cost. With patience and care, you can grow brand-new plants from cuttings and enjoy the satisfaction of watching roots develop day by day.
Whether you’re a plant parent looking to expand your indoor garden or simply seeking a creative way to reuse household items, this project offers beauty, sustainability, and a hands-on connection to nature—all starting with a simple bottle and a ZZ leaf.


