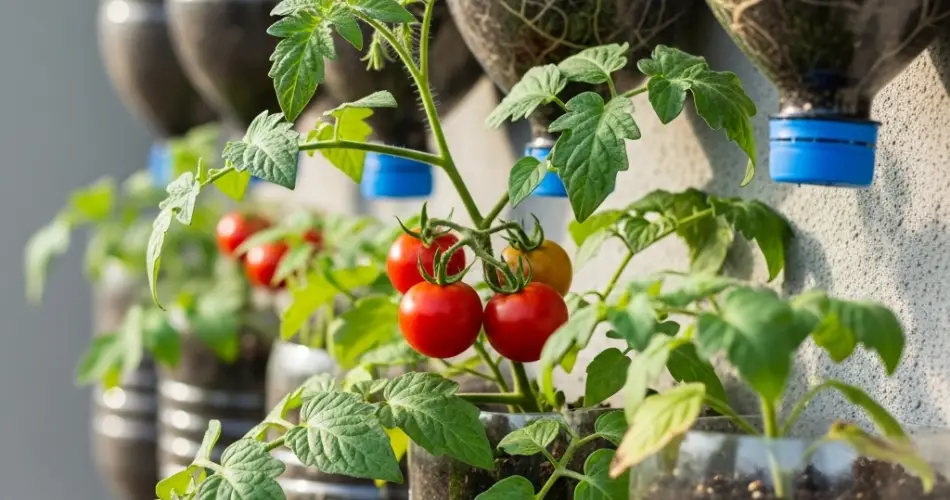
Tomatoes are one of the most popular and rewarding crops to grow at home, offering fresh flavor and versatility in the kitchen. If you don’t have access to garden beds or large containers, you can still grow plump, juicy tomatoes using wall-mounted plastic bottles. This vertical gardening technique is ideal for balconies, patios, and urban spaces, combining space-saving innovation with sustainability by reusing plastic waste.
With the right setup, soil, and care, you can enjoy a productive tomato harvest straight from your wall—turning unused vertical space into a vibrant green patch of edible goodness.
Why Use Wall-Mounted Bottles for Tomatoes?
Tomatoes are often grown in large pots or garden plots, but they adapt surprisingly well to vertical growing systems with proper support and root space. Wall-mounted bottles offer several benefits:
-
Space efficiency: Ideal for small outdoor areas like balconies or fences.
-
Eco-conscious gardening: Recycles plastic bottles that would otherwise be discarded.
-
Improved drainage: Reduces the risk of waterlogged roots.
-
Cleaner harvests: Elevates plants off the ground, minimizing soil splash and pests.
-
Convenient maintenance: Easier to prune, water, and harvest without bending over.
This setup works best for cherry, grape, or dwarf tomato varieties, which are more compact and manageable than large-fruiting types.
What You’ll Need
To build your own wall-mounted tomato garden, gather the following materials:
-
1.5 to 2-liter plastic bottles (clear or opaque)
-
A utility knife or sharp scissors
-
Good-quality potting mix
-
Compost or organic fertilizer
-
Tomato seedlings or seeds (compact varieties recommended)
-
Hooks, screws, or sturdy wire for mounting
-
Drill or heated metal tool for making drainage holes
Be sure the plastic bottles are strong, clean, and able to withstand moisture and weight over time.
Recommended Tomato Varieties
Not all tomatoes are suitable for small containers. Choose compact or determinate varieties that thrive in confined spaces:
-
Tiny Tim – A dwarf cherry tomato that grows well in containers.
-
Patio Princess – Designed for container and small-space gardening.
-
Balcony Cherry – Compact and productive, ideal for vertical setups.
-
Bush Early Girl – Fast-maturing and perfect for smaller containers.
-
Red Robin – A short, bushy plant ideal for bottle gardens.
Avoid large, indeterminate varieties unless you can provide extra support and depth.
Preparing the Bottles
-
Clean the bottles thoroughly and remove any labels.
-
Cut a planting window: Lay each bottle horizontally and cut a rectangular slit (around 4–5 inches wide) on one side. This is where your plant will grow.
-
Create drainage holes: Poke several small holes at the bottom of each bottle using a drill or hot nail.
-
Add mounting holes: Punch two holes near the neck and bottom of the bottle (above the planting window) for threading rope or wire.
Mount the bottles securely to a wall or vertical frame using hooks, nails, or brackets. Ensure they’re placed in a sunny location.
Soil and Fertilizer Mix
Tomatoes need rich, well-draining soil to thrive, especially in small containers where nutrients are limited.
Recommended mix:
-
2 parts high-quality potting soil
-
1 part compost or worm castings
-
Optional: A handful of perlite or coco coir to improve drainage and moisture retention
Mix in a slow-release organic fertilizer or tomato-specific blend before planting. Supplement with liquid feed every two weeks once flowering begins.
Planting the Tomatoes
-
Fill each bottle about three-quarters full with your soil mix.
-
Plant one seedling per bottle through the opening, ensuring the roots are well covered and the stem is upright.
-
Firm the soil gently around the base and water thoroughly.
Tomatoes like deep planting, so if your seedling is tall, you can bury part of the stem to encourage additional root growth.
Sunlight and Watering Needs
-
Sunlight: Tomatoes require at least 6–8 hours of direct sunlight per day. South-facing walls are ideal.
-
Watering: Keep the soil evenly moist, especially during flowering and fruiting. Hanging bottles tend to dry out quickly, so check moisture levels daily.
-
Mulching: Use dried leaves or straw at the surface of the soil to retain moisture and prevent rapid evaporation.
Install a drip irrigation line or water manually with a narrow-spouted can to avoid overwatering or splashing the leaves.
Maintenance and Support
-
Prune regularly to remove suckers (side shoots) if using indeterminate types. For compact types, pruning is minimal.
-
Support growth by tying the stem to a stake or using a string trellis from above.
-
Watch for pests like aphids and whiteflies. Neem oil or insecticidal soap can be used if infestations occur.
Ensure good airflow between plants to prevent fungal diseases, especially in humid environments.
Harvesting Your Tomatoes
Tomatoes are ready to harvest when they turn fully red (or the color of their variety), feel slightly soft to the touch, and come off the vine easily with a gentle twist.
For continuous production, pick ripe fruits regularly to encourage more flowering. Some cherry tomato varieties can produce heavily for several weeks.
Final Thoughts
Wall-mounted bottle gardening offers a fun, sustainable, and productive way to grow tomatoes at home, especially when space is tight. With minimal investment and the use of recycled materials, you can transform any sunny wall into a thriving vertical garden full of sweet, juicy tomatoes. Whether you’re a seasoned gardener or just getting started, this DIY method delivers satisfying results and a delicious reward.


