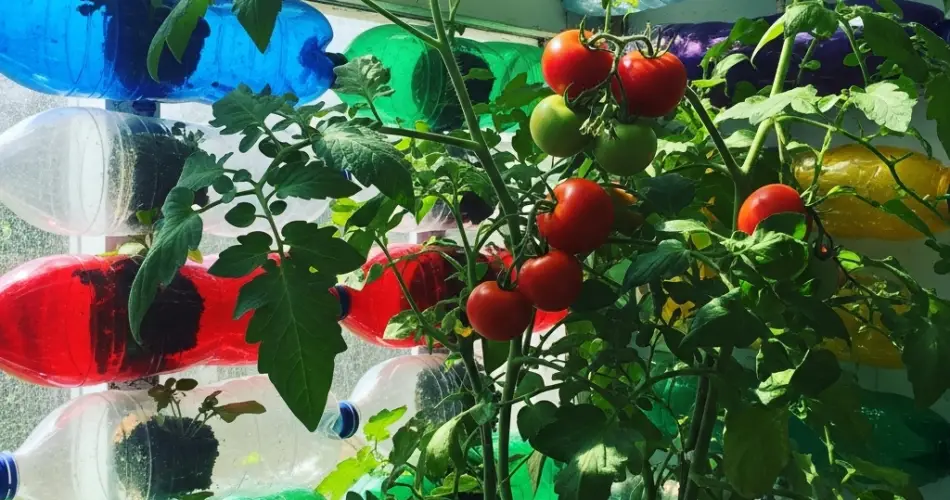
Tomatoes are among the most popular vegetables to grow at home, loved for their juicy flavor and versatility in the kitchen. But what if you don’t have a garden or much space? No worries—growing tomatoes vertically on your wall using plastic bottles is not only possible, but also efficient, sustainable, and surprisingly productive.
Using recycled plastic bottles for vertical gardening is a smart way to turn unused wall space into a thriving tomato garden. It helps reduce waste, makes use of limited space, and brings fresh food closer to home—even in tight urban areas.
Why Grow Tomatoes in Bottles on a Wall?
This innovative method combines vertical gardening and container growing, offering several practical advantages:
-
Space-saving – Ideal for balconies, fences, and apartment walls
-
Eco-friendly – Reuses plastic bottles instead of discarding them
-
Clean and organized – Keeps fruit off the ground and makes harvesting easy
-
Customizable – Arrange bottles however you like, based on your space
-
Improved airflow – Reduces the risk of disease by allowing air circulation
-
Great for small varieties – Perfect for cherry and grape tomatoes
If you love gardening but lack ground space, this vertical solution is perfect for you.
Best Tomato Varieties for Bottle Gardening
Tomatoes come in many sizes and growth habits. For wall-mounted bottles, choose compact or determinate (bush-type) varieties that thrive in containers. Some great options include:
-
Tiny Tim – A compact cherry tomato ideal for small containers
-
Balcony – Bred specifically for patios and vertical setups
-
Patio Princess – Small and decorative with high productivity
-
Bush Early Girl – A short but productive variety
-
Red Robin – Perfect for hanging or wall-mounted planters
Avoid large indeterminate varieties like Beefsteak or Brandywine, as these require deeper soil and more support than bottles can provide.
Materials You’ll Need
Before starting, gather these materials:
-
1.5 or 2-liter plastic bottles (clean and with caps)
-
Sharp scissors or utility knife
-
Good-quality potting mix (with compost and perlite)
-
Tomato seeds or seedlings
-
A wall, wooden pallet, or fence for mounting
-
String, wire, or screws for attachment
-
Organic fertilizer or compost tea
-
Optional: mulch to help retain moisture
Step 1: Prepare the Bottles
-
Wash and dry each bottle, removing labels.
-
Cut an opening on one side about 4–5 inches long and 2–3 inches wide—this is where the plant will grow.
-
Puncture drainage holes in the bottom and cap to let excess water out.
-
Make hanging holes near the top and bottom of the bottle so you can attach it to a wall using string or screws.
-
Add gravel (optional) to the bottom for better drainage.
Step 2: Add Soil and Plant Tomatoes
Fill each bottle with a lightweight potting mix that includes compost and perlite for drainage. Avoid heavy garden soil, which compacts and restricts root growth.
If starting from seeds, sow 1–2 seeds per bottle about ¼ inch deep. For seedlings, carefully transplant one per bottle, keeping the root ball intact. Water gently after planting.
Step 3: Mount Bottles on the Wall
Choose a sunny spot that receives at least 6–8 hours of sunlight daily. Use a sturdy wall, wooden pallet, or wire frame to support your vertical garden.
Attach the bottles using strong string, metal wire, or screws. Space them far enough apart to allow air circulation and light access for each plant.
You can arrange bottles in vertical columns or staggered rows depending on available space and aesthetic preference.
Step 4: Watering and Fertilizing
Tomatoes need consistent moisture, especially in containers that dry out quickly. Check soil daily—if the top inch is dry, water gently until it begins to drain from the bottom.
Feed every 2–3 weeks with a balanced liquid fertilizer or compost tea to support flowering and fruit development. Avoid over-fertilizing, which can lead to lots of leaves but fewer fruits.
Adding a thin layer of mulch can help keep soil moist and cool.
Step 5: Pruning and Support
Tomatoes benefit from light pruning. Remove the lower leaves that touch the soil or bottle edge to reduce disease risk. Pinch off suckers (the shoots that form between the main stem and branches) to encourage fruiting rather than excessive leaf growth.
Some varieties may need a small support stick or a soft tie to keep them upright as they grow.
Step 6: Harvesting Tomatoes
Depending on the variety, tomatoes are typically ready to harvest 60–85 days after transplanting. Pick fruit when it’s fully colored, slightly firm, and fragrant.
Use scissors or garden snips to avoid damaging the plant. Harvesting regularly encourages continued fruit production.
Step 7: Refresh and Replant
Once a plant has finished its growing cycle, remove it from the bottle, refresh the soil with compost, and start again with a new seedling or seeds. Rotating crops or replanting every few months helps maintain soil health and productivity.
Final Thoughts
Growing tomatoes in a bottle garden on your wall is a clever and eco-friendly way to enjoy fresh produce without a traditional garden. It’s perfect for urban gardeners, balcony dwellers, and anyone who wants to grow their own food in a compact space.
With the right setup, some sunlight, and a little care, you can turn a plain wall into a vertical farm filled with flavorful, homegrown tomatoes.


