Sage is a hardy, aromatic herb known for its earthy flavor and many culinary and medicinal uses. It thrives in warm, sunny environments and does especially well in containers, making it an ideal candidate for small-space gardening. If you’re looking for a sustainable way to grow sage without taking up floor space, a vertical garden made from recycled plastic bottles is an efficient and eco-friendly solution.
With just a few basic tools and a handful of materials, you can turn used plastic bottles into a productive wall garden filled with fragrant sage. This DIY setup is perfect for balconies, patios, fences, or even sunny indoor spaces, and it offers an affordable, compact way to cultivate your own fresh herbs year-round.
Why Grow Sage Vertically?
Sage is well-suited to vertical gardening for several reasons:
-
Shallow root system: Sage doesn’t need deep soil, making it ideal for small containers like plastic bottles.
-
Low water requirements: Once established, sage is drought-tolerant and thrives with minimal maintenance.
-
Compact growth: This herb doesn’t spread aggressively and stays tidy in containers.
-
Sun-loving nature: A vertical wall makes it easy to position sage where it gets plenty of sunlight.
Using vertical space also frees up ground area and creates an organized, visually appealing herb display.
Materials Needed
To build your vertical sage garden, collect the following supplies:
-
Clean 1.5- or 2-liter plastic bottles (one per plant)
-
Sharp scissors or a utility knife
-
A drill or heated nail for making holes
-
Strong twine, wire, or zip ties
-
A wall hook, fence, or wooden frame for mounting
-
Lightweight potting mix
-
Small sage plants or stem cuttings
-
Optional: gravel or charcoal pieces for drainage
This setup can be customized based on how many sage plants you want to grow and the amount of vertical space available.
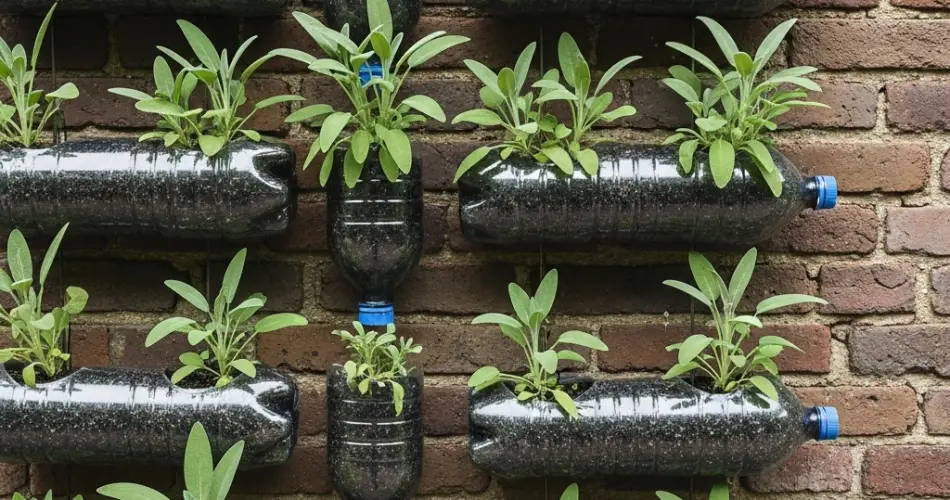
Preparing the Bottles
-
Cut a planting window: Lay each bottle horizontally and cut a rectangular opening on one side. This will serve as your planting and watering access point.
-
Drill drainage holes: Make several small holes at the bottom of each bottle to allow excess water to escape and prevent root rot.
-
Add hanging holes: Punch or drill two holes near the top and two near the bottom on either side of each bottle for threading twine or attaching with wire.
-
Create a drainage layer: Add a few small stones or charcoal pieces at the bottom to help improve water flow.
-
Add soil: Fill each bottle with well-draining potting mix, leaving about an inch of space at the top for watering.
Best Soil for Sage
Sage grows best in sandy or loamy soil that drains well. A heavy or moisture-retaining mix can lead to root rot and stunted growth.
Recommended soil mix:
-
2 parts potting soil
-
1 part coarse sand or perlite
-
Optional: a small amount of compost for added nutrients
The ideal pH range is between 6.0 and 7.0, and the soil should feel light and dry quickly after watering.
Planting Sage
Sage can be grown from seed, but it’s faster and more reliable to use young plants or cuttings.
-
From seed: Sow a few seeds in each bottle, cover lightly with soil, and keep moist until germination (7–14 days).
-
From cuttings or transplants: Gently insert the plant into the soil and firm the soil around the roots. Water lightly after planting.
Position the bottles so the plants receive at least 6 hours of full sunlight per day. Sage needs good light to develop strong flavor and healthy foliage.
Assembling the Vertical Garden
You can mount your bottle planters in a variety of configurations:
-
Vertical column: Tie several bottles together using twine or wire and hang them vertically from a hook or support beam.
-
Wall-mounted grid: Fasten bottles to a pallet, mesh panel, or wood frame and hang the structure on a wall or fence.
-
Balcony railing: Attach bottles side-by-side along a railing using zip ties.
Leave enough space between bottles to allow airflow and prevent overcrowding. Ensure the structure is stable and secure.
Watering and Maintenance
Sage prefers slightly dry soil, so be cautious with watering.
-
Water only when the top inch of soil feels dry.
-
Reduce watering during cooler months.
-
Avoid wetting the foliage to prevent fungal issues.
Because sage is low-maintenance, it doesn’t need frequent fertilizing. A light application of compost or diluted organic liquid fertilizer once a month during the growing season is usually sufficient.
Harvesting and Pruning
Regular pruning encourages bushy growth and prevents the plant from becoming woody.
-
Begin harvesting once the plant is about 6–8 inches tall.
-
Snip leaves or stems as needed, preferably in the morning for the best flavor.
-
Always leave a few sets of leaves to allow the plant to continue growing.
-
Remove flower buds to prolong leaf production.
You can air-dry harvested sage leaves and store them for year-round use.
Common Issues and Tips
-
Yellowing leaves: Could be a sign of overwatering or poor drainage.
-
Leggy growth: Typically caused by inadequate light—move the garden to a sunnier location.
-
Pest problems: Rare in sage, but aphids can be managed with a light spray of soapy water or neem oil.
Sage is generally pest-resistant and thrives with minimal attention when planted in the right conditions.
Final Thoughts
A vertical sage garden made from recycled plastic bottles is a smart, sustainable way to enjoy fresh herbs at home. Not only does it repurpose materials that would otherwise go to waste, but it also makes herb gardening possible in even the smallest spaces. With good sunlight, proper drainage, and a little routine care, your sage wall garden will flourish—providing flavorful leaves for cooking and a touch of green for your home.


