If you enjoy cooking with fresh herbs but lack garden space, a vertical wall garden using recycled plastic bottles is a smart and eco-friendly solution. Sage, with its fragrant leaves and medicinal benefits, is an excellent candidate for this type of setup. It’s hardy, low-maintenance, and thrives in containers, making it perfect for small balconies, patios, or wall-mounted gardens.
This guide will walk you through everything you need to know to successfully grow sage in a wall garden made from repurposed plastic bottles.
Why Choose Sage?
Sage is a perennial herb known for its culinary, medicinal, and ornamental qualities. It adds earthy flavor to dishes like poultry, stuffing, soups, and sauces. Sage also attracts pollinators and repels certain pests, making it a companion-friendly plant in any garden. Best of all, sage is drought-tolerant and grows well in containers, needing only moderate sunlight and occasional watering.
Materials You’ll Need
To build your vertical sage garden, gather the following supplies:
-
Clean 1.5 to 2-liter plastic bottles
-
Sharp scissors or a utility knife
-
A nail or small drill for drainage holes
-
Garden soil or potting mix
-
Sage seeds or seedlings
-
Twine, wire, or zip ties
-
A wood panel, fence, or vertical surface
-
Optional: small rocks or gravel for drainage
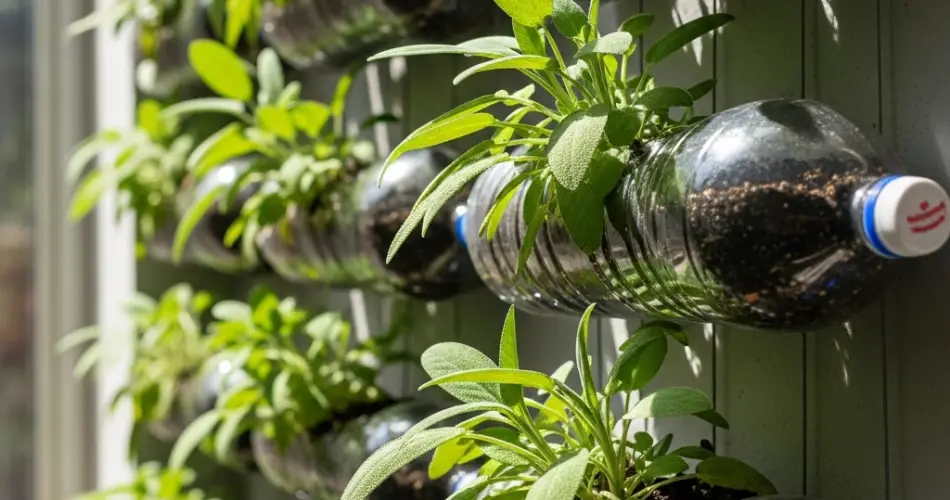
Step 1: Prepare the Plastic Bottles
Start by thoroughly washing the bottles and removing any labels. Use a knife or scissors to cut an opening in the side of each bottle—large enough to plant your sage but still deep enough to hold soil. Typically, removing about one-third of the side works well.
Next, drill or poke small holes into the bottom of each bottle to allow excess water to drain. Proper drainage is essential to prevent root rot and promote healthy growth.
Step 2: Build the Wall Garden
Decide how you want to mount your bottles. Here are some effective methods:
-
Hanging Rows: Use twine or wire to string the bottles horizontally across a sturdy wooden frame or metal rack.
-
Mounted System: Fix each bottle directly onto a wooden board or wall using screws or brackets.
-
Stacked Drainage Method: Arrange bottles vertically, one above the other, so excess water from the top can trickle down to the lower levels.
Make sure the bottles are secure and slightly angled upward to keep the soil and water in place.
Step 3: Add Drainage and Soil
Before filling the bottles with soil, place a thin layer of small rocks or gravel at the bottom of each bottle to enhance drainage. Then fill the bottle with high-quality potting mix. Sage prefers well-draining soil, so choose a mix designed for herbs or add some perlite or sand to improve drainage.
Leave about an inch of space at the top to avoid overflow when watering.
Step 4: Plant the Sage
You can start from seeds or small seedlings. If using seeds, plant 2–3 in each bottle and cover lightly with a thin layer of soil. If using seedlings, transplant them carefully into the bottle, keeping the root ball intact.
Sage seeds may take 2–3 weeks to germinate. During this time, keep the soil consistently moist but not waterlogged.
Step 5: Position the Wall Garden
Choose a sunny location for your wall garden. Sage needs about 6 hours of sunlight per day. A south- or west-facing wall is ideal. If growing indoors or in a shaded spot, consider supplementing with a grow light.
Rotate the bottles occasionally to ensure even light distribution and prevent the plants from leaning in one direction.
Step 6: Care and Maintenance
Sage is low-maintenance but does appreciate some regular attention:
-
Watering: Water only when the top inch of soil feels dry. Overwatering is a common mistake.
-
Fertilizing: Feed lightly with a balanced organic fertilizer once a month during the growing season.
-
Pruning: Regularly pinch off the top leaves to encourage bushier growth. Remove any yellow or dead leaves.
-
Pest Control: Sage is generally pest-resistant, but keep an eye out for aphids or spider mites. Use neem oil or insecticidal soap if needed.
Step 7: Harvesting Sage
You can start harvesting once the plant has grown several inches tall and has a few sets of leaves. Snip the outer leaves first, leaving the center growth to continue maturing. Harvest in the morning when the essential oils are most concentrated for the best flavor.
Avoid over-harvesting—never take more than a third of the plant at one time. With proper care, sage can live for several years, providing a continuous harvest.
Final Tips
-
Avoid letting the soil stay soggy—sage prefers slightly dry conditions.
-
Trim flowers if you want to extend leaf production.
-
Refresh the soil every 12–18 months to maintain good nutrient levels.
-
If your climate has harsh winters, consider moving the bottles indoors during the cold months.
Creating a plastic bottle wall garden for sage is a sustainable way to reuse household waste while growing fresh herbs. It’s ideal for urban gardeners or anyone with limited horizontal space. With just a bit of planning and care, you can enjoy the beauty and flavor of homegrown sage right outside your door—or even on your kitchen wall.


