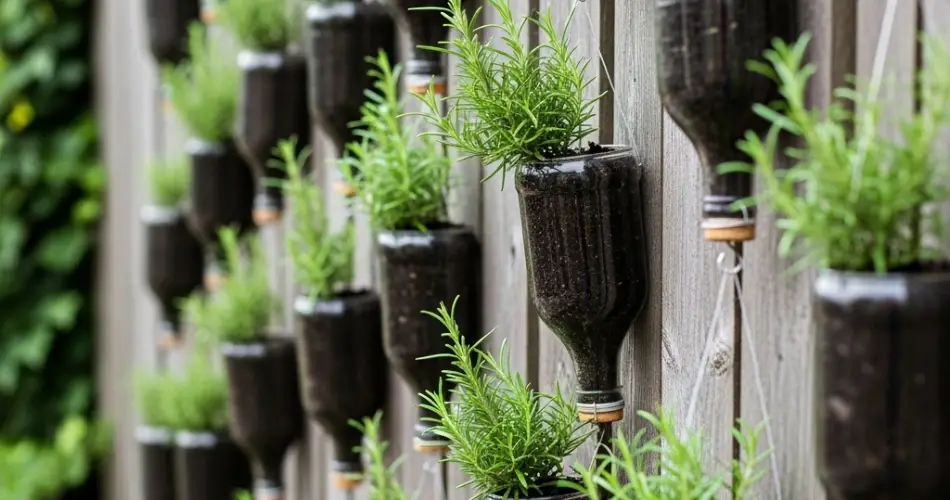
If you love the flavor and fragrance of rosemary but have limited gardening space, a vertical garden made from hanging plastic bottles is a clever and sustainable solution. This DIY project is perfect for balconies, patios, or sunny walls, and it helps you grow your own herbs while repurposing plastic waste.
Rosemary is a drought-tolerant, evergreen herb that thrives in containers. When planted in recycled bottles and arranged vertically, it not only saves space but also creates a beautiful, aromatic display. Whether you’re an experienced gardener or just starting out, this project is easy to set up and rewarding to maintain.
Why Use Hanging Bottles for Rosemary?
Plastic bottles are lightweight, durable, and easy to find. Instead of throwing them away, you can transform them into efficient planters. Hanging bottles vertically allows you to make use of otherwise unused spaces, like fences or exterior walls, and create a stacked herb garden with minimal ground area.
Rosemary’s deep aroma, resilience, and low water needs make it an ideal herb for this kind of setup. It grows slowly but steadily, and with the right care, your vertical rosemary garden can provide fresh sprigs all year round.
Materials Needed:
-
1.5- or 2-liter clear plastic bottles
-
Rosemary cuttings or seedlings
-
Scissors or a utility knife
-
Nail or screwdriver (to poke drainage holes)
-
Potting mix with good drainage (mix of soil, sand, and perlite or coco coir)
-
Twine, string, or wire for hanging
-
Small stones or pebbles (optional, for drainage)
-
Watering can or spray bottle
-
Sunny location for hanging
Step 1: Prepare the Bottles
Start by cleaning the bottles thoroughly. Remove labels to allow more light in, especially if your vertical garden is placed in partial sun.
Cut a rectangular window on one side of the bottle, large enough to accommodate the plant and soil. Leave enough plastic at the edges to maintain the bottle’s structure. Poke 3–4 drainage holes in the bottom using a heated nail or screwdriver.
Make two small holes near the top edges on opposite sides of the bottle. Thread string or twine through these holes and knot securely to create a hanging loop.
Step 2: Prepare the Soil Mix
Rosemary thrives in well-draining soil and doesn’t like to sit in moisture. Create a suitable potting mix by combining:
-
2 parts potting soil
-
1 part coarse sand or perlite
-
1 part coco coir or compost
If drainage holes are minimal, add a layer of pebbles at the bottom of the bottle before filling with soil. This helps keep roots from sitting in water.
Fill each bottle about two-thirds full with the soil mixture.
Step 3: Plant the Rosemary
You can start rosemary from cuttings or use small nursery-grown seedlings.
From cuttings: Take a 5–6 inch cutting from a healthy rosemary plant. Strip the leaves from the lower half and place the cutting in water for 1–2 weeks until roots develop. Then transplant into the soil-filled bottle.
From seedlings: Gently remove the seedling from its container and transplant it into the bottle. Press the soil around the roots to secure the plant and water lightly.
Step 4: Hang and Position Your Bottles
Choose a sunny spot where the bottles will receive at least 6–8 hours of direct sunlight each day. Rosemary is a sun-loving herb and needs plenty of light to thrive. Ideal locations include:
-
Balcony railings
-
Fence lines
-
Wall-mounted racks
-
Hooks along a porch or pergola
Ensure the bottles hang securely and are spaced far enough apart to allow airflow and light between them.
Step 5: Watering and Maintenance
Rosemary prefers dry conditions and doesn’t need frequent watering. Wait until the top inch of soil is dry before watering again. Use a watering can with a narrow spout or spray bottle to control the flow, avoiding waterlogging.
Avoid overwatering, especially in plastic containers, which can heat up quickly and retain moisture longer.
Prune the plant occasionally to encourage bushier growth. Remove dead or woody stems and trim back long shoots to shape the plant.
Step 6: Feeding and Long-Term Care
Rosemary is not a heavy feeder, but you can apply a light dose of organic fertilizer or compost tea once every 4–6 weeks during the growing season.
If the plant becomes root-bound after several months, consider transferring it to a larger container or trimming the roots and refreshing the soil.
In colder climates, move the vertical garden to a more sheltered location during winter or insulate the bottles to protect the roots.
Step 7: Harvesting Rosemary
Begin harvesting once the plant is well established, typically after a couple of months. Use scissors or garden shears to snip sprigs just above a leaf node. Regular harvesting encourages growth and keeps the plant tidy.
Use fresh rosemary to flavor meats, soups, vegetables, or herbal teas. You can also dry sprigs and store them in airtight containers for long-term use.
Creative Tips for Your Vertical Rosemary Garden
-
Paint or label each bottle for a decorative touch.
-
Combine rosemary with other Mediterranean herbs like thyme, oregano, or sage in a vertical system.
-
Add a drip irrigation line if you’re growing multiple bottles for consistent watering.
Conclusion
A vertical rosemary garden made with hanging bottles is a practical and eco-friendly way to grow herbs at home. It maximizes vertical space, reduces waste, and brings beauty and functionality to your outdoor or indoor environment. With a bit of sunlight, proper drainage, and minimal maintenance, you can enjoy fresh rosemary all year long—right from your own upcycled garden wall.


