Mint is one of the easiest and most rewarding herbs to grow, thanks to its vigorous growth, refreshing aroma, and versatility in the kitchen. From teas and cocktails to sauces and desserts, mint adds a fresh twist to countless recipes. But its aggressive spreading nature can overwhelm garden beds. That’s why growing mint in containers—especially vertical DIY bottle planters—is a smart, space-saving, and sustainable option.
Whether you have a small balcony, a sunny kitchen wall, or a narrow patio, you can enjoy a thriving mint garden using recycled plastic bottles. This method not only controls mint’s growth but also helps reduce plastic waste. Here’s how to create a vertical mint garden that keeps your kitchen stocked with fresh leaves year-round.
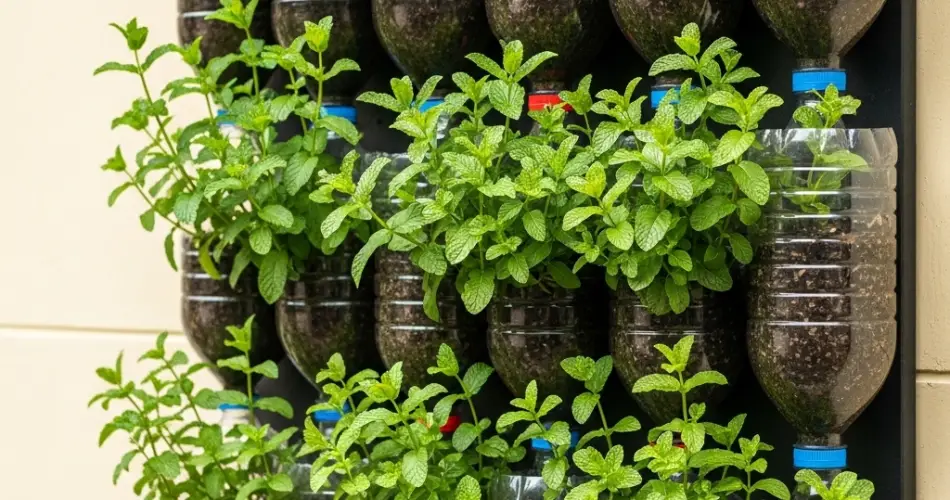
Why Grow Mint in Vertical Bottle Planters?
Mint grows rapidly and can take over garden beds if not contained. Using plastic bottles gives you full control over its roots and spread. Growing vertically also maximizes limited space, making it ideal for apartment dwellers or those with small outdoor areas.
Vertical gardening improves airflow around plants, enhances sunlight exposure, and makes maintenance easier. And by repurposing plastic bottles, you turn waste into a productive and eco-friendly growing system.
Materials You’ll Need
To get started, gather the following:
-
Clean 2-liter plastic bottles (one per plant)
-
A utility knife or scissors
-
Twine, sturdy wire, or zip ties
-
Nail or drill for drainage and hanging holes
-
Potting mix suitable for herbs
-
Mint cuttings or young mint plants
-
Optional: small stones or charcoal for drainage
Each bottle will serve as an individual planter. You can stack them vertically or hang them side-by-side depending on your space and preference.
Preparing Your DIY Bottle Planters
-
Cut an opening: Lay each bottle horizontally and cut a rectangular window (about 3–4 inches wide) into one side. This is where your mint will grow.
-
Add drainage holes: Poke 4–5 small holes in the bottom of each bottle using a nail or drill to allow excess water to escape.
-
Create hanging holes: Poke small holes near both ends of the bottle to thread twine or wire through for vertical stacking or hanging.
-
Layer the base: Add a thin layer of small pebbles or charcoal at the bottom of each bottle to help with drainage and prevent soggy roots.
-
Add soil: Fill the rest of the bottle with a loose, well-draining potting mix rich in organic matter. Leave about an inch of space at the top for watering.
Best Soil for Mint
Mint thrives in moist but well-draining soil. A mix of:
-
2 parts potting soil
-
1 part compost
-
1 part perlite or coarse sand
This combination ensures the roots stay well-oxygenated while retaining enough moisture. The ideal pH range for mint is between 6.0 and 7.0.
Planting Mint in Bottles
Mint can be grown from seed, but it’s far easier and faster to propagate from cuttings or transplant young nursery plants.
To plant:
-
Place a rooted cutting or small seedling into each bottle’s soil opening.
-
Firm the soil gently around the base to keep the plant stable.
-
Water thoroughly after planting.
Mint prefers partial to full sunlight, ideally 4–6 hours a day. Choose a spot where the vertical planter will receive morning light and some shade during the hottest part of the day.
Setting Up the Vertical Garden
There are several ways to arrange your bottle planters vertically:
-
Stacked system: Thread twine or rope through each side and knot below each bottle to hold it in place. Hang from a sturdy hook or beam.
-
Wall-mounted grid: Attach bottles horizontally to a wooden pallet, wire rack, or mesh grid using zip ties or hooks.
-
Fence or railing: Line bottles along a balcony railing or garden fence for a green vertical display.
Make sure the bottles are spaced far enough apart to allow light and airflow for each plant.
Watering and Feeding
Mint loves consistent moisture but doesn’t tolerate waterlogged roots.
-
Water when the top inch of soil feels dry.
-
In hot weather, check daily as bottle planters dry out more quickly.
-
Always water at the base, avoiding the leaves.
Feed the mint every 3–4 weeks with a diluted organic liquid fertilizer or compost tea to keep growth lush and leaves flavorful. Avoid overfeeding, which can result in bland-tasting mint.
Pruning and Harvesting Tips
Regular harvesting encourages mint to grow bushier and prevents it from becoming leggy.
-
Once the plant reaches 6–8 inches tall, begin harvesting the top 2–3 inches of each stem.
-
Cut just above a leaf pair to encourage branching.
-
Pinch off any flower buds to keep the plant focused on leaf production.
With regular care, you’ll enjoy continuous harvests for months.
Common Issues and Solutions
-
Yellow leaves: Often due to overwatering or poor drainage. Check holes and adjust watering.
-
Aphids or spider mites: Use a light spray of water or neem oil to remove pests.
-
Leggy growth: Not enough light—move to a sunnier location.
Mint is generally pest-resistant and low-maintenance when grown in the right conditions.
Final Thoughts
Vertical mint farming with DIY bottle planters is a creative, sustainable, and practical way to grow one of the most useful herbs in your kitchen. With just a few recycled materials, you can enjoy a constant supply of fresh, aromatic mint while saving space and minimizing waste. Whether hung on a wall, railing, or fence, this system brings greenery and convenience to even the smallest urban spaces.


