Dill is a fragrant herb with feathery green leaves and a slightly tangy, citrus-like flavor. Widely used in pickles, salads, soups, and fish dishes, dill is not only tasty but also easy to grow at home. Even if you lack traditional garden space, you can cultivate dill vertically using recycled plastic bottles. This DIY method is ideal for balconies, kitchen walls, or small outdoor areas—and it turns everyday waste into a productive, space-saving herb garden.
Vertical gardening with bottles allows you to grow multiple plants in a compact footprint while promoting sustainability and creativity. Whether you’re a beginner or a seasoned gardener, this vertical dill garden project offers a practical and rewarding way to enjoy fresh herbs year-round.
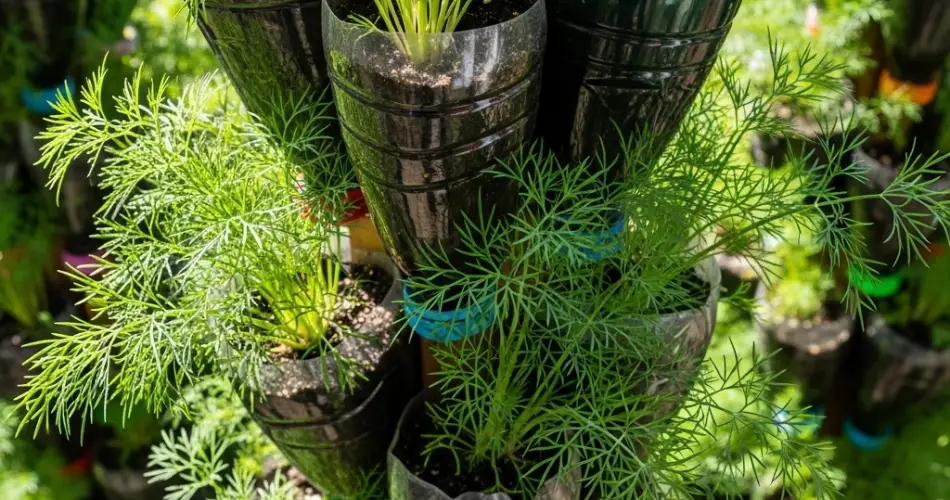
Why Grow Dill in Recycled Bottles?
Plastic bottles are lightweight, widely available, and easy to repurpose into vertical planters. Dill, which has shallow roots and grows best in full sun, adapts well to container gardening. A vertical setup allows you to stack or hang bottles on a wall, making it possible to grow herbs even in the most limited spaces.
By recycling plastic bottles, you’re reducing waste and creating a low-cost alternative to commercial pots and planters. Plus, the vertical arrangement improves airflow, keeps plants off the ground, and adds a touch of greenery to your environment.
Materials Needed:
-
Several 1.5- or 2-liter plastic bottles
-
Dill seeds or seedlings
-
Scissors or utility knife
-
Heated nail or screwdriver (for making drainage holes)
-
Lightweight, well-draining potting mix
-
Small pebbles or gravel (optional)
-
String, wire, or hooks (for vertical hanging)
-
Spray bottle or small watering can
-
A sunny wall, balcony railing, or fence
Step 1: Cut and Prepare the Bottles
Start by washing the bottles thoroughly and removing labels. Using scissors or a sharp knife, cut a rectangular window along one side of each bottle, large enough to allow planting and watering. Leave the bottom and sides intact to hold the soil securely.
Poke 3–5 drainage holes into the bottom of each bottle to prevent water from accumulating. If you plan to hang the bottles vertically, make two small holes near the top edge of each bottle and loop through twine, string, or wire to create a hanger.
Step 2: Fill with Soil and Prepare for Planting
Add a thin layer of small stones or gravel to the bottom of each bottle to improve drainage. Then, fill the bottle two-thirds full with potting soil that has good drainage. A mix containing perlite, compost, and coconut coir works well.
Dill prefers slightly acidic to neutral soil (pH 5.5 to 7.5) and needs a light texture to support its fine roots. Avoid heavy, clay-based soils that retain too much moisture.
Step 3: Plant the Dill
From seeds:
Dill grows well from seeds. Sprinkle 5–7 seeds in each bottle, spacing them evenly. Cover with a thin layer of soil (about 1 cm) and gently pat down. Mist with water to moisten the surface and place the bottle in a sunny location.
Seeds will germinate in 7–14 days if kept consistently moist and warm.
From seedlings:
If using young plants, dig a small hole in the soil and carefully transplant the seedling. Firm the soil around the base and water lightly.
Step 4: Arrange Your Vertical Garden
Hang your bottles on a fence, balcony railing, or sunny wall. You can also secure them to a wooden pallet or metal grid for a neat vertical layout. Make sure each planter receives at least 5–6 hours of direct sunlight daily.
Space the bottles so the upper planters don’t block light from reaching the ones below. If possible, stagger them diagonally or use a tiered setup.
Step 5: Watering and Maintenance
Water your dill garden when the top inch of soil feels dry. Use a watering can with a narrow spout or a spray bottle to avoid disturbing the roots. Avoid overwatering, as excess moisture can lead to root rot.
Dill doesn’t require much feeding. However, a diluted organic liquid fertilizer every 3–4 weeks can support healthy foliage growth.
Trim away any yellow or wilting leaves and check periodically for pests such as aphids. Good air circulation in vertical setups helps reduce fungal issues.
Step 6: Harvesting Dill
You can begin harvesting dill once the plants are 6–8 inches tall, usually within 4–6 weeks of planting. Use scissors to snip the outer leaves, allowing the inner foliage to continue growing. Avoid cutting more than one-third of the plant at a time to prevent stunting its growth.
For long-term storage, dill can be dried by hanging small bundles upside down in a well-ventilated area or freezing fresh leaves in airtight containers or ice cube trays with water.
If your plants start to flower, you can allow some to go to seed. Dill seeds are edible and can be collected for cooking or replanting.
Creative Tips for Your Dill Bottle Garden
-
Paint or label the bottles for a personalized and decorative touch.
-
Combine dill with other herbs like parsley, basil, or thyme in adjacent bottles.
-
Attach bottles to a pallet or lattice to create a portable herb wall.
-
Use color-coded strings to differentiate between herbs or planting dates.
Conclusion
Growing dill in vertical gardens made from recycled plastic bottles is a smart, sustainable, and rewarding way to enjoy fresh herbs, even in small spaces. With just a little sunlight, some well-prepared soil, and regular care, you can transform plastic waste into a lush, aromatic garden wall. Whether you’re cooking, pickling, or simply enjoying the greenery, your vertical dill garden will be a flavorful and eco-conscious addition to your home.


