Tomatoes are among the most popular and rewarding plants to grow at home. One efficient way to propagate tomato plants and expand your garden is by rooting their side shoots, also known as suckers. These small offshoots develop between the main stem and leaf branches and can be rooted easily to create new plants. Using plastic bottles as simple rooting chambers makes this process clean, convenient, and eco-friendly. This article explains how to root tomato side shoots using bottles, helping you multiply your tomato plants effortlessly.
Why Root Tomato Side Shoots?
Side shoots or suckers are essentially clones of the parent tomato plant. Propagating tomatoes from side shoots offers several benefits:
-
Cost-effective: You don’t need to buy new seeds or plants.
-
Faster growth: Rooted suckers develop into mature plants quicker than seedlings started from seeds.
-
True to type: New plants are genetically identical to the parent, preserving desired traits.
-
Saves space: Using bottles allows propagation indoors in a compact, controlled setup.
-
Eco-friendly: Reusing plastic bottles reduces waste and supports sustainable gardening.
Materials Needed
-
Clear plastic bottles (1 to 2 liters)
-
Sharp scissors or utility knife
-
Healthy tomato side shoots (4-6 inches long)
-
Clean water
-
Small containers or trays for initial rooting (optional)
Selecting and Preparing Side Shoots
-
Choose Healthy Shoots: Select side shoots that are about 4 to 6 inches long with several leaf nodes but no flowers or fruit.
-
Cut Properly: Using clean scissors or pruning shears, cut the side shoot just below a leaf node to encourage root development. Remove any flowers or buds to direct the plant’s energy toward rooting.
-
Trim Lower Leaves: Remove leaves from the bottom half of the cutting to prevent them from rotting in water.
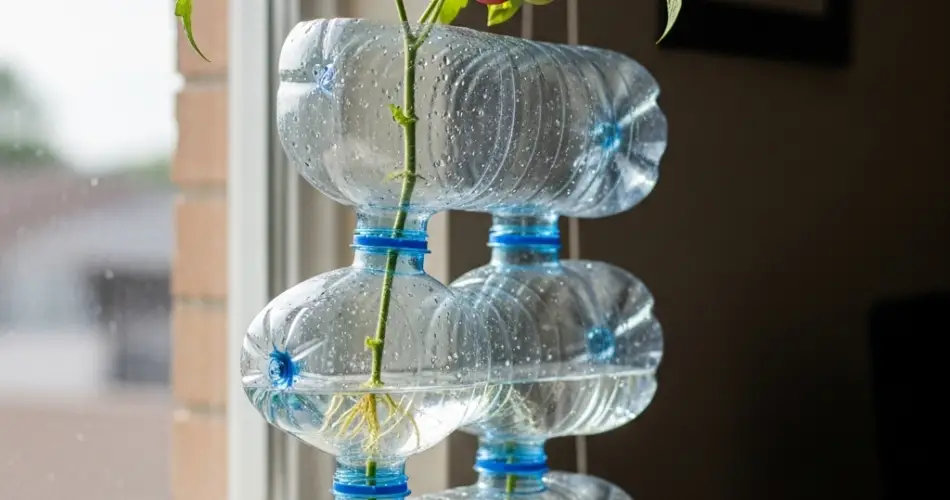
Preparing the Bottle Rooting Chamber
-
Select the Bottle: Use a clean, transparent plastic bottle so you can monitor root growth easily.
-
Cut the Bottle: Cut the bottle horizontally near the middle or two-thirds from the bottom, creating a base and a removable lid.
-
Prepare for Watering: Fill the bottom part with clean, room-temperature water about 2 to 3 inches deep.
-
Create a Support: You can make small holes or slots in the bottle’s top section to hold the cutting upright or simply balance the shoot on the bottle’s opening so the cut end stays submerged in water.
Rooting Tomato Side Shoots in Bottles
-
Place the Cutting: Insert the prepared side shoot into the water, ensuring the cut end is submerged while leaves remain above water.
-
Position the Bottle: Place the bottle in a warm, bright spot with indirect sunlight. Avoid direct sun which can heat the water excessively or cause algae growth.
-
Maintain Water: Change the water every few days to keep it fresh and oxygenated, preventing bacterial growth that can rot the cutting.
-
Monitor Root Development: Roots usually begin to form within 7 to 14 days. Healthy roots are white and slender.
Transplanting Rooted Side Shoots
Once the side shoot has developed a healthy root system (about 1 to 2 inches long):
-
Prepare Soil: Use a well-draining potting mix or seed-starting mix in a pot or planting tray.
-
Plant Carefully: Transplant the rooted cutting into moist soil, burying the roots and part of the stem. Firm the soil gently around the base.
-
Acclimate Plants: Keep newly potted plants in a shaded, protected area for a few days before moving them to brighter light to reduce transplant shock.
-
Water: Keep soil moist but not waterlogged as roots establish.
Benefits of Using Bottles for Rooting
-
Clean and Simple: Bottles provide a tidy way to propagate indoors without soil mess.
-
Visibility: Clear plastic lets you observe root progress and detect problems early.
-
Humidity Control: Using the bottle’s top as a cover can maintain humidity around the cutting to promote rooting.
-
Reuse Plastic: Helps reduce plastic waste by repurposing common household items.
Tips for Success
-
Use healthy, disease-free parent plants to avoid spreading problems to new cuttings.
-
Keep water clean and fresh to prevent rot and bacterial infections.
-
Avoid excessive heat or direct sunlight that can stress cuttings.
-
Be patient—rooting can take up to two weeks depending on conditions and tomato variety.
-
Once established, gradually expose new plants to outdoor conditions before transplanting to the garden.
Troubleshooting Common Issues
-
Rotting Cuttings: Often due to dirty water or submerged leaves. Change water regularly and remove leaves below waterline.
-
No Root Growth: May be caused by cold temperatures or poor cutting quality. Provide warmth (70°F-75°F) and ensure cuttings are healthy.
-
Leggy or Weak Shoots: Insufficient light leads to weak growth. Provide bright, indirect light during rooting.
Final Thoughts
Rooting tomato side shoots in plastic bottles is an easy, economical, and eco-conscious way to propagate tomato plants. This method maximizes your gardening resources by turning existing plants into new, healthy transplants without the need for seeds. Whether you’re a beginner or an experienced gardener, this technique can help you expand your tomato crop while reducing waste and saving money. With some care and attention, you’ll enjoy a flourishing tomato garden, starting with simple bottle propagation of side shoots.


