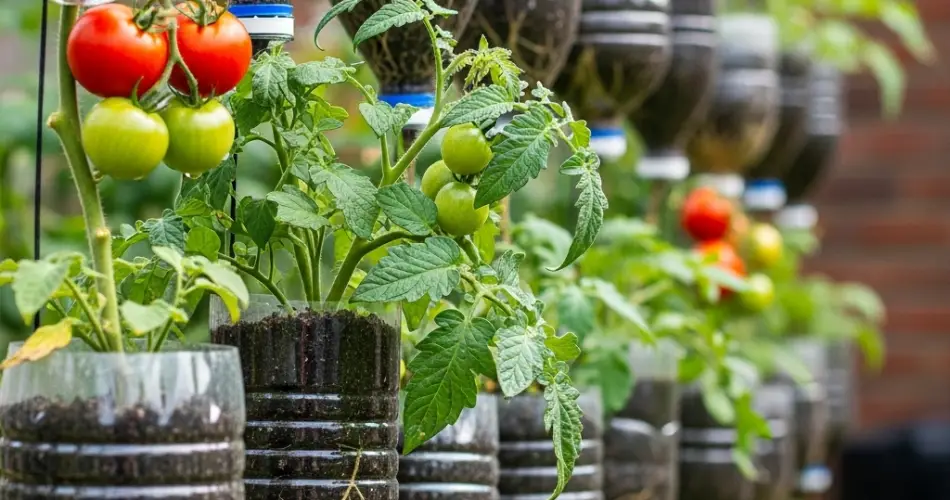
Tomatoes are one of the most popular and rewarding plants to grow at home, and starting new tomato plants from cuttings or seeds is a cost-effective way to expand your garden. Using reused plastic bottles as planters offers an eco-friendly, affordable, and space-saving method to propagate and grow healthy tomato plants. This approach is especially handy for urban gardeners or those with limited space, turning everyday waste into productive growing containers.
This guide will walk you through the process of growing new tomato plants in reused bottles, from preparing the bottles to nurturing your young plants.
Why Use Reused Bottles for Growing Tomatoes?
Reused plastic bottles have several benefits as planters:
-
Sustainability: They help reduce plastic waste by repurposing containers that would otherwise be discarded.
-
Cost-Effectiveness: Using bottles eliminates the need to buy pots or seed trays.
-
Space Efficiency: Bottles are compact and portable, perfect for windowsills, balconies, or small gardens.
-
Transparency: Clear bottles let you monitor soil moisture and root growth easily.
-
Drainage Control: You can customize drainage holes to suit your plants’ needs.
What You’ll Need
-
Clean plastic bottles (1 to 2 liters work well)
-
Sharp scissors or a craft knife
-
Quality potting mix or seed-starting soil
-
Tomato seeds or healthy tomato cuttings
-
Water
-
Small sticks or skewers (optional, for support)
-
Labels or markers (optional)
Step 1: Preparing the Bottles
Begin by washing your plastic bottles thoroughly to remove any dirt or residue. Remove the labels so you have a clear view of the soil and roots.
Next, cut the bottle horizontally about one-third from the top. The bottom portion will serve as the planter, and the top can be used as a humidity dome if desired.
Create several small holes in the bottom of the bottle to allow for proper drainage. This prevents waterlogging, which can cause root rot. If you’re using the bottle top as a cover, poke a few holes in it to ensure adequate airflow.
Step 2: Filling the Planters
Fill the bottom half of the bottle with a lightweight, well-draining potting mix suitable for tomatoes. Avoid using heavy garden soil as it can compact and hinder root growth.
Fill the bottle to about an inch below the cut edge to allow space for watering and seed placement.
Step 3: Starting from Seeds or Cuttings
From Seeds:
Plant tomato seeds about 0.5 centimeters (¼ inch) deep into the soil. You can plant two to three seeds per bottle, but thin to the strongest seedling after germination to avoid overcrowding.
From Cuttings:
If you’re propagating from cuttings, choose a healthy tomato plant and cut a 4 to 6-inch stem section just below a leaf node. Remove lower leaves, leaving a few sets of leaves at the top.
Make a small hole in the soil with your finger or a stick and insert the cutting gently. Firm the soil around it to hold it upright.
Step 4: Watering and Creating the Right Environment
Water the soil gently but thoroughly, making sure it is evenly moist but not soggy.
If you have saved the top portion of the bottle, invert it and place it over the planter to create a mini-greenhouse. This dome will help maintain humidity and warmth, which is beneficial for seed germination and rooting cuttings.
Place the bottle planters in a warm, well-lit area with indirect sunlight. Tomatoes require temperatures between 21°C and 27°C (70°F to 80°F) for optimal growth.
Step 5: Caring for Your Tomato Plants
Keep the soil consistently moist by checking daily and watering as needed. Avoid overwatering, which can lead to root rot and fungal diseases.
Once seedlings appear, ensure they receive plenty of light—ideally 12 to 16 hours daily. If natural light is limited, supplement with grow lights.
If using the bottle top as a dome, gradually remove it after seedlings have grown their first true leaves to acclimate them to normal humidity.
Support young plants with small sticks or skewers as they grow to keep stems upright.
Step 6: Transplanting
When tomato plants reach about 15 to 20 centimeters (6 to 8 inches) tall and have several sets of true leaves, they are ready for transplanting into larger pots or your garden.
If transplanting outdoors, harden off your plants first by gradually exposing them to outdoor conditions over a week, reducing watering slightly to prepare them.
Tips for Success
-
Label your bottle planters with seed variety and planting date for easy tracking.
-
Use organic or disease-free seeds and cuttings to reduce plant health risks.
-
Change water regularly if rooting cuttings in water before transferring to soil.
-
Avoid placing bottles in direct harsh sunlight to prevent overheating inside the plastic.
-
Fertilize plants lightly once they develop true leaves to promote healthy growth.
Benefits of Growing Tomatoes in Reused Bottles
Using reused bottles as planters is not only eco-friendly but also helps novice gardeners learn about plant growth by observing roots and soil moisture levels clearly. This hands-on method encourages recycling and sustainability while producing tasty, fresh tomatoes at home.
Conclusion
Growing new tomato plants in reused plastic bottles is an innovative, low-cost way to propagate healthy tomatoes with minimal space and resources. Whether starting from seeds or cuttings, the controlled environment created by bottle planters supports faster germination and rooting, leading to vigorous plants ready for transplanting.
By following these steps—preparing bottles, planting seeds or cuttings, maintaining moisture and light, and carefully transplanting—you can enjoy homegrown tomatoes while reducing plastic waste and practicing sustainable gardening.


