Urban gardening is on the rise, and if you have a roof with ample sunlight, it’s an ideal space to grow fresh vegetables. One of the easiest and most rewarding crops you can grow on your roof is red radishes. Not only are radishes a fast-growing vegetable, but they also thrive in containers, making them perfect for roof-top gardening where space can be limited.
If you’ve been wondering how to start your own roof garden, growing radishes is a great way to get your feet wet. With just a few simple steps, you can have a bountiful harvest of crispy, peppery radishes right from your roof.
Why Choose Radishes for Your Roof Garden?
Radishes are a fantastic choice for beginner gardeners, especially those looking to make the most out of their roof space. Here’s why:
-
Quick growth – Radishes mature in about 3 to 4 weeks, meaning you can enjoy a fast harvest.
-
Minimal space – Radishes can grow well in small containers, making them perfect for roofs, balconies, or patios.
-
Easy to care for – They require little maintenance and can grow in a variety of climates, making them ideal for rooftops.
-
High yield – Radishes are incredibly productive, and a small container can yield a significant amount of vegetables.
-
Nutrient-rich – Radishes are packed with vitamins, minerals, and antioxidants, making them a healthy addition to your meals.
What You’ll Need to Grow Radishes on the Roof
To get started with growing red radishes on your roof, here’s a list of the materials you’ll need:
-
Radish seeds – Choose a variety suited for container gardening (most red radishes work well).
-
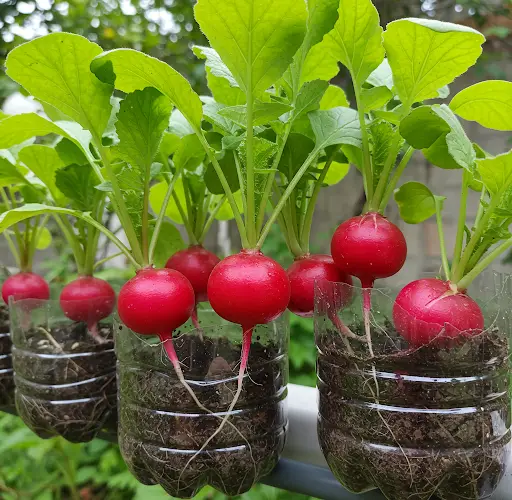
Containers or pots – Any container at least 6-8 inches deep. It should have good drainage holes.
-
Quality potting soil – Well-draining soil is essential for healthy radish growth.
-
Watering can or spray bottle – Radishes need consistent moisture but don’t like to be waterlogged.
-
A sunny spot – Radishes thrive in full sunlight, so choose a sunny section of your roof.
-
Organic fertilizer (optional) – For boosting growth, especially if your soil lacks nutrients.
Step-by-Step Guide to Growing Red Radishes on Your Roof
Step 1: Select the Right Location
Radishes need full sunlight to grow properly, so choose a spot on your roof that gets at least 6 hours of direct sunlight per day. A sunny rooftop provides the warmth radishes need to germinate and grow quickly.
Ensure that the spot you select is safe and accessible for watering and maintenance. Ideally, you’ll want to avoid areas that are too exposed to wind or extreme weather, but a well-drained roof space should do the trick.
Step 2: Prepare Your Containers
Choose containers that are at least 6 to 8 inches deep to give the radish roots enough space to grow. You can use plastic containers, wooden crates, or even large planter boxes. Just make sure that the containers have adequate drainage to avoid waterlogging, which can lead to root rot.
Fill the containers with a well-draining potting mix, preferably one that’s enriched with compost or organic matter. Radishes don’t like heavy, clayey soil, so a light, loamy mix is ideal.
Step 3: Plant the Radish Seeds
Radishes are easy to plant and don’t require complicated spacing. Here’s how to plant them:
-
Sow seeds about ½ inch deep into the soil.
-
Space seeds 1 inch apart in rows, leaving 2-3 inches between rows. This spacing allows the radishes to have enough room to grow without overcrowding.
-
Water gently after sowing to ensure the soil settles around the seeds.
Radish seeds will typically germinate within 4-7 days, and you’ll start seeing tiny shoots emerge shortly after.
Step 4: Care and Maintenance
Once your radishes are planted, here’s how to care for them:
-
Water regularly: Radishes need consistent moisture to grow well. Water them when the top of the soil feels dry, but avoid overwatering as this can cause the roots to rot.
-
Thin the plants: If seedlings emerge too close together, thin them out by gently pulling up the weaker plants. This ensures that the remaining plants have enough space to grow properly.
-
Fertilize lightly: While radishes are not heavy feeders, you can add a light dose of organic fertilizer after a few weeks to promote healthy growth.
Step 5: Harvesting Your Radishes
Radishes grow incredibly fast, and you’ll be ready to harvest them in as little as 3–4 weeks after sowing. You’ll know they’re ready when the radish bulbs have reached 1-2 inches in diameter and the tops begin to show above the soil surface.
To harvest, gently pull the radish by the tops of the leaves, taking care not to damage the surrounding plants. Radishes are best eaten fresh, but you can also store them in the fridge for up to a week.
Tips for Maximizing Your Roof Radish Yield
-
Stagger planting: For a continuous harvest, sow new seeds every 2–3 weeks. This way, you’ll have fresh radishes available throughout the season.
-
Rotate containers: If you’re growing multiple containers, rotate them occasionally to ensure even sunlight exposure and avoid one side getting too shaded.
-
Companion planting: Consider planting radishes alongside other quick-growing vegetables, such as lettuce, spinach, or herbs. This not only maximizes your space but also helps reduce pests.
Final Thoughts
Growing red radishes on your roof is a great way to enjoy fresh, homegrown vegetables without needing a large garden. With minimal space, quick growth, and high yield, radishes are the perfect crop for urban rooftop gardening. Whether you’re an experienced gardener or just starting out, these easy-to-grow vegetables can provide fresh, nutritious produce for you and your family all year round.
By following these simple steps, you can create a productive, low-maintenance rooftop garden that will give you a consistent supply of radishes with little effort. Happy gardening!


