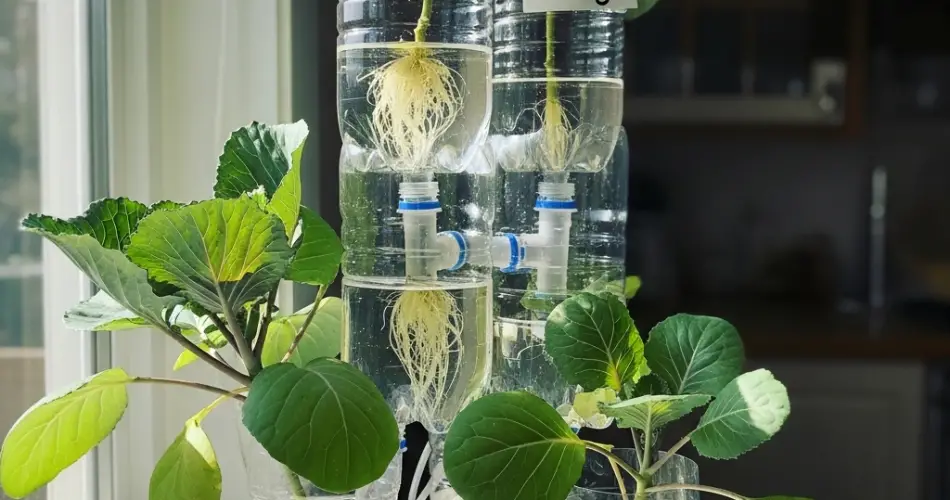
Cabbage is a versatile, nutrient-rich vegetable that thrives in cooler weather and is a staple in many home gardens. While it is relatively easy to grow, cabbage seedlings can be sensitive to environmental stress in their earliest stages. Germination, temperature changes, and pests often pose challenges for new seedlings. One clever and eco-friendly solution is to use recycled plastic bottles as propagation chambers. This simple method creates a controlled environment where cabbage seeds can sprout and establish strong roots before being transplanted outdoors.
Bottle propagation is ideal for gardeners of all experience levels. It’s inexpensive, sustainable, and works even if you don’t have much space. Whether you’re working with a backyard garden, balcony containers, or a sunny windowsill, this method helps you start your cabbage season off strong.
Why Propagate Cabbage in Bottles?
Recycled bottles act like mini greenhouses, giving young seedlings the protection and warmth they need to develop. Here are some of the benefits:
-
Moisture Retention – The enclosed bottle prevents soil from drying out too quickly, keeping seedlings evenly hydrated.
-
Temperature Control – The clear plastic traps heat, maintaining a stable environment even in cooler weather.
-
Pest Protection – Slugs, insects, and birds can’t reach the delicate seedlings inside.
-
Portability – Bottle starters are lightweight and easy to move around to catch more sun.
-
Eco-Friendly Gardening – Repurposing bottles reduces plastic waste while serving a practical purpose.
For gardeners with limited resources, this method eliminates the need to purchase seed trays or specialized equipment.
Setting Up Bottle Starters for Cabbage
You don’t need special tools or materials for this project. A few household items are enough to build your own cabbage propagation system.
What You’ll Need:
-
Clear plastic bottles (1.5 to 2 liters work best)
-
A sharp knife or scissors
-
Seed-starting mix or light potting soil
-
Cabbage seeds
-
A spray bottle for gentle watering
Steps to Build Your Bottle Starter:
-
Prepare the Bottle – Cut the bottle horizontally about two-thirds of the way up, keeping both parts intact.
-
Add Drainage Holes – Make small holes in the bottom half to prevent waterlogging.
-
Fill with Soil – Use a seed-starting mix, which is light and airy, helping delicate roots grow without stress.
-
Sow the Seeds – Plant two or three cabbage seeds about 1 cm deep, then cover lightly with soil.
-
Moisten the Soil – Use a spray bottle to dampen the soil evenly without washing the seeds away.
-
Reattach the Top – Place the upper portion of the bottle back over the base. Leave the cap off to allow airflow.
In just a few days to weeks, you’ll begin to see the first sprouts emerging.
Caring for Seedlings in Bottles
Proper care ensures that seedlings remain strong until it’s time for transplanting.
-
Light – Place bottles in a sunny spot where seedlings can get 6–8 hours of light daily. Indoors, supplement with grow lights if needed.
-
Watering – Check soil moisture regularly. The bottle will retain humidity, so you may only need to water occasionally.
-
Ventilation – Open the bottle dome for a few hours each day to reduce excess humidity and prevent mold.
-
Thinning – Once seedlings emerge, thin them to one strong plant per bottle. This prevents overcrowding and ensures each seedling develops well.
This mini greenhouse environment supports healthy root growth and strong stems, making the seedlings better prepared for outdoor conditions.
Transplanting Your Bottle-Grown Cabbage
After four to six weeks, seedlings should have at least three or four true leaves and be ready for transplanting.
-
Harden Off – Before moving them outside, gradually expose the seedlings to outdoor conditions. Start with a few hours each day, then extend the time until they adjust.
-
Choose the Right Spot – Cabbage prefers full sun and fertile, well-draining soil enriched with organic matter.
-
Spacing – Plant seedlings 12–18 inches apart to allow enough room for mature heads to form.
-
Transplant Carefully – Gently lift the seedling from the bottle with its soil intact and plant it at the same depth it was growing.
-
Water Generously – Give newly transplanted seedlings a thorough watering to help roots settle in.
Once established in the garden, cabbage will continue to grow steadily, eventually producing crisp and flavorful heads.
Tips for a Successful Cabbage Season
-
Start Early – Use bottle propagation to get a head start before outdoor conditions are favorable.
-
Fertilize Lightly – Apply a diluted liquid fertilizer once seedlings have true leaves to encourage steady growth.
-
Mulch the Soil – After transplanting, mulch around the base to keep soil cool and moist.
-
Watch for Pests – Common cabbage pests like aphids and caterpillars can damage leaves. Use row covers or natural repellents to protect your crop.
-
Rotate Crops – Avoid planting cabbage in the same spot year after year to prevent soil-borne diseases.
Final Thoughts
Bottle propagation is a simple, sustainable, and effective way to give your cabbage seedlings a healthy start. By creating a controlled microclimate, recycled bottles provide the perfect balance of warmth, moisture, and protection during the crucial early stages of growth. Once transplanted outdoors, these well-established seedlings are resilient and capable of producing robust, tasty heads of cabbage.
This low-cost method makes cabbage growing accessible to anyone—whether you garden on a balcony, patio, or backyard plot. With bottle propagation, you’ll not only reduce waste but also enjoy a productive, eco-friendly gardening season.


