Growing potatoes from slips—sprouted shoots from mature tubers—is a quick and effective way to multiply your potato crop. While most people are familiar with planting seed potatoes directly in the soil, starting slips in cut plastic bottles offers better control, cleaner rooting, and a jump-start on the growing season. This method is especially useful in small spaces or urban environments where garden beds aren’t readily available.
Using plastic bottles to start your potato slips is easy, cost-effective, and ideal for preparing healthy transplants that are ready to thrive in garden beds, grow bags, or crates.
What Are Potato Slips?
Potato slips are shoots or sprouts that grow from mature potatoes. While slips are more commonly associated with sweet potatoes, the method also works with white, red, and yellow potatoes. When allowed to sprout and root, these slips can become new plants, each capable of producing several tubers.
Starting them in bottles helps promote strong root systems before they’re transplanted, giving your crop a healthy head start.
Why Use Bottles for Potato Propagation?
Plastic bottles provide a mini nursery for potato slips, offering several benefits:
-
Improved moisture control during rooting
-
Visibility to monitor root growth
-
Easy movement and positioning for optimal light
-
Compact solution for indoor or balcony setups
-
Sustainable reuse of plastic waste
Whether you’re short on garden space or just want a cleaner method of propagation, bottles offer a practical solution.
What You’ll Need
Gather the following materials:
-
Mature potatoes (organically grown or unsprayed, with visible eyes)
-
1L or 1.5L clear plastic bottles
-
Sharp scissors or knife
-
Toothpicks or wooden skewers
-
Clean water
-
Optional: Marker for labeling varieties
Preparing the Bottles
-
Clean and Dry
Rinse your bottles thoroughly and let them dry. Remove any labels to let in more light. -
Cut the Bottle
Slice the bottle about two-thirds up from the base, creating a cup-like lower portion for water. The upper half can be used as a humidity dome or discarded if not needed. -
Poke Holes for Airflow
Make 2–3 small holes near the top edge to allow ventilation, especially if using the top half as a cover. This helps reduce mold during rooting.
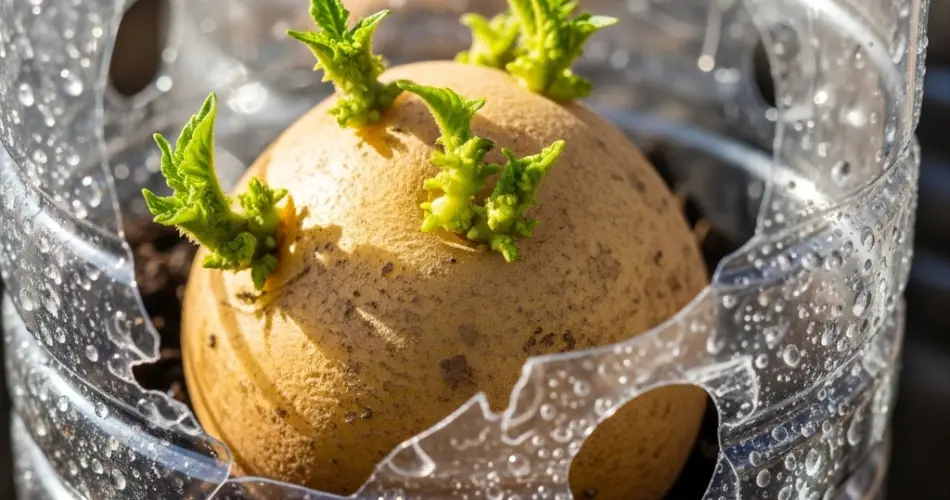
Preparing the Potato for Slips
-
Select a Healthy Potato
Choose a firm, mature potato with visible eyes (small dimples). Avoid wrinkled, moldy, or shriveled tubers. -
Cut if Needed
Large potatoes can be cut into chunks, each with at least one or two eyes. Let the pieces dry for 1–2 days to form a callus over the cut surface—this helps prevent rot. -
Insert Toothpicks
Insert three or four toothpicks around the sides of each potato piece to suspend it over the bottle opening, leaving the bottom submerged in water. -
Add Water
Fill the bottom part of the bottle with water until the lower third of the potato piece is submerged. Avoid covering the entire potato—only the base needs to be in contact with water.
Positioning and Waiting
Place the bottles in a warm, sunny area such as a windowsill or balcony shelf. Slips typically begin to sprout within 7–14 days, depending on the temperature and potato variety.
Change the water every 2–3 days to prevent mold and bacteria buildup. Rinse the potato base lightly if it starts to develop any film or discoloration.
Root Development and Slip Growth
Once sprouts (slips) reach about 10–15 cm long and have several leaves, check the base for root formation. Slips that develop visible roots are ready to be separated.
To remove a slip:
-
Gently twist it away from the potato or cut it close to the base.
-
If it doesn’t have roots yet, place it in another bottle with shallow water to encourage rooting before planting in soil.
Each healthy slip has the potential to become a new plant and produce its own potatoes.
Planting the Slips
When your slips have a good root system, you can transplant them into:
-
Crates or boxes
-
Grow bags
-
Raised beds
-
Buckets or deep pots
Use loose, well-draining soil with plenty of compost or organic matter. Plant the slip about 10 cm deep, covering part of the stem, and mound the soil as it grows. Potatoes grow best in full sun and need consistent watering throughout the growing season.
Tips for Success
-
Keep slips warm: Rooting is faster in temperatures between 20–25°C (68–77°F).
-
Use rainwater or filtered water: If tap water is heavily chlorinated, let it sit overnight before using.
-
Start early: Begin slips a few weeks before your target planting date to ensure they’re well-rooted and vigorous.
-
Label varieties: If growing more than one type of potato, label your bottles for easy tracking.
Conclusion
Starting potato slips in bottles is a simple and space-saving way to prepare your plants for a productive growing season. It allows for close monitoring, healthy rooting, and easy transplanting into soil when conditions are right. With just a few bottles, water, and sprouting potatoes, you’ll soon be on your way to harvesting homegrown spuds—no garden bed required.


