Starting carrot seeds in plastic bottles is a clever and space-saving way to grow this popular root vegetable at home. Carrots thrive in loose, deep soil and can easily be grown in recycled containers, making this method perfect for balcony gardens, patios, and small urban spaces. Using plastic bottles not only reduces waste but also gives you full control over soil conditions—an important factor when growing straight, healthy carrots.
Here’s a step-by-step guide to successfully starting carrot seeds in plastic bottles and enjoying a harvest of sweet, crunchy roots.
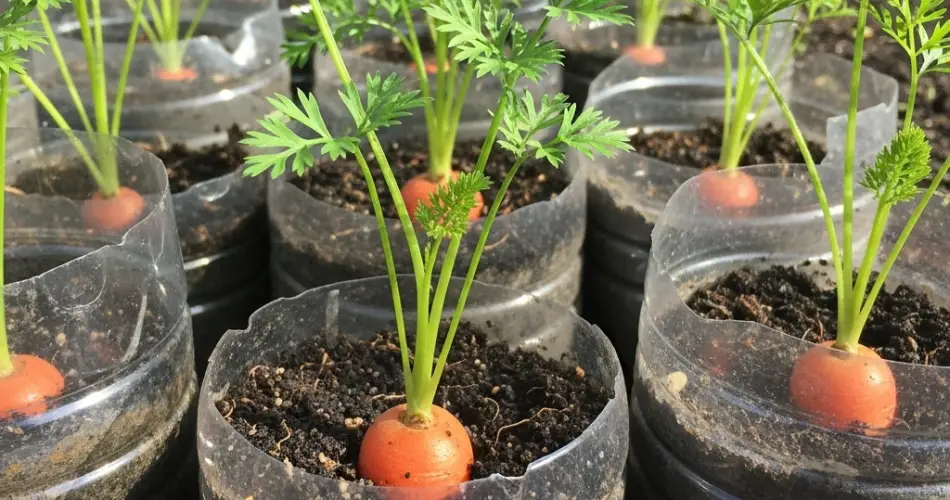
Why Use Plastic Bottles for Carrots?
Plastic bottles are readily available, inexpensive, and surprisingly effective for vegetable gardening. Their vertical shape is ideal for carrots, which require deep soil for proper root development. Transparent bottles also make it easy to monitor soil moisture and root formation. This method is especially helpful if you’re gardening in a limited area or want to test your growing skills before expanding to larger containers or beds.
Materials You’ll Need
-
Clear plastic bottles (preferably 2-liter or more)
-
Scissors or a utility knife
-
Carrot seeds (choose a short or medium variety for container growing)
-
Loose, well-draining soil mix (garden soil + compost + sand or perlite)
-
Small stones or pebbles (for drainage)
-
Water spray bottle or small watering can
-
A marker (optional, for cutting guides)
Step 1: Prepare the Plastic Bottle
-
Clean and Cut:
Rinse out the plastic bottle thoroughly. Using scissors or a utility knife, cut the bottle horizontally about 5–6 inches from the bottom. You’ll be using the bottom part as your carrot planter. -
Create Drainage:
Poke several holes in the bottom of the bottle to allow for drainage. Without proper drainage, water can accumulate and cause root rot, especially in enclosed containers. -
Add Pebbles and Soil:
Place a thin layer of small pebbles or gravel at the bottom to improve drainage. Then fill the container with a light, loose soil mix. Carrots need soft soil to grow straight and smooth, so avoid compacted or clay-heavy soils. Fill the container to about 1 inch below the rim.
Step 2: Sow the Carrot Seeds
Carrot seeds are tiny and should be sown shallowly. Sprinkle the seeds evenly across the soil surface, aiming for light spacing (about ½ inch apart). Cover them with a very thin layer of fine soil—no more than ¼ inch thick.
Gently mist the surface with water using a spray bottle to avoid displacing the seeds. Keep the soil consistently moist but not soggy.
Place the container in a location that receives full sun—at least 6 hours a day. Carrots need ample light to develop strong foliage and roots.
Step 3: Germination and Thinning
Carrot seeds are slow to germinate, typically taking 10–20 days. During this time, maintain even moisture and avoid letting the soil dry out. If you’re using a clear plastic bottle, you can cover the top with plastic wrap to retain humidity, removing it once seedlings emerge.
Once the seedlings are about 2 inches tall, thin them out by snipping the weaker ones at the base with scissors. Space the remaining plants about 1–1.5 inches apart. Thinning is crucial for healthy root development—overcrowded carrots become stunted or misshapen.
Step 4: Watering and Maintenance
Carrots need consistent watering to grow well. The soil should remain moist but not waterlogged. Deep, even watering encourages long, straight roots. Avoid letting the soil dry out completely, especially as the roots begin to develop.
You can lightly mulch the top of the soil with dry leaves or shredded paper to retain moisture and reduce temperature fluctuations.
If you want to feed the plants, apply a diluted organic fertilizer every 2–3 weeks. Avoid high-nitrogen fertilizers, as they encourage leaf growth at the expense of root formation.
Step 5: Monitor Growth
As the plants grow, you may notice the tops of the carrot roots starting to peek above the soil surface. You can gently mound some soil around them to keep them covered and prevent greening, which can make the carrot tops bitter.
Depending on the variety, carrots are typically ready to harvest 60–80 days after sowing. Check the maturity guide on your seed packet.
Step 6: Harvesting
When ready, the carrot tops will look lush and the roots will have a visible crown at the soil line. Gently grasp the base of the foliage and pull straight up to harvest. If the soil is dry or compacted, water it slightly before pulling to make harvesting easier.
After harvesting, clean the bottles and refresh the soil if you plan to reuse them for another batch.
Final Thoughts
Growing carrots in plastic bottles is a fun, rewarding, and practical way to enjoy homegrown vegetables—no garden plot required. This method is perfect for beginners and ideal for teaching kids about gardening. By reusing everyday materials, you’ll not only reduce waste but also gain a steady supply of fresh, crunchy carrots straight from your balcony, patio, or windowsill garden.


