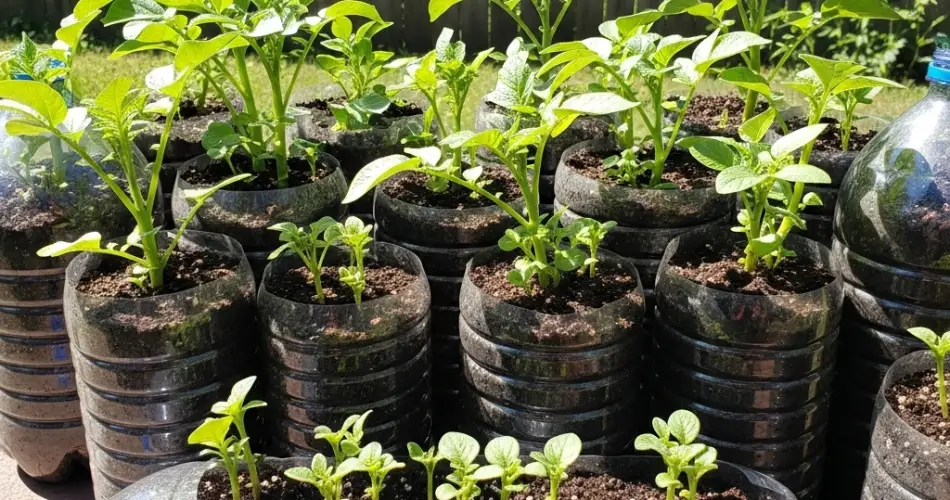
Growing potatoes from eyes using plastic bottles is a smart and sustainable way to cultivate your own food in tight spaces. This method is perfect for those with small balconies, patios, or limited garden beds. By reusing plastic bottles, you reduce waste while creating a compact, efficient setup that allows you to monitor the growing process from start to finish. Best of all, potatoes are low-maintenance and ideal for beginners.
Here’s a detailed, step-by-step guide on how to propagate potatoes using nothing more than a few sprouted tubers and clear plastic bottles.
Why Grow Potatoes in Plastic Bottles?
Plastic bottles serve as excellent mini-grow towers for potatoes. Their vertical shape allows for layering soil as the plant grows, encouraging the development of more tubers along the buried stem. The clear walls also let you observe root and tuber formation, giving you an educational and visual experience not possible in traditional opaque containers. It’s a perfect DIY project for home gardeners, school projects, or anyone aiming for sustainable urban farming.
Materials You’ll Need
-
2-liter or larger clear plastic bottles
-
Sprouted potatoes (look for firm tubers with visible eyes or sprouts)
-
Sharp knife or scissors
-
Loose, well-draining potting mix (garden soil + compost + coco peat or sand)
-
Water spray bottle or watering can
-
Pebbles or gravel (for drainage)
-
Small hand shovel or spoon
Optional:
-
Toothpick or stick (to mark planting depth)
-
Natural fertilizer or compost tea (for feeding during growth)
Step 1: Prepare the Potato
Start with seed potatoes or mature potatoes that have developed “eyes”—the small dimpled sprouts that will become new plants. Cut the potato into chunks, ensuring each piece has at least one eye. Let the cut pieces dry for 1–2 days in a cool, dry place. This helps prevent rot when placed in soil.
Alternatively, you can use small whole potatoes with several eyes if you don’t want to cut them.
Step 2: Prepare the Bottle
-
Cut the Bottle:
Using scissors or a sharp knife, cut the top third of the bottle off. This top piece can be reused as a humidity dome or discarded. -
Add Drainage Holes:
Poke 4–6 holes in the bottom of the bottle for water drainage. -
Layer Pebbles and Soil:
Add a 1-inch layer of small pebbles or gravel for drainage. Then add 3–4 inches of moistened potting mix.
Step 3: Planting the Potato
Place one or two sprouted potato chunks into the soil with the eyes facing upward. Cover them with 2 inches of loose soil. Gently press down and water lightly. The moisture should be consistent but not soggy, as overly wet conditions can lead to rot.
Place the bottle in a sunny location—potatoes need at least 6 hours of direct sunlight daily for healthy growth.
Step 4: Encouraging Growth with Soil Layering
As the potato plant begins to grow, it will produce green shoots and leaves. When the shoots reach about 4–6 inches tall, gently add more soil to cover the lower part of the stem, leaving the top leaves exposed. This process is called “hilling” and is key to encouraging more tubers to form along the buried stem.
Repeat this process as the plant grows, adding soil every few inches until the bottle is nearly full.
Step 5: Watering and Feeding
Keep the soil evenly moist, watering when the top inch feels dry. Avoid overwatering, especially in bottles, where drainage is limited.
Once the plant is well established, you can feed it with a diluted compost tea or an organic fertilizer every 2–3 weeks. Potatoes are moderate feeders and will benefit from potassium-rich nutrition, especially during tuber development.
Step 6: Monitoring Growth
You’ll notice the foliage becoming lush as the plant matures. The transparent bottle walls may reveal tiny tubers forming in the lower layers, giving you a sneak peek into the underground progress.
If the bottle becomes too crowded or the roots circle the container excessively, consider transplanting the plant into a larger container or grow bag to allow for better tuber formation.
Step 7: Harvesting
Potatoes are generally ready to harvest when the leaves begin to yellow and die back, usually 80–100 days after planting. Stop watering at this stage to allow the soil to dry slightly, making harvesting easier.
Carefully cut the bottle open from the side to access the soil and tubers without damaging them. Gently sift through the soil and collect the mature potatoes. Allow them to air-dry for a few hours before storing.
Final Thoughts
Propagating potatoes from eyes using plastic bottles is a practical, eco-friendly gardening method that works in even the smallest of spaces. It’s an excellent way to recycle household materials while producing a rewarding crop. Whether you’re gardening on a balcony or in a classroom, this method offers a hands-on way to learn about plant growth, sustainability, and food production—all from a simple plastic bottle.


