Thyme is a wonderfully aromatic and resilient herb that thrives in both garden beds and containers. Its low-growing, woody stems and tiny leaves pack a powerful punch of flavor, making it a favorite for seasoning meats, soups, vegetables, and Mediterranean dishes. If you already have a healthy thyme plant and want to grow more, propagation by cuttings is an easy and effective method—especially when using a DIY bottle greenhouse.
By turning a simple plastic bottle into a miniature greenhouse, you can create a warm, humid environment that encourages thyme cuttings to root quickly and successfully. This method is cost-effective, eco-friendly, and perfect for small-space or indoor gardeners.
Why Use a DIY Bottle Greenhouse?
Thyme can be grown from seed, but the process is slow and germination can be unreliable. Propagating thyme from cuttings is faster and ensures the new plant is identical to the parent in flavor, growth habit, and hardiness.
The main challenge in rooting thyme cuttings is maintaining consistent moisture and humidity without overwatering. A plastic bottle greenhouse helps maintain this balance by creating a warm, enclosed space that traps humidity and protects delicate cuttings from temperature fluctuations and drafts.
What You’ll Need
To create your own DIY bottle greenhouse for rooting thyme cuttings, gather the following materials:
-
Healthy thyme cuttings (8–10 cm long)
-
A clean, clear plastic bottle (1–2 liters)
-
A sharp knife or garden scissors
-
Light potting mix or a seed-starting medium
-
A small container or the bottom half of the plastic bottle
-
Spray bottle with clean water
-
A sunny windowsill or bright indoor spot
Avoid using woody stems for cuttings. Instead, look for green, flexible stems that haven’t yet flowered.
Preparing Thyme Cuttings
-
Select a stem: Choose a healthy, green stem with no signs of disease or pests. Cut a section about 8 to 10 cm long, just below a leaf node (where leaves attach to the stem).
-
Remove lower leaves: Strip the leaves from the bottom 3–4 cm of the cutting. This portion will be inserted into the soil and is where roots will form.
-
Optional: Use rooting hormone: Dip the cut end of the stem in rooting hormone powder if you have it. This can speed up root development but isn’t essential for thyme.
Assembling the Bottle Greenhouse
-
Cut the bottle: Slice the plastic bottle in half. The bottom half will serve as a planter, and the top half will act as a humidity dome.
-
Add drainage (optional): Poke a few small holes in the bottom of the bottle base for drainage. If placing on a windowsill or tray, use a saucer underneath to catch any excess water.
-
Fill with soil: Add a light, well-draining potting mix or seed-starting blend to the bottom half of the bottle. Moisten it slightly before inserting the cuttings.
-
Insert the cuttings: Use a pencil or stick to make a small hole in the soil. Place the thyme cutting into the hole and gently press the soil around the stem to hold it upright.
-
Water lightly: Mist the soil and the inside of the bottle with water using a spray bottle to increase humidity. Avoid soaking the soil—damp is sufficient.
-
Cover with the top half: Place the top portion of the bottle over the bottom, creating a dome that traps humidity and warmth inside. You now have a miniature greenhouse.
Rooting and Care
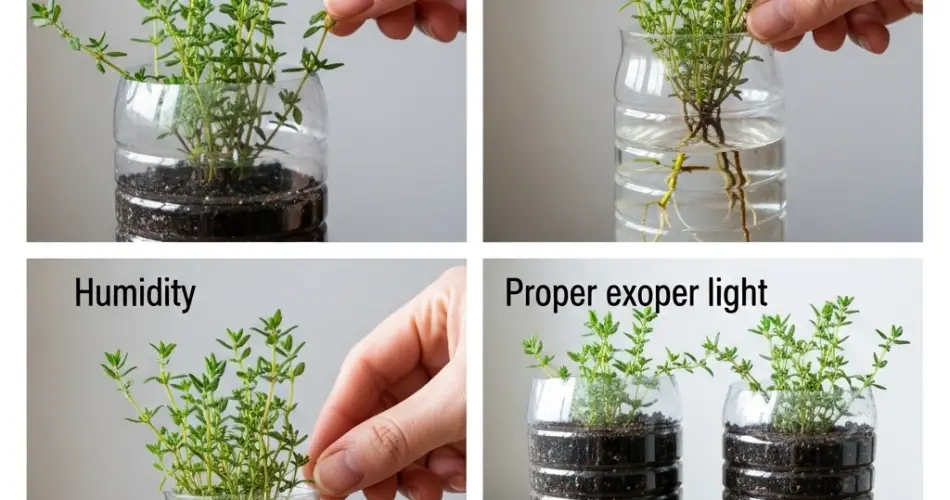
Place your DIY bottle greenhouse in a bright location with indirect sunlight. Direct sunlight can cause overheating inside the dome. A bright windowsill or partially shaded balcony is ideal.
Check the moisture level daily. If the soil appears dry, lightly mist it again. Remove the dome for an hour or two each day to allow airflow and prevent mold or fungal buildup.
In about 2 to 3 weeks, you should begin to see signs of rooting. Gently tug on the cutting to check for resistance, which indicates root development. Once strong roots have formed and new growth appears, the thyme is ready for transplanting.
Transplanting Rooted Cuttings
When the thyme cuttings are well-rooted, transplant them into small pots with well-draining soil. Thyme prefers a sunny spot and does best in slightly dry conditions. Avoid heavy watering; let the top layer of soil dry between waterings.
As the plant matures, you can pinch back the tips to encourage bushier growth. Thyme is drought-tolerant once established and thrives in containers or directly in the garden.
Tips for Success
-
Use several cuttings at once to increase the chances of successful rooting.
-
Reuse water bottles or soda bottles to create multiple mini greenhouses.
-
Avoid overly rich soil—thyme prefers lean conditions with good drainage.
-
If growing indoors long-term, place the plant near a south-facing window or use a grow light.
Conclusion
Rooting thyme cuttings in a DIY bottle greenhouse is a smart, sustainable way to grow your herb garden with minimal supplies. This method not only recycles plastic but also provides an ideal environment for tender cuttings to take root. In just a few weeks, you can go from a single stem to a thriving thyme plant ready for kitchen use or further propagation. It’s an easy project for beginners and seasoned gardeners alike—and a satisfying way to enjoy fresh herbs grown right at home.


