Rosemary is a highly aromatic herb prized for its culinary, medicinal, and ornamental uses. Known for its woody stems and needle-like leaves, it thrives in warm climates and adds a Mediterranean charm to any home garden. One of the most rewarding ways to grow rosemary is through propagation, and the simplest method involves using plastic bottles — a practical, low-cost, and eco-friendly solution, especially for beginners.
By repurposing common household materials, you can create a propagation setup that requires little space and offers a high success rate. This guide walks you through every step of propagating rosemary using plastic bottles, making it ideal even for those new to gardening.
Why Propagate Rosemary?
While rosemary can be grown from seed, it’s a slow and often unpredictable process. Propagation by stem cuttings is much faster and ensures the new plant will be identical to the parent in both appearance and flavor. Using stem cuttings allows gardeners to multiply a favorite variety and establish healthy plants in a short time.
What You’ll Need
To propagate rosemary in plastic bottles, you’ll need the following materials:
-
A healthy rosemary plant
-
One or more clean plastic bottles (1 to 2-liter size is ideal)
-
Sharp scissors or garden shears
-
Fresh water
-
Potting mix (if using the soil method)
-
Small container or jar (optional)
-
Rooting hormone (optional but helpful)
-
A warm, bright location
Step 1: Take a Cutting
Choose a healthy, non-woody stem from a mature rosemary plant. Younger green stems root better than older, hardened ones.
-
Cut a 4–6 inch (10–15 cm) stem using sterilized scissors or pruning shears.
-
Strip off the lower leaves from the bottom two inches of the cutting, leaving the upper leaves intact.
-
Optionally, dip the cut end in rooting hormone powder or gel to encourage faster root development.
Try to take several cuttings to improve your chances of success.
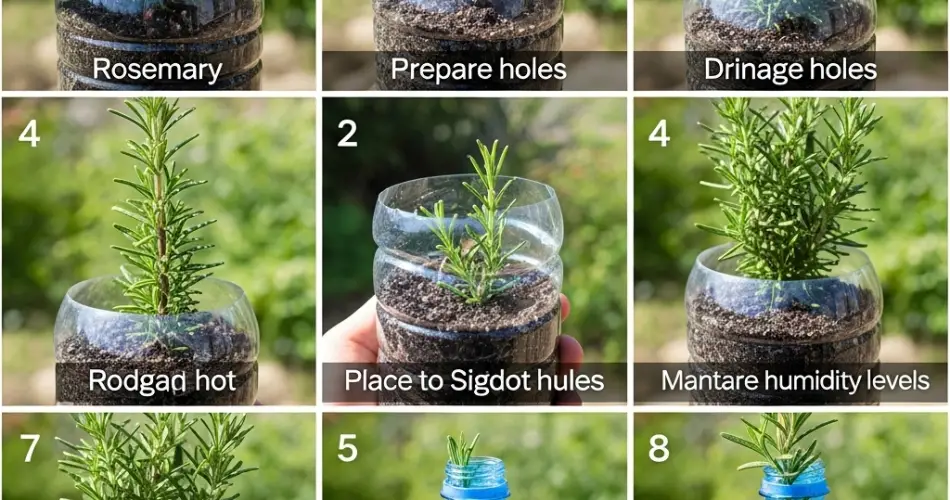
Step 2: Prepare the Plastic Bottle
You can propagate rosemary either in water or soil using a plastic bottle. Here’s how to set up both methods:
For Water Propagation:
-
Cut the plastic bottle in half.
-
Fill the bottom half with clean, room-temperature water.
-
Insert the rosemary cuttings so that only the leafless portion is submerged.
-
Loosely cover the setup with the top half of the bottle, inverted, to help retain humidity. Cut off the bottle cap to allow air circulation.
For Soil Propagation:
-
Cut the bottle horizontally or lengthwise, depending on your space.
-
Poke small holes in the bottom for drainage.
-
Fill the container with well-draining potting mix, ideally mixed with sand or perlite.
-
Moisten the soil slightly, but don’t overwater.
-
Insert the rosemary cuttings into the soil, burying the leafless part.
-
Cover with the top portion of the bottle to create a greenhouse effect.
Step 3: Provide the Right Environment
Place your propagation setup in a warm spot with bright, indirect sunlight. Avoid direct sun, as it may cause the cuttings to dry out before they root.
-
If using water: Change the water every 2–3 days to keep it fresh.
-
If using soil: Mist the soil regularly to keep it moist, not soggy.
Temperatures between 20–25°C (68–77°F) are ideal for rooting.
Step 4: Monitor and Wait for Rooting
Rosemary typically takes 2 to 4 weeks to develop roots, depending on temperature and humidity levels. In the water method, you’ll see roots appear along the submerged stem. In the soil method, gently tug on the cutting after 3 weeks; resistance indicates root growth.
If you notice yellowing leaves or mold, remove the affected cutting and ensure the environment isn’t too damp.
Step 5: Transplant the Rooted Cuttings
Once your cuttings have formed strong roots, they’re ready to be transplanted:
-
Fill a small pot with well-draining potting mix.
-
Make a hole in the center and place the rooted cutting inside.
-
Gently cover the roots and press the soil down to support the stem.
-
Water lightly and place the pot in a sunny location.
Rosemary thrives in full sun and needs at least 6–8 hours of sunlight daily.
Step 6: Care for Your New Rosemary Plant
After transplanting, your rosemary plant will need a little extra care to ensure it thrives:
-
Watering: Rosemary prefers dry conditions, so water only when the top inch of soil feels dry.
-
Light: Full sunlight is best. If growing indoors, place the plant near a south-facing window.
-
Fertilizer: A light feeding with diluted organic fertilizer once a month can support healthy growth.
-
Pruning: Trim regularly to encourage bushy growth and prevent flowering, which can reduce leaf production.
Conclusion
Propagating rosemary using plastic bottles is an easy, affordable, and effective method for expanding your herb garden. Whether you’re working with limited space or want a sustainable way to grow more plants, this technique is ideal for beginners and seasoned gardeners alike. With just a few cuttings and some patience, you’ll soon have a thriving rosemary patch that adds both flavor and fragrance to your home.


