Thyme is a flavorful and aromatic herb that’s indispensable in the kitchen. Whether you’re adding it to roasted vegetables, sauces, or stews, having fresh thyme on hand elevates any dish. The good news is that thyme is also incredibly easy to propagate. One of the most accessible and cost-effective ways to do this is by using recycled plastic bottles.
Repurposing plastic bottles for herb propagation is not only sustainable but also practical. This method is ideal for small spaces such as balconies, patios, or indoor windowsills. If you already have a healthy thyme plant, you can grow several new ones using this simple technique.
Why Propagate Thyme from Cuttings?
Propagating thyme from cuttings has many advantages over starting from seeds:
-
Faster Growth: Cuttings root and mature quicker than seeds.
-
Genetic Consistency: The new plant will retain the flavor, growth habit, and hardiness of the parent plant.
-
Simplicity: You don’t need special tools—just a healthy stem, a plastic bottle, and some water or soil.
-
Cost-Effective: It reduces the need to buy new plants or expensive propagation kits.
What You’ll Need
To get started with thyme propagation in plastic bottles, gather the following materials:
-
A healthy thyme plant
-
A clean plastic water bottle (1L or 2L works well)
-
Scissors or pruning shears
-
Fresh water
-
Potting mix (optional, depending on your chosen method)
-
A sunny windowsill or bright outdoor area
Optional items:
-
Rooting hormone (can speed up rooting but not essential)
-
Labels for keeping track of different cuttings
Step 1: Take Healthy Thyme Cuttings
Choose a mature thyme plant with healthy, green stems. Avoid any stems that look woody, dry, or diseased.
-
Cut a 4–6 inch stem just below a node (the point where leaves emerge).
-
Strip off the leaves from the bottom half of the cutting. This area will go into the water or soil and should be free of foliage to prevent rot.
-
Optionally, dip the cut end in rooting hormone to encourage quicker root formation.
Take multiple cuttings if you want to grow several new plants at once.
Step 2: Prepare the Plastic Bottle
You can use the bottle in two ways: as a water propagation station or a mini greenhouse for soil rooting.
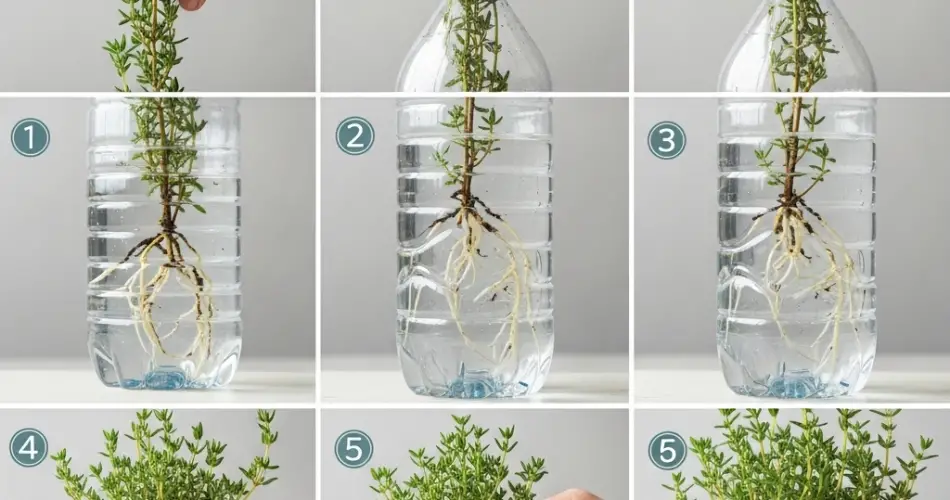
Water Propagation Method:
-
Cut the plastic bottle in half.
-
Fill the bottom half with clean, room-temperature water.
-
Place the thyme cuttings in the water, ensuring the leaf-free nodes are submerged while the remaining leaves stay dry.
-
Cover the setup loosely with the top half of the bottle (inverted) to maintain humidity, or leave it open if placed in a humid area.
Soil Propagation Method:
-
Cut the bottle in half or lengthwise.
-
Poke a few drainage holes at the bottom.
-
Fill with potting mix and moisten it lightly.
-
Insert the prepared cuttings into the soil, burying the leafless portion.
-
Use the top part of the bottle as a cover to create a greenhouse effect.
Step 3: Place in Bright, Indirect Light
Position the bottle setup in a location that receives plenty of bright but indirect sunlight. A kitchen windowsill or a shaded corner of your balcony is ideal.
If propagating in water, change the water every 2–3 days to keep it clean and oxygenated. In the soil method, keep the soil slightly moist—not soggy—to encourage rooting without causing rot.
Maintain a warm temperature (around 20–24°C or 68–75°F) to promote successful root development.
Step 4: Monitor Root Growth
Root formation usually begins within 7–14 days. In water, you’ll see white roots emerging from the submerged stem. In soil, gently tug on the stem after two weeks; if there’s resistance, rooting has likely begun.
Once the roots are around 1.5 to 2 inches long (or the cutting shows strong new growth in soil), it’s time to transplant the thyme into a pot or your garden.
Step 5: Transplant and Grow
Transplant your rooted thyme into small pots filled with well-draining potting soil. Choose containers with drainage holes to prevent waterlogging.
-
Gently place the rooted cutting into the soil and cover the roots completely.
-
Press the soil around the base to secure it.
-
Water lightly and place the pot in full sun. Thyme thrives with at least 6 hours of sunlight daily.
As the plant grows, water it only when the soil is dry to the touch. Overwatering is one of the most common mistakes with thyme.
Caring for Your Thyme Plant
Once established, thyme is a hardy, drought-tolerant herb that requires minimal maintenance.
-
Light: Full sun is best, though it can tolerate partial shade.
-
Water: Water sparingly. Let the topsoil dry out between waterings.
-
Fertilizer: Feed once a month with a diluted organic fertilizer if desired.
-
Pruning: Regularly trim the tips to encourage bushy growth and prevent flowering, which can alter flavor.
Conclusion
Propagating thyme using plastic bottles is a smart, sustainable way to grow more herbs at home. Whether you use water or soil, this method makes use of everyday materials and requires very little effort. In just a few weeks, you’ll have fresh thyme ready for transplanting and eventually, harvesting. Perfect for balcony gardens, windowsill setups, or backyard herb patches, this method brings simplicity and satisfaction to herb gardening.


