Spider plants (Chlorophytum comosum) are among the most popular and easy-to-grow indoor plants, known for their long, arching leaves and baby offshoots—or “pups”—that make propagation almost effortless. These resilient plants not only purify the air but also add a fresh, decorative touch to any room. A creative and sustainable way to root and display spider plants is by using recycled plastic bottles. This method is cost-effective, eco-friendly, and ideal for gardeners of all levels.
Repurposing bottles for plant propagation helps reduce plastic waste while offering a clean, stylish way to grow new plants. Whether you’re rooting spider plant pups in water or displaying mature plants in small soil setups, plastic bottles can be turned into beautiful, functional planters with just a little effort.
Why Use Bottles for Spider Plants?
Spider plants are well-suited for propagation in both water and soil. Their fast-growing roots and adaptability make them perfect candidates for bottle gardening. Transparent bottles, in particular, allow you to observe root development and water levels, making it easy to manage plant health.
Benefits of using recycled bottles:
-
Reduces single-use plastic waste
-
Saves money on traditional pots or vases
-
Ideal for propagation and compact spaces
-
Visually appealing and customizable
-
Educational for kids and beginner gardeners
Materials You’ll Need
To start your bottle project, you’ll need:
-
A spider plant with visible pups or offshoots
-
Clean plastic bottles (500 ml to 2 liters in size)
-
Scissors or a sharp knife
-
Filtered water (for water propagation) or potting mix (for soil)
-
Small stones or gravel (for drainage in soil setups)
-
Optional: activated charcoal to keep water fresh
-
Decorative materials (twine, paint, fabric, etc.)
Preparing the Bottle
1. Cut the Bottle:
Use scissors or a knife to cut the top third of the plastic bottle. For rooting in water, keep the bottle’s narrow neck for added support. For planting in soil, the bottom portion works best.
2. Clean Thoroughly:
Wash the bottle thoroughly with soap and water, removing any labels or residue. Allow it to dry completely before use.
3. (Optional) Customize:
Wrap your bottle with jute, paint it, or cover it with fabric to match your home décor. You can also punch small holes in the sides for hanging or ventilation.
Method 1: Rooting in Water
Water propagation is one of the easiest and most effective ways to root spider plant pups.
Steps:
-
Select a Healthy Pup:
Choose a spiderette (baby plant) that has small, visible roots or at least a node where roots can form. -
Place in Water:
Fill the bottle with filtered or distilled water. Submerge the base of the pup (where roots grow), but keep the leaves above the waterline to prevent rot. -
Position Correctly:
Place the bottle in a location with bright, indirect light. Avoid direct sun, which can heat the water and damage the plant. -
Maintain Water Quality:
Change the water every 5 to 7 days to keep it clean. Add a small piece of activated charcoal to reduce bacteria and odor. -
Watch the Roots Grow:
Within 1 to 2 weeks, new roots will begin to appear. Once they are 1 to 2 inches long, you can transfer the plant into soil or keep it growing in water as a minimalist display.
Method 2: Planting in Soil
Once the spider plant pup has developed roots—or if you prefer to plant directly in soil—you can use a plastic bottle as a small planter.
Steps:
-
Add Drainage:
Place a layer of small stones or gravel at the bottom of the bottle. This prevents water from accumulating around the roots. -
Prepare the Soil:
Use a lightweight, well-draining potting mix. Spider plants don’t like soggy soil, so adding perlite or coarse sand can improve drainage. -
Plant the Pup:
Gently place the rooted pup in the soil and fill around it. Press the soil lightly to secure the plant. -
Water Carefully:
Water until the soil is evenly moist, but not soaked. Allow excess water to drain out.
Care Tips for Bottle-Grown Spider Plants
-
Light: Bright, indirect light is best. Too much direct sun may scorch the leaves, while too little can slow growth.
-
Water: Water regularly, allowing the top inch of soil to dry out between waterings. For water propagation, keep the water fresh and topped up.
-
Humidity: Spider plants enjoy moderate humidity. Mist occasionally in dry environments.
-
Fertilizing: Feed monthly during spring and summer with a diluted, balanced liquid fertilizer.
-
Trimming: Prune dead or brown leaf tips to keep the plant tidy.
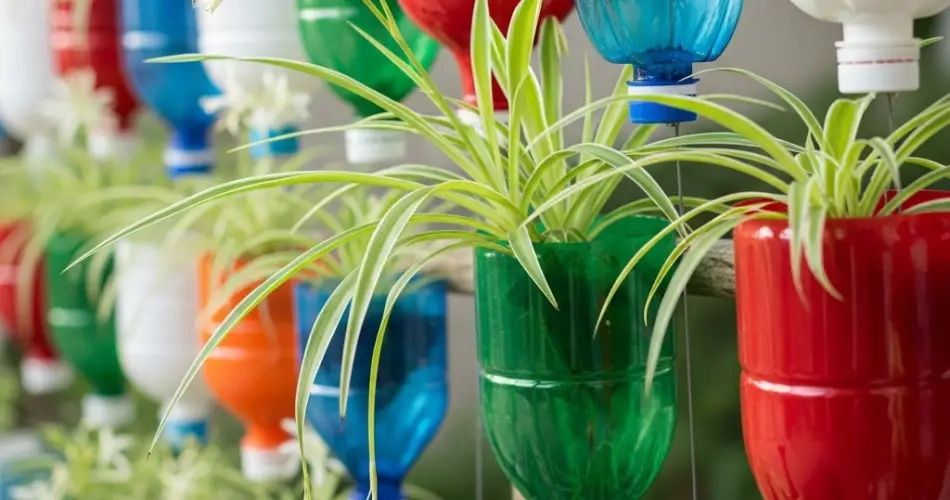
Decorative Ideas
Make your bottle planters stand out by styling them creatively:
-
Hang several bottle planters vertically using twine or wire for a cascading green wall.
-
Line them on a windowsill for an organized propagation station.
-
Mix and match bottle sizes for a playful, layered look.
-
Group different colored bottles together for a vibrant display.
Conclusion
Rooting and displaying spider plants in reused plastic bottles is a simple and sustainable way to bring nature indoors. Whether you’re starting new plants in water or growing established ones in soil, this method offers a perfect blend of practicality and charm. With a bit of creativity and care, your recycled bottle garden will flourish—turning everyday waste into thriving greenery that brightens your home.


