Spider plants (Chlorophytum comosum) are known for their graceful, arching leaves and easy-care nature. One of their most charming traits is how effortlessly they produce offshoots, or “babies,” which makes them perfect for propagation. If you’re looking for a fun and sustainable way to expand your indoor garden, try growing spider plant babies in a recycled plastic bottle.
This bottle garden method is not only an eco-friendly alternative to traditional pots but also ideal for small spaces and beginner gardeners. With minimal materials and a little attention, you can nurture a tiny spider plant into a thriving, full-sized beauty—all inside an upcycled container.
Why Use a Bottle for Spider Plant Propagation?
Plastic bottles are readily available and can be easily transformed into functional mini planters. They provide the right depth and space for young spider plants to root and grow. Here’s why they work particularly well:
-
Sustainable: Reuses plastic waste and reduces the need for store-bought planters.
-
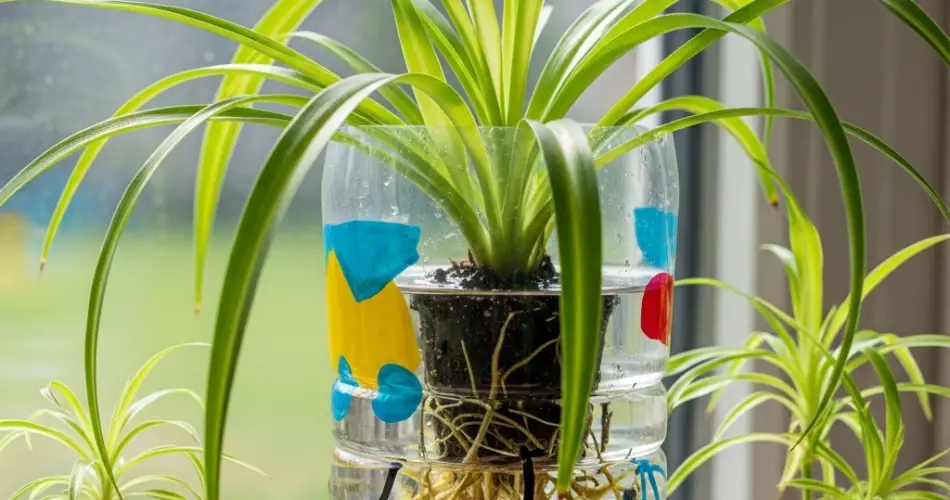
Transparent: Allows you to see root development and moisture levels.
-
Customizable: Easy to cut, paint, or decorate to match your space.
-
Cost-effective: No need to spend on nursery pots or propagation trays.
-
Perfect for small spaces: Fits on windowsills, countertops, or desktops.
Spider plants thrive in moderate containers and don’t mind being slightly root-bound, which makes plastic bottles a practical and sustainable option.
What You’ll Need
Before you start, gather these basic materials:
-
A 500ml to 1.5-liter plastic bottle
-
A spider plant baby or offshoot
-
Scissors or a utility knife
-
Cactus or all-purpose potting mix
-
Small stones or pebbles (optional)
-
Activated charcoal (optional, for odor control and moisture balance)
-
A spoon or small trowel
-
Water
-
Optional: string, twine, or decorative materials
Preparing the Bottle Planter
-
Cut the Bottle
Use scissors or a sharp knife to cut the bottle roughly one-third from the top. The bottom part will serve as your pot. If you’d like to create a self-watering setup, invert the top part and place it inside the bottom half, with a wick running through the bottle cap. -
Add Drainage Holes
Poke 4–5 small holes in the base to allow excess water to drain out. If drainage isn’t possible (e.g., you’re using the bottle in a hanging setup), place a thick layer of gravel or stones at the bottom to manage moisture. -
Layer the Soil
Add a layer of small stones or charcoal, then fill the bottle two-thirds full with potting mix. Spider plants prefer well-draining soil, so a mix with sand or perlite is ideal.
Preparing and Planting the Spider Plant Baby
Spider plant babies usually grow at the ends of long stems and already have tiny root nubs. Once they’re at least 2–3 inches long and have visible root points, they’re ready to plant.
-
Gently snip the baby off the mother plant just below the base.
-
If desired, let the base dry for a few hours to reduce the risk of rot (optional).
-
Make a small hole in the soil and tuck the baby into it, with the roots just below the surface.
-
Firm the soil around the base and water lightly.
Keep the bottle in a warm spot with bright, indirect sunlight. Avoid direct sun during the early days, as it may stress the young plant.
Ongoing Care and Growth
Spider plants are low-maintenance but still benefit from consistent care during their early growth. Here’s how to support their development:
-
Light: Place the bottle where the plant gets bright, indirect light. East- or north-facing windows work well.
-
Watering: Allow the top inch of soil to dry out before watering again. Bottles without drainage need special attention to avoid overwatering.
-
Humidity: These plants are adaptable but do appreciate moderate humidity.
-
Feeding: After a few weeks, once the plant is well-established, feed with a diluted liquid houseplant fertilizer once a month during spring and summer.
In about 4–8 weeks, you’ll see noticeable growth and stronger root formation. As the plant matures, you may also spot new shoots—signs that it’s adjusting well to its new home.
Decorating and Display Ideas
Bottle-grown spider plants look great on their own or grouped with other mini planters. Here are some fun ways to make your project visually appealing:
-
Wrap the bottle in jute, twine, or fabric.
-
Paint the exterior with colorful, waterproof designs.
-
Add labels or chalkboard tags to track planting dates.
-
Hang the bottles using macramé or cord for a vertical garden display.
You can also arrange multiple bottle planters on a tray for a stylish indoor propagation station.
When to Transplant
As the spider plant outgrows its bottle, you may want to move it to a larger pot. Signs it’s time to transplant include:
-
Roots pushing out of the soil or drainage holes
-
Soil drying out within a day or two
-
The plant becoming top-heavy
When transplanting, gently remove the plant and place it into a slightly larger pot with fresh potting mix. Water well and keep it in the same light conditions for a smooth transition.
Final Thoughts
Growing spider plant babies in recycled plastic bottles is a smart, sustainable way to enjoy gardening without the need for traditional tools or expensive supplies. This method not only makes propagation simple but also helps you contribute to a greener lifestyle.
With minimal effort and care, your spider plant will grow from a tiny offshoot into a healthy, full-sized houseplant—proof that with a little creativity, even something as common as a plastic bottle can become the beginning of a thriving indoor garden.


