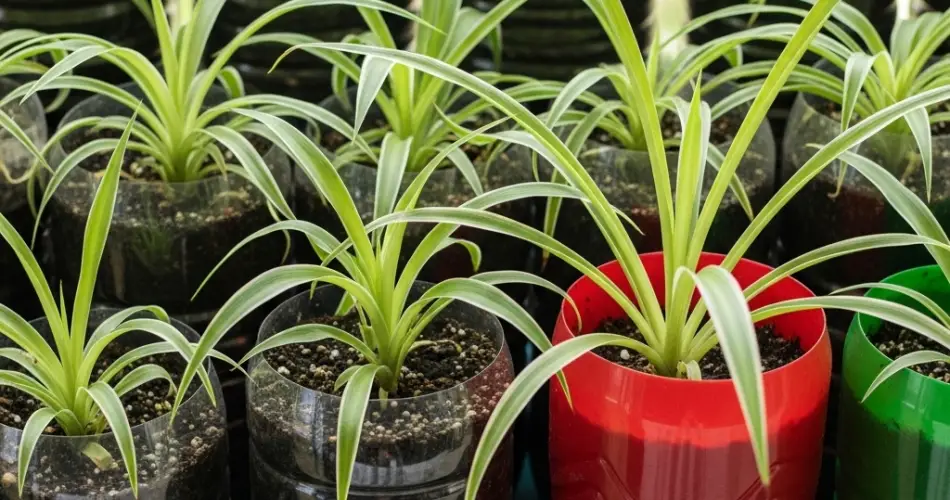
Spider plants (Chlorophytum comosum) are well-known for their arching leaves, air-purifying qualities, and their ability to produce baby offshoots, or “pups,” that can be rooted easily. They’re among the most beginner-friendly houseplants, and their graceful shape makes them perfect for indoor decoration. If you’re looking for a sustainable and stylish way to root and display spider plants, reusing plastic bottles offers an easy, eco-friendly solution.
Instead of throwing bottles away, turn them into propagation vessels and unique mini planters. This low-cost approach is perfect for urban gardeners, plant lovers on a budget, and anyone who wants to combine green living with green decor.
Why Plastic Bottles Work for Spider Plants
Plastic bottles are surprisingly versatile and ideal for rooting and growing spider plants. Here’s why they’re a great match:
-
Sustainable: Reduces plastic waste and supports eco-conscious gardening.
-
Affordable: No need for store-bought pots or propagation stations.
-
Customizable: Can be cut, painted, or wrapped to suit any decor style.
-
Transparent: Lets you monitor root growth and water levels easily.
-
Space-saving: Fits on shelves, windowsills, or hanging setups.
Whether you’re rooting spider plant pups or creating small displays from mature cuttings, bottles offer both form and function.
Materials You’ll Need
-
Spider plant pups or mature cuttings
-
Clean plastic bottles (any size from 500 ml to 2 liters)
-
Scissors or a utility knife
-
Filtered or dechlorinated water (for rooting in water)
-
Lightweight potting mix (for rooting in soil)
-
Optional: gravel or stones (for drainage if using soil)
-
Optional: string, paint, twine, or fabric for decoration
Step 1: Choose the Right Spider Plant Cuttings
Spider plants are prolific producers of baby plants. Look for plantlets that already have small root nubs forming. These are the easiest to propagate.
-
Use clean scissors to snip the baby plant from the main stem.
-
If there are no visible roots yet, that’s fine—spider plants root readily.
-
You can also cut a longer stem with multiple pups and divide them into individual units.
Step 2: Prepare the Plastic Bottle
Pick a plastic bottle that suits your available space and cutting size.
-
Cut the bottle about one-third from the top if you plan to use it as a water propagation station.
-
For soil planting, cut a little higher to allow more depth for roots and soil.
-
Smooth sharp edges with sandpaper or carefully melt them with a flame.
-
Optionally, poke small holes at the bottom for drainage if planting in soil.
If desired, wrap the bottle in twine, paint it, or cover it with fabric to match your indoor decor.
Step 3A: Rooting in Water
Water propagation is perfect for watching roots grow in real-time. Here’s how to do it:
-
Fill the bottle with room-temperature filtered or dechlorinated water.
-
Place the spider plant pup so that only the base is submerged—avoid soaking the leaves.
-
Position the bottle in bright, indirect light, such as near a north- or east-facing window.
-
Change the water every 5–7 days to keep it fresh and oxygenated.
Roots should begin to develop within a week or two. Once the roots are a couple of inches long, you can choose to transplant into soil or continue growing it in water.
Step 3B: Rooting in Soil
If you prefer to root your spider plant directly in soil:
-
Add a layer of gravel or small stones to the bottom of the bottle if it doesn’t have drainage holes.
-
Fill with a light, well-draining potting mix (a cactus or houseplant mix works well).
-
Moisten the soil slightly before planting.
-
Insert the pup’s base into the soil, pressing gently to secure it.
-
Keep the soil lightly moist until new growth appears, indicating successful rooting.
Place the container in bright, indirect sunlight.
Step 4: Ongoing Care and Maintenance
Spider plants are easygoing and resilient, but here are a few tips to keep them thriving:
-
Light: Provide bright, indirect light. Avoid direct sun, which can scorch the leaves.
-
Water: For soil-rooted plants, water when the top inch of soil feels dry. For water-propagated ones, keep the water level consistent.
-
Humidity: Spider plants enjoy moderate humidity. Mist occasionally if the air is dry.
-
Fertilizer: Feed monthly during the growing season (spring and summer) with diluted houseplant fertilizer.
Once your plant is well established, you can transplant it into a larger bottle or traditional pot.
Creative Display Ideas
-
Hanging garden: Use string or wire to hang bottle planters near windows.
-
Windowsill row: Line up several small bottles with baby spider plants for a mini indoor nursery.
-
Label and personalize: Add names or propagation dates for tracking and sharing.
-
Upcycled wall planters: Mount bottles on a vertical board or lattice for a decorative plant wall.
Spider plants pair well with minimalist, boho, or natural-themed interiors and bring a refreshing green accent to any space.
Final Thoughts
Rooting and displaying spider plants in reused plastic bottles is a practical, sustainable, and visually appealing way to enjoy one of the most adaptable houseplants. It allows you to propagate new plants effortlessly while making the most of everyday materials.
With a little light, care, and creativity, your plastic bottle can become a home for a thriving, air-purifying spider plant—bringing life to both your indoor space and a discarded piece of plastic. It’s an easy way to green your space while doing something kind for the planet.


