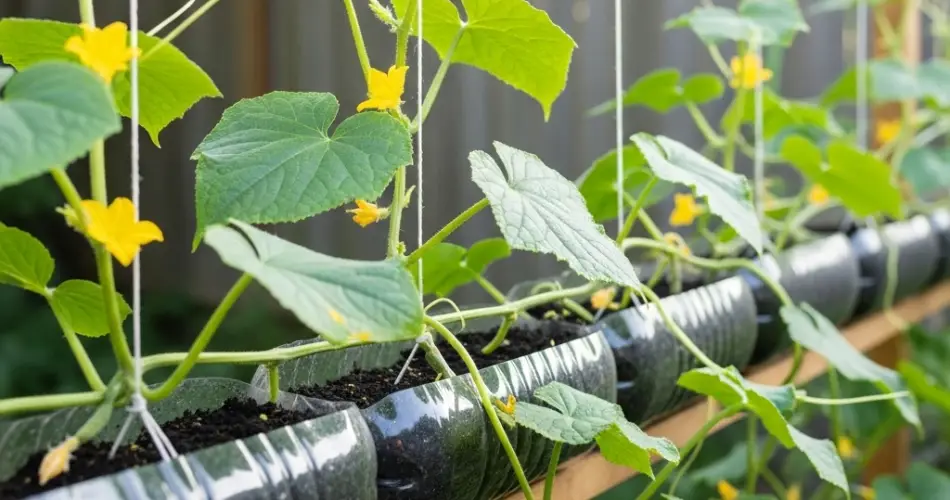
Cucumbers are one of the most rewarding crops for home gardeners. Their fast growth, refreshing taste, and versatility in the kitchen make them a favorite choice. While cucumbers grow best in warm weather, many gardeners face the challenge of unpredictable temperatures during early planting. A simple and effective solution is to use plastic bottle covers to create a mini greenhouse effect for seed starting. This method not only speeds up germination but also protects tender seedlings from pests, wind, and sudden temperature drops.
Using bottle covers is a low-cost, eco-friendly way to reuse plastic while ensuring your cucumber seeds get the best possible start. With just a few bottles and some preparation, you can create a controlled environment that helps cucumbers sprout strong and healthy.
Why Use Bottle Covers for Cucumber Seeds?
Bottle covers act as a protective shield and microclimate manager. By placing a clear plastic bottle over the seedling site, you are essentially building a tiny greenhouse around each plant. This technique offers several key benefits:
-
Faster germination: The cover traps warmth and moisture, creating ideal conditions for seeds to sprout.
-
Protection from pests: Bottle covers keep out insects, birds, and small animals that might nibble on seedlings.
-
Shield against harsh weather: Young plants are sensitive to cold nights, wind, and heavy rain. Covers provide a buffer.
-
Moisture control: The enclosed space helps retain soil moisture, reducing the need for frequent watering.
-
Reusable and eco-friendly: Instead of tossing plastic bottles, you give them a new purpose in your garden.
This method is especially useful in regions with cool springs or fluctuating early-season weather.
Materials You’ll Need
-
Clear plastic bottles (1–2 liters work best)
-
A sharp knife or scissors
-
Cucumber seeds of your chosen variety
-
Potting mix or nutrient-rich garden soil
-
Watering can or spray bottle
-
Sunny planting location or containers
Preparing the Bottle Covers
-
Clean thoroughly: Wash the bottles with warm, soapy water to remove any residues.
-
Cut the base: Using scissors or a sharp knife, cut off the bottom of the bottle. This will create an open-bottomed dome.
-
Adjust the cap: Keep the bottle cap handy. In the early stages, you can leave it on to hold in humidity, then loosen or remove it later to allow ventilation.
Now you have a ready-to-use bottle cover that functions like a personal greenhouse for each seed.
Planting and Covering Cucumber Seeds
-
Prepare the soil: Cucumber seeds prefer light, well-draining soil. Work compost or organic matter into the planting area for extra nutrients.
-
Sow the seeds: Plant seeds about 1 inch deep and space them according to the variety’s recommendations, usually 12–18 inches apart.
-
Water lightly: Moisten the soil after planting but avoid overwatering, which can cause seeds to rot.
-
Place the bottle cover: Position the bottle over the spot where the seed was planted, pressing it slightly into the soil to hold it in place.
Each seed now has its own mini greenhouse that protects and nurtures it.
Caring for Bottle-Covered Seeds
-
Light exposure: Place your seedbeds in full sun, as cucumbers thrive on warmth and light. The bottle amplifies heat, speeding germination.
-
Moisture check: Because the covers trap humidity, soil generally stays moist longer. Lift the bottle occasionally to check if watering is needed.
-
Ventilation: After seedlings sprout, remove or loosen the bottle caps during the day to prevent overheating. Proper airflow keeps plants healthy.
-
Hardening off: As seedlings grow, gradually remove the covers for longer periods each day to acclimate them to outdoor conditions.
Within 5–10 days, depending on temperature, cucumber seeds should sprout inside their protective domes.
When to Remove the Covers
Once cucumber seedlings reach about 3–4 inches in height and develop their first set of true leaves, it’s time to transition them. Bottle covers can be lifted during the day and replaced at night for a few days before being removed completely. By then, the seedlings will be strong enough to handle outdoor conditions.
If pests are a concern in your area, you can keep the covers on longer but ensure proper ventilation by removing the caps.
Advantages Beyond Germination
Bottle covers not only help with seed sprouting but also provide ongoing protection in the early growth stages. They reduce transplant shock if you are moving seedlings from indoors and give young plants a stronger start. Additionally, they can be used to shield cucumbers later in the season if unexpected cold snaps occur.
Troubleshooting Tips
-
Condensation buildup: If too much moisture collects inside, loosen the cap for better airflow.
-
Seed rot: This can happen if the soil stays too wet. Water sparingly and ensure good drainage.
-
Leggy seedlings: If plants stretch too tall, they may need more light. Move them to a sunnier location.
Final Thoughts
Starting cucumbers with bottle covers is a smart and sustainable gardening practice. It ensures faster germination, protects seedlings, and gives them the strength to thrive in your garden. This method is budget-friendly, environmentally conscious, and easy to set up, making it perfect for both beginners and experienced gardeners.
By reusing bottles as mini greenhouses, you not only reduce waste but also give your cucumbers the best possible start. A few simple steps with upcycled bottles can lead to vigorous plants and a generous cucumber harvest all season long.


