Scallions, also known as green onions or spring onions, are among the most rewarding plants to grow in small spaces. Their fast growth, minimal care requirements, and versatility in the kitchen make them a favorite for home gardeners. Whether you live in a high-rise apartment or a house with limited outdoor space, a few buckets on your balcony are all you need to enjoy a continuous supply of fresh scallions.
This guide will walk you through the simple steps of growing scallions in buckets on your balcony so you can enjoy quick harvests and fresh flavors right at home.
Why Grow Scallions in Buckets?
Growing scallions in buckets is a practical solution for urban gardeners. These compact containers make it possible to grow food in tight spaces while keeping the process manageable. Buckets also allow for mobility—you can move them to follow the sun or protect plants from extreme weather.
Scallions are particularly well-suited to container life because they don’t require deep soil or much space. Their shallow root systems thrive in buckets, and with the right care, you can harvest fresh greens in just a few weeks.
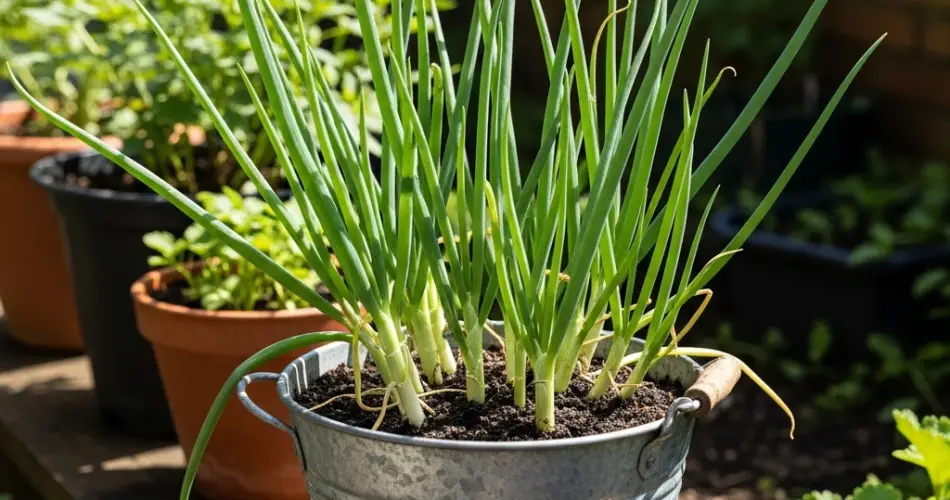
Step 1: Choosing the Right Bucket
The first step is selecting a bucket that fits both your space and your scallions’ needs.
-
Size: A bucket with a depth of 10–12 inches is enough, since scallions have shallow roots. A 2–3 gallon bucket works for small harvests, while a 5-gallon bucket allows for more plants.
-
Drainage: Good drainage is essential. Drill several holes in the bottom if the bucket doesn’t already have them.
-
Placement: Choose a spot on your balcony that gets at least 6 hours of sunlight per day. Scallions love light, but they can also tolerate partial shade.
Step 2: Preparing the Soil
Scallions thrive in soil that is both fertile and well-draining. Garden soil alone is often too compact for buckets, so a light, fluffy mix is best.
-
Soil blend: Use high-quality potting soil mixed with compost. Adding a small amount of sand or perlite improves drainage and prevents root rot.
-
Nutrients: Incorporate a slow-release organic fertilizer before planting to give your scallions a good start.
Fill the bucket nearly to the top, leaving about 2 inches of space for watering.
Step 3: Planting Scallions
There are two easy ways to start scallions: from seeds or from kitchen scraps.
-
From seeds:
-
Scatter seeds evenly across the soil surface, about 1 inch apart.
-
Cover lightly with soil, no more than ¼ inch deep.
-
Water gently to settle the seeds in place.
-
-
From cuttings:
-
Save the white root ends of scallions from your kitchen.
-
Place them in a glass of water for a few days until new green shoots appear.
-
Plant them directly into the bucket, spacing them 2 inches apart.
-
Both methods work well, but using cuttings often results in a quicker harvest.
Step 4: Watering and Care
Scallions prefer consistently moist soil. Buckets tend to dry out faster than garden beds, so regular watering is essential.
-
Watering: Check daily by touching the soil. If the top inch feels dry, water until it drains out the bottom holes.
-
Feeding: Use a balanced liquid fertilizer every 2–3 weeks, or refresh the soil with compost tea to encourage lush green growth.
-
Mulching: Adding a thin layer of straw or shredded leaves on the soil surface helps retain moisture and reduce weeds.
Step 5: Balcony Sunlight and Temperature
Scallions do best with 6 hours of direct sun daily, but they can still grow in partial shade. On hot summer balconies, protect them from intense afternoon sun by moving the bucket or using a light shade cloth.
They grow best in temperatures between 55–75°F (13–24°C). This makes them ideal for spring and fall planting, but with the right care, you can grow them year-round in buckets.
Step 6: Harvesting Scallions
One of the best things about scallions is how quickly they’re ready to harvest. Depending on whether you start from seed or cuttings, you can begin harvesting in as little as 3–4 weeks.
To harvest, you can either:
-
Snip the greens: Use scissors to cut the tops, leaving the white base and roots in place. This allows the scallions to regrow for multiple harvests.
-
Pull the whole plant: If you prefer, you can harvest the entire scallion, roots and all, once it reaches a mature size.
For continuous harvests, stagger your planting by sowing new seeds every 2–3 weeks. This ensures a constant supply of fresh scallions.
Step 7: Common Balcony Growing Tips
-
Pests: Scallions are generally pest-resistant, but keep an eye out for aphids. A quick spray of water or a mild soapy solution can help control them.
-
Companion planting: Scallions grow well with lettuce, carrots, and herbs. If your balcony space allows, mix them with other crops for a productive mini-garden.
-
Compact growing: Since scallions don’t spread much, you can grow them alongside other container plants without overcrowding.
Conclusion
Growing scallions in balcony buckets is one of the simplest and most rewarding ways to enjoy fresh food at home. With minimal space, little effort, and a quick turnaround from planting to harvest, scallions are perfect for beginner and experienced gardeners alike.
Whether you start from seeds or reuse kitchen scraps, you’ll find that scallions are reliable, fast-growing, and endlessly useful in the kitchen. A bucket or two on your balcony can supply crisp, flavorful greens all year round—proof that even the smallest spaces can produce big rewards.


