Cabbage is a versatile and nutritious vegetable that has been a staple in gardens and kitchens for centuries. Growing your own cabbage at home can be both rewarding and cost-effective, especially if you start the plants indoors. One of the most creative and sustainable ways to do this is by using plastic bottles as seed-starting cells. This method not only helps you recycle but also provides cabbage seedlings with a protected environment to sprout and grow strong before moving them outdoors.
By turning discarded bottles into mini planters, you can create a low-cost propagation system that works in small spaces such as windowsills, balconies, or compact indoor gardening setups.
Why Start Cabbage Indoors?
Cabbage grows best in cool conditions, but seeds and young seedlings are sensitive to temperature fluctuations and pests. Starting cabbage indoors gives gardeners a head start by:
-
Controlling conditions: Indoor planting lets you manage light, warmth, and moisture.
-
Avoiding pests: Seedlings are safe from slugs, cutworms, and other common outdoor threats.
-
Earlier harvests: By starting indoors, you get mature cabbages sooner in the growing season.
-
Efficient use of space: Indoor propagation means your outdoor beds are free for other crops until cabbage seedlings are ready for transplanting.
Materials Needed
To set up your plastic bottle propagation system, you’ll need just a few simple items:
-
Clear or semi-clear plastic bottles (1–2 liters work best)
-
Scissors or a sharp knife
-
Potting mix or seed-starting soil
-
Cabbage seeds (choose your preferred variety)
-
A tray or shallow container to hold the bottle cells
-
Watering can or spray bottle
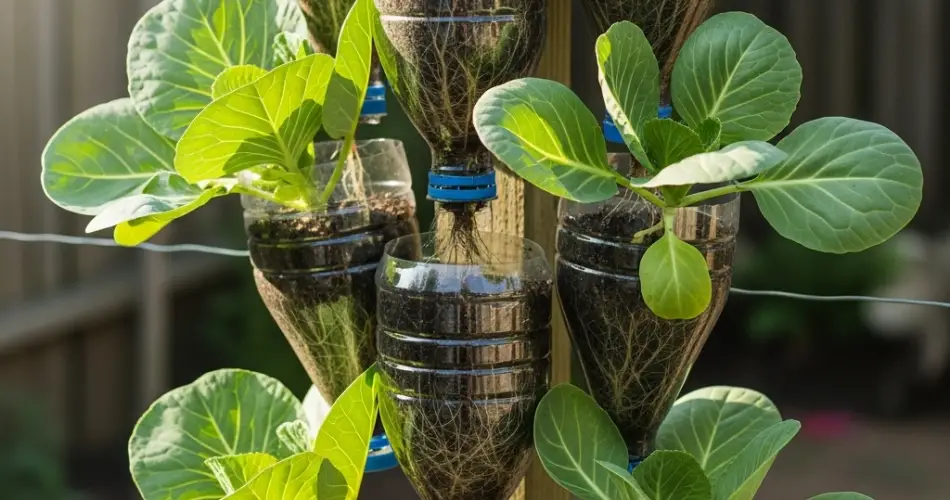
Preparing the Bottle Cells
-
Clean the bottles: Rinse thoroughly with soap and water to remove residues.
-
Cut the bottles: Slice each bottle in half or cut just above the middle. The bottom section will act as your planting cell.
-
Add drainage holes: Using a knife or heated tool, poke two to three small holes in the bottom of each half-bottle for proper drainage.
-
Arrange on a tray: Place the cut bottles on a shallow tray to catch excess water.
These DIY cells function just like store-bought seed trays, but they’re sturdier and eco-friendly.
Sowing Cabbage Seeds
-
Fill with soil: Add seed-starting mix into each bottle half, leaving about 1–2 cm of space at the top.
-
Plant the seeds: Sow cabbage seeds about ¼–½ inch deep, placing 2–3 seeds in each bottle cell.
-
Water gently: Moisten the soil evenly, but avoid soaking. A spray bottle works well for delicate watering.
-
Provide light: Place the bottle cells in a sunny windowsill or under grow lights for 12–14 hours a day.
Within 5–10 days, you should see the first seedlings emerging.
Caring for Bottle-Grown Seedlings
-
Thinning: Once seedlings have grown their first true leaves, thin them to one plant per cell by snipping weaker seedlings at soil level.
-
Moisture management: Keep the soil consistently moist but not waterlogged. The enclosed bottle cells help retain humidity.
-
Temperature: Aim for indoor temperatures of 65–75°F (18–24°C) during the day. Cooler nighttime temperatures are fine, as cabbage prefers cool growing conditions.
-
Ventilation: If using the top half of the bottle as a humidity dome, remove it once seedlings sprout to prevent mold.
Transplanting Outdoors
Cabbage seedlings are usually ready for transplanting after 4–6 weeks, or when they are about 4 inches tall with several true leaves. Before planting them outdoors, harden them off by gradually exposing them to outside conditions over a week:
-
Day 1–2: Place seedlings outdoors in a shaded spot for a few hours.
-
Day 3–5: Increase outdoor exposure and introduce some direct sunlight.
-
Day 6–7: Leave them outside overnight if temperatures are mild.
Once hardened, transplant cabbage seedlings into well-prepared garden beds or large containers, spacing them according to the variety’s requirements (usually 12–18 inches apart).
Benefits of Bottle Propagation
-
Cost-effective: No need to buy seed trays or pots.
-
Eco-friendly: Keeps plastic bottles out of the waste stream.
-
Customizable: Bottle size can be adjusted for different crops, not just cabbage.
-
Portable: Easy to move seedlings indoors or outdoors as needed.
Troubleshooting Tips
-
Leggy seedlings: If seedlings stretch too tall, they may not be getting enough light. Move them closer to a sunny window or use a grow light.
-
Damping-off disease: Good ventilation helps prevent fungal issues. Remove bottle tops once seedlings sprout.
-
Drying out: Check soil regularly, as small containers can dry out quickly in warm indoor environments.
Final Thoughts
Starting cabbage indoors with plastic bottle cells is a clever, affordable, and sustainable method that makes propagation easy, even for beginners. It ensures stronger seedlings, reduces waste, and creates a smoother transition to outdoor growing. By giving your cabbage plants this head start, you set the stage for healthier growth and a bountiful harvest.
This approach works not only for cabbage but also for many other leafy greens and vegetables. With a little creativity and a few recycled bottles, you can transform your indoor space into a thriving nursery for your garden.


