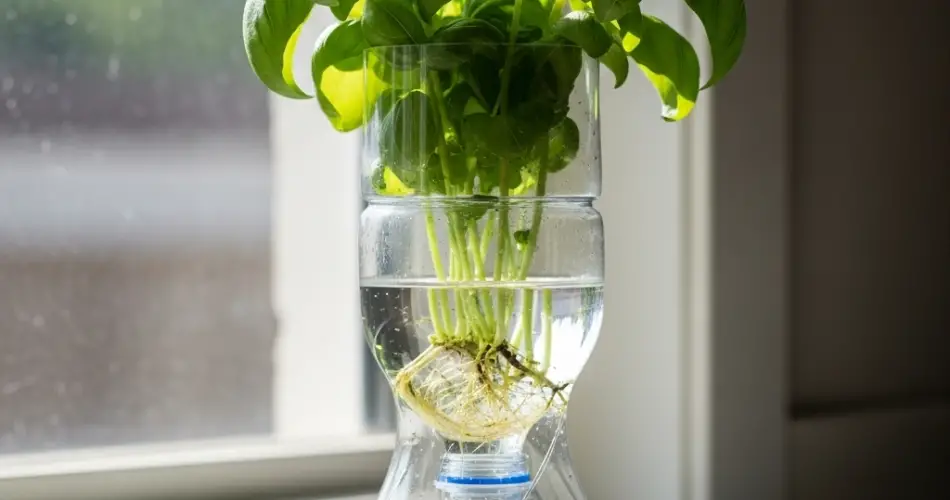
Basil is one of the most popular kitchen herbs, valued for its fragrant leaves and ability to enhance both simple and elaborate dishes. From fresh salads to pasta sauces, its vibrant flavor makes it a staple in many homes. While store-bought basil plants and seeds are easy to find, constantly purchasing them can add up over time. Fortunately, there’s a simple, budget-friendly way to expand your basil supply: propagating cuttings using plastic bottles.
This method is practical, cost-effective, and environmentally friendly since it repurposes common household materials. With just a few cuttings, a recycled bottle, and a sunny spot, you can grow multiple basil plants without spending much at all.
Why Plastic Bottles Work for Basil Propagation
Plastic bottles provide an excellent environment for starting basil cuttings. Their transparent surface allows you to monitor root growth, while their lightweight design makes them easy to move around. By cutting and modifying a bottle, you create both a water reservoir and a mini greenhouse, ensuring that cuttings receive consistent moisture and humidity.
This simple setup makes it possible to start a basil garden indoors, even on a kitchen windowsill, where space may be limited. Plus, reusing bottles helps reduce waste while keeping your gardening costs to a minimum.
Choosing and Preparing Basil Cuttings
Propagation begins with selecting healthy basil stems. Choose a strong, non-flowering stem about 4–6 inches long. Stems that have not yet produced flowers are best, as they concentrate their energy on leaf and root growth rather than seed production.
Using clean scissors or garden shears, snip the cutting just below a node—the point where leaves attach to the stem. This is where roots will naturally form. Strip away the lower leaves, leaving two or three sets at the top. Removing the extra leaves reduces water loss and helps the cutting focus on root development.
Setting Up Your Bottle Garden
Start with a standard plastic water or soda bottle. Cut the bottle in half: the bottom portion will serve as a water reservoir, while the top can act as a humidity dome.
Fill the bottom half with clean, room-temperature water. If you’re using tap water, allow it to sit for 24 hours so chlorine can dissipate. Insert the basil cuttings into the water, ensuring that the nodes remain submerged but the leaves stay above the surface.
To maintain higher humidity, you can invert the top half of the bottle and place it over the cuttings like a cover. This creates a simple greenhouse effect, keeping the environment warm and moist.
Light, Temperature, and Care
Place your bottle garden in a bright spot with indirect sunlight. Basil thrives in warmth, so try to keep the environment between 70–80°F (21–27°C). Avoid direct harsh sunlight at this stage, as it may overheat the cuttings inside the bottle.
Change the water every two to three days to prevent bacteria buildup and ensure that cuttings stay fresh. Within a week, you should notice small white roots beginning to sprout from the nodes. After about 10–14 days, the roots will usually be long enough—around 2 inches—to transplant into soil.
Transplanting Basil Cuttings into Soil
Once your basil cuttings have developed a healthy root system, they are ready to be moved into pots. Choose containers with drainage holes and fill them with a nutrient-rich potting mix.
Carefully remove the cuttings from the water, taking care not to damage the fragile roots. Plant each cutting in its own pot, gently pressing soil around the stem to secure it. Water thoroughly to help the roots settle in.
After transplanting, place the pots in a sunny location where they can receive at least six hours of light each day. Basil loves warmth and sun, so a bright kitchen window, balcony, or patio is ideal.
Maintaining Healthy Basil Plants
To keep your basil plants growing strong, water them regularly but avoid soggy soil. Check the moisture by touching the top inch of the soil—if it feels dry, it’s time to water.
Fertilize every few weeks with a balanced liquid fertilizer or compost tea to boost leaf production. Pinch back the growing tips frequently to encourage branching, which will result in bushier plants and more leaves to harvest.
Be sure to remove flower buds as soon as they appear. Once basil begins to flower, the leaves can become bitter. By preventing flowering, you’ll extend your harvest season and keep your basil flavorful.
Benefits of Propagating Basil with Bottles
This method of basil propagation comes with several advantages:
-
Affordable: Eliminates the need to buy multiple plants.
-
Eco-friendly: Gives plastic bottles a second life.
-
Space-efficient: Ideal for kitchens, apartments, or small gardens.
-
Fast results: New roots form in just days.
-
High success rate: Cuttings root easily, even for beginner gardeners.
Harvesting and Enjoying Your Basil
Once your basil plants are established, you can begin harvesting leaves regularly. Always harvest from the top, cutting just above a pair of leaves. This will encourage new shoots to grow, providing a steady supply of fresh leaves for your cooking.
Basil can be enjoyed fresh or preserved for later. Try drying it, freezing whole leaves, or blending with olive oil to make a base for sauces. With several propagated plants, you’ll never run out of basil for your favorite recipes.
Final Thoughts
Propagating basil using plastic bottles is an easy and sustainable way to expand your herb garden without spending much money. This method requires minimal equipment, produces quick results, and offers an ongoing supply of fresh, fragrant basil. Whether you’re an experienced gardener or just starting out, this budget-friendly approach makes it simple to enjoy homegrown basil all year round.


