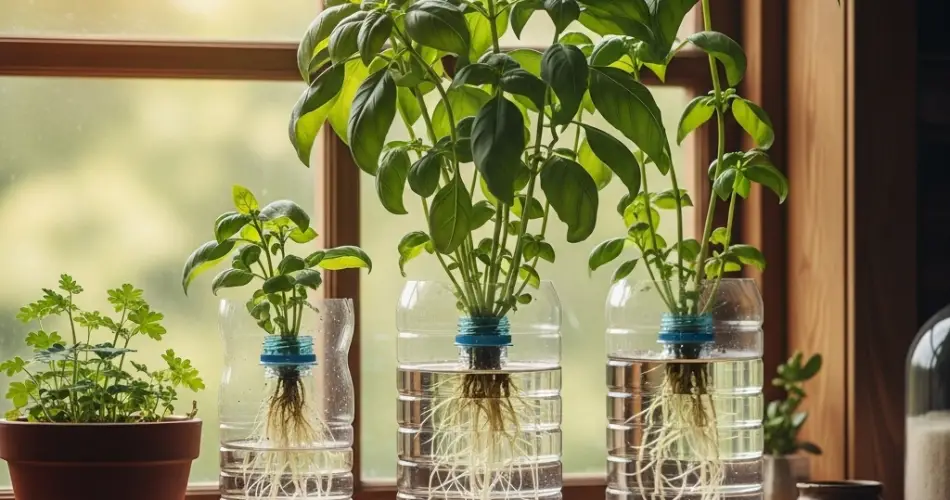
Basil is one of the most widely cherished herbs, loved for its fresh, fragrant leaves that brighten up countless recipes. Whether sprinkled over salads, stirred into pasta sauces, or blended into pesto, its versatility makes it a staple in kitchens around the world. While many gardeners grow basil from seed, there is another simple and sustainable method to expand your basil supply—propagation from cuttings. Even better, you can use recycled bottles to start the process, combining eco-friendly practices with the joy of homegrown herbs.
This guide will walk you step-by-step through the process of growing new basil plants from just a single cutting, using nothing more than a clean bottle, some water, and a little patience.
Why Propagate Basil from Cuttings?
Growing basil from cuttings is a rewarding alternative to starting from seed, with several benefits:
-
Saves Time – Cuttings root much faster than seeds germinate, which means you can enjoy mature plants more quickly.
-
Guarantees Flavor – Since cuttings are exact clones of the parent plant, you can preserve the taste and aroma you already love.
-
Eco-Friendly – This method reuses bottles that might otherwise be discarded, reducing waste.
-
Cost-Effective – You only need one healthy plant to create many new ones without buying seeds or seedlings.
For urban gardeners or those working with limited space, this technique is a straightforward and sustainable way to enjoy basil year-round.
Materials You’ll Need
Starting basil cuttings requires very little equipment. Gather the following:
-
A healthy basil plant with strong stems
-
Clean scissors or garden shears
-
A recycled glass or plastic bottle
-
Fresh water
-
Potting soil and containers for transplanting
Step 1: Select and Prepare a Cutting
Choose a healthy basil stem about 4–6 inches long. Look for one that is free of pests or disease and has vibrant green leaves. Using clean scissors or shears, cut just below a leaf node—the small bump on the stem where leaves grow.
Once you have your cutting, remove the leaves from the bottom half of the stem. This prevents the submerged leaves from rotting in water and allows the plant to focus its energy on producing roots. Keep a few healthy leaves at the top to support photosynthesis.
Step 2: Set Up the Bottle
Wash your recycled bottle thoroughly to remove any residue. If using a plastic bottle, you can cut the top half off to create a wider opening, though many glass bottles work well as they are.
Fill the bottle with enough fresh water to cover the bottom leaf nodes of your cutting. Place the basil cutting into the bottle so that the leaves remain above water while the stem rests below.
Step 3: Provide the Right Conditions
Position the bottle in a warm, bright spot where it can receive at least six hours of indirect sunlight daily. A sunny windowsill is ideal. Direct midday sunlight can heat the water too much, so indirect light is usually best.
Remember to change the water every 2–3 days. This prevents bacterial growth and ensures the cutting has plenty of oxygen. Within 7–10 days, you should see tiny white roots beginning to sprout.
Step 4: Monitor Root Development
Patience is key during this stage. Allow the roots to grow until they are at least 2 inches long, which usually takes 2–3 weeks. Longer roots will help the cutting adapt better to soil once transplanted.
Step 5: Transplant into Soil
When your cutting has developed strong roots, it’s time to move it into soil. Choose a container at least 6–8 inches deep with good drainage holes. Fill it with nutrient-rich potting mix, ideally blended with compost.
Create a small hole in the soil and carefully place the rooted cutting inside. Cover the roots and firm the soil gently around the base. Water thoroughly but avoid overwatering—basil prefers consistently moist, not soggy, soil.
Step 6: Care for Your New Basil Plant
Once transplanted, your new basil plant needs regular care:
-
Sunlight: Place the container in a location that receives at least 6 hours of sunlight daily. If indoors, supplement with grow lights if necessary.
-
Watering: Water when the top inch of soil feels dry. Basil thrives in evenly moist conditions but suffers if the soil becomes waterlogged.
-
Pruning: Pinch off the top sets of leaves regularly to encourage bushier growth and prevent flowering. This helps the plant remain productive for longer.
-
Harvesting: Once the plant is well established, harvest leaves as needed. Always leave at least two-thirds of the plant intact to allow for continuous growth.
Sustainability Bonus: Repurposing Bottles
One of the best aspects of this method is its eco-friendly nature. By using recycled bottles as rooting containers, you reduce waste while giving your basil cuttings the perfect environment to grow. Instead of throwing bottles away, you transform them into mini-greenhouses that contribute to a more sustainable gardening practice.
Enjoy the Rewards
Once your basil cutting has matured into a thriving plant, you can enjoy an ongoing supply of fresh leaves in your cooking. Whether it’s tossed into salads, stirred into sauces, or blended into homemade pesto, the flavor of freshly picked basil elevates any dish. And the best part? All of it started from a single cutting and a recycled bottle.
Final Thoughts
Propagating basil from a single cutting is not only easy but also highly rewarding. With just a bottle, some water, and a little care, you can grow a steady supply of this aromatic herb right in your kitchen. This sustainable method allows you to expand your herb garden, save money, and reduce waste—all while enjoying the unmatched flavor of homegrown basil.


