Spider plants (Chlorophytum comosum) are among the easiest houseplants to grow and propagate. Their charming, arching leaves and baby offshoots (often called “pups” or “plantlets”) make them a favorite in homes and offices. Not only are spider plants tolerant of a wide range of growing conditions, but they’re also one of the simplest plants to multiply. If you’ve got a healthy spider plant, you’re just a few steps away from creating many more.
Whether you prefer growing in water or directly in soil, spider plant propagation is rewarding and straightforward. Here’s everything you need to know to do it successfully.
When to Propagate Spider Plants
Spider plants typically produce baby plantlets on long runners once they’re mature and well cared for. These pups are the best candidates for propagation. Spring and early summer are the best seasons to propagate, as this is when the plant is actively growing and recovery is faster. However, you can still propagate during other seasons if your home offers warm temperatures and adequate light.
What You’ll Need
-
Healthy spider plant with visible pups
-
Clean scissors or pruning shears
-
Small glass or jar (for water propagation)
-
Pot with drainage holes and well-draining potting mix (for soil propagation)
-
Optional: Rooting hormone (though not necessary for spider plants)
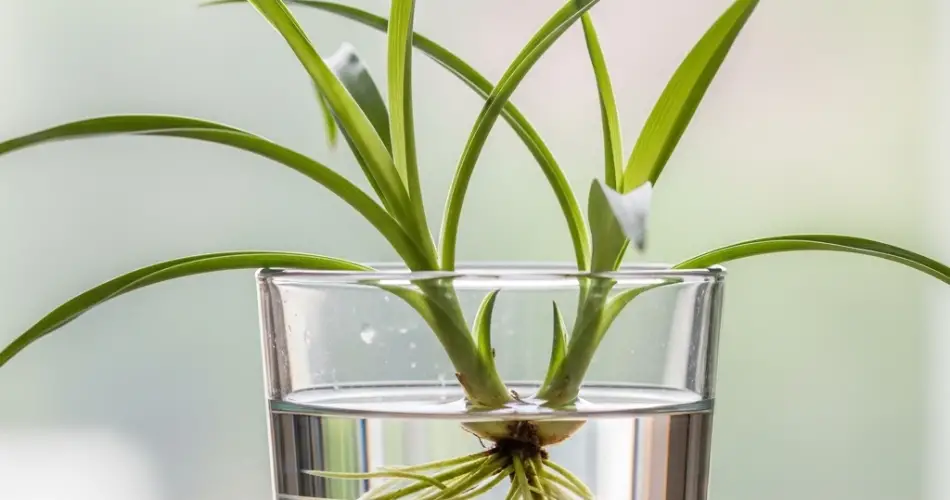
Method 1: Propagating Spider Plants in Water
Water propagation is an excellent way to watch the roots form and can be particularly satisfying for beginners.
Step-by-Step Guide:
-
Choose a Healthy Pup
Look for a baby spider plant with small roots already forming at its base. These pups typically appear at the ends of the plant’s long stems. Make sure the pup has at least a few leaves and is not too small. -
Cut the Pup from the Mother Plant
Using clean, sharp scissors or pruning shears, snip the pup from the runner. Cut close to the base of the pup, removing any excess stem. -
Place the Pup in Water
Fill a small glass or jar with room temperature water and submerge only the root area of the plantlet. The leaves should remain above the water to prevent rot. -
Wait for Roots to Grow
Place the jar in a warm, bright location out of direct sunlight. In about 7–14 days, you should see new roots emerging. Change the water every few days to keep it fresh and prevent bacterial buildup. -
Transplant into Soil
Once the roots are an inch or two long, transfer the baby plant into a pot with well-draining soil. Water lightly and keep in a bright spot.
Method 2: Propagating Spider Plants in Soil
Soil propagation is more hands-off once the plantlet is in place and can encourage faster acclimation to potted life.
Step-by-Step Guide:
-
Select a Pup
Just as with water propagation, choose a plantlet that already has tiny root nubs. These signs mean the pup is ready to grow on its own. -
Plant Directly into Soil
Fill a small pot with a light, well-draining potting mix—ideally one made for houseplants or a mix with peat, perlite, and vermiculite. Gently press the plantlet into the soil, ensuring the base is in contact with the soil but the leaves stay upright and above ground. -
Keep It Moist (But Not Wet)
Lightly water the soil after planting. Keep it evenly moist for the first couple of weeks to encourage root growth, but avoid overwatering. -
Optional: Keep Attached to the Mother Plant
If you’re not in a rush, you can plant the pup in soil while it’s still attached to the runner. Once it establishes roots and shows new growth, you can sever the stem connecting it to the main plant. -
Provide Bright, Indirect Light
Place the pot in a warm location with bright, indirect sunlight. Avoid harsh sun that might scorch the leaves.
Aftercare for New Spider Plants
Once your new plant is rooted in soil, care for it as you would any spider plant:
-
Water when the top inch of soil feels dry.
-
Light: Place in bright, indirect sunlight.
-
Humidity: Prefers moderate humidity but adapts well to typical indoor conditions.
-
Feeding: After a month or so, begin feeding monthly with a diluted liquid houseplant fertilizer.
Final Tips
-
Don’t worry if the outer leaves of the plantlet droop slightly during the first few days—it often perks up once the roots develop.
-
Always use sterile tools to prevent disease transfer between plants.
-
Avoid overwatering during early stages, especially for soil-propagated pups.
-
Spider plants are non-toxic and safe for most pets, making them great for homes with animals.
Propagating spider plants is a satisfying way to expand your indoor garden or share plants with friends. With just a little care, those adorable pups will quickly become mature, full-sized plants ready to produce babies of their own. Whether you choose water or soil, propagation is simple and effective—just one more reason to love this easygoing houseplant.


