Sage is a fragrant, perennial herb known for its savory flavor and beautiful, silvery-green leaves. Popular in roasted dishes, stuffings, teas, and herbal remedies, sage is both a culinary and ornamental favorite. If you have a healthy sage plant and want to multiply it, propagation through cuttings is an excellent method. Even better, you can use a simple DIY plastic bottle system to root new sage plants at home.
Using recycled plastic bottles offers an affordable and sustainable way to propagate herbs. The enclosed setup helps maintain humidity, protect cuttings from harsh conditions, and support root development. Whether you’re growing sage on a balcony, windowsill, or backyard garden, this propagation method is both effective and beginner-friendly.
Why Propagate Sage from Cuttings?
While sage can be grown from seed, it takes time and doesn’t always guarantee the same quality or flavor as the parent plant. Propagating from cuttings ensures you’re cloning the original plant, preserving its taste, aroma, and growth characteristics.
Cuttings also root faster than seeds grow, allowing you to expand your herb garden in less time. By using a bottle propagation system, you create a mini greenhouse that increases your success rate, especially in indoor or cooler environments.
What You’ll Need
To get started with your DIY sage propagation system, gather these materials:
-
Healthy sage cuttings (8–12 cm long)
-
A clean plastic bottle (1 to 2 liters in size)
-
Sharp scissors or garden pruners
-
Light potting mix or seed-starting soil
-
Spray bottle with clean water
-
Small container or use the bottom half of the bottle
-
Optional: rooting hormone powder
Choose cuttings from a vigorous sage plant that is disease-free and not currently flowering. Look for flexible, green stems with plenty of leaves.
How to Take and Prepare Sage Cuttings
-
Select the Cutting: Use sterilized scissors or pruners to cut a stem 8–12 cm long, just below a leaf node. Avoid using very woody stems, as younger growth roots more successfully.
-
Trim the Leaves: Strip the bottom half of the leaves from the stem. Leave a few leaves at the top to support photosynthesis, but reduce the overall number to minimize moisture loss.
-
Optional Rooting Hormone: Dip the base of the cutting into rooting hormone powder. This step encourages faster root formation, though sage often roots well without it.
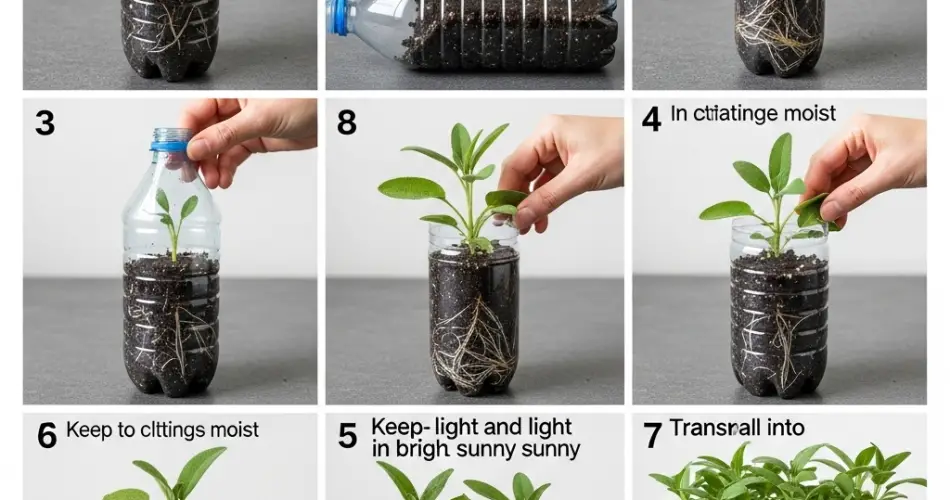
Setting Up the Bottle Propagation System
-
Prepare the Bottle: Cut the plastic bottle in half. The bottom portion will serve as the planter. If desired, poke drainage holes in the base using a hot nail or small drill. Use a saucer underneath if indoors.
-
Add Soil: Fill the bottom half of the bottle with light, well-draining potting soil. Moisten the soil slightly before inserting the cuttings.
-
Plant the Cuttings: Make a hole in the soil with a pencil or stick and insert the cutting so the leaf nodes are buried. Gently firm the soil around the base of the stem to hold it upright.
-
Mist and Cover: Lightly mist the cutting and inside of the bottle. Then take the top half of the bottle and place it over the base to form a humidity dome. This keeps moisture in and creates a greenhouse-like environment.
Placement and Care
Place your bottle setup in a warm area with indirect sunlight. Avoid direct sun, which can overheat the interior. A bright windowsill or lightly shaded outdoor spot is ideal.
Check the soil daily to ensure it stays lightly moist but not soggy. Use a spray bottle to mist as needed. Remove the dome for an hour each day to allow airflow and prevent mold buildup.
In 2 to 3 weeks, you should begin to see signs of root development. Lightly tug on the cutting—if there’s resistance, roots are forming. Once new leaf growth appears, your sage is ready to transplant.
Transplanting Rooted Sage
When the cutting has established a healthy root system (usually after 3–4 weeks), transplant it into a larger pot or directly into your garden. Use well-draining soil and place the plant in a sunny location.
Sage thrives in full sun and prefers slightly dry conditions. Water only when the top layer of soil is dry, and avoid overwatering to prevent root rot. Regular pruning encourages fuller growth and helps keep the plant productive.
Tips for Success
-
Take multiple cuttings to improve your chances of success.
-
Clean all tools and containers before use to prevent contamination.
-
If propagating indoors, ensure good airflow around the bottle to reduce moisture-related problems.
-
Rotate the bottle setup occasionally for even light exposure.
Conclusion
Propagating sage using a DIY bottle system is a practical, eco-friendly way to expand your herb garden. With just a few simple tools and a little care, you can root sage cuttings successfully and enjoy a fresh, homegrown supply of this flavorful herb year-round. Whether you’re growing sage for the kitchen or the garden, this propagation method offers a fast, rewarding start from a single parent plant.


