Sage is a beloved herb, prized for its earthy aroma and culinary versatility. Whether you’re seasoning roasted vegetables, brewing a calming tea, or making homemade herbal remedies, having a fresh supply of sage on hand is always a plus. Instead of repeatedly buying new plants or seeds, you can propagate sage through cuttings—an easy and efficient way to clone your existing plants. Even better, you can do this using recycled plastic bottles, making the process sustainable and budget-friendly.
This method is perfect for gardeners with limited space or those looking to expand their herb garden with minimal cost. Here’s a step-by-step guide to cloning sage using plastic bottles.
Why Propagate Sage from Cuttings?
Cloning sage from cuttings offers several advantages:
-
Faster growth: Cuttings root more quickly than seeds germinate.
-
Preserve plant traits: The new plants will retain all the characteristics of the parent, including aroma, leaf size, and flavor.
-
Cost-effective: You can grow multiple plants from a single parent plant.
-
Sustainable: Reusing plastic bottles reduces waste while providing a controlled environment for rooting.
Materials You’ll Need
Before you begin, gather the following items:
-
Healthy sage plant (for cuttings)
-
Clean plastic bottles (1–2 liters work best)
-
Sharp scissors or pruning shears
-
Water
-
Optional: Rooting hormone (powder or gel)
-
Potting mix (for transplanting later)
-
A pencil or chopstick
-
Spray bottle (optional)
Step 1: Take Your Sage Cuttings
Select a healthy, mature sage plant. Look for stems that are green, flexible, and free from pests or disease. Avoid woody or overly old growth.
-
Use scissors or pruning shears to cut 4- to 6-inch stems just below a leaf node (the point where leaves emerge).
-
Remove the leaves from the bottom half of the cutting to prevent them from sitting in water or soil and rotting.
-
If desired, dip the cut end into a rooting hormone to encourage faster root development (optional but helpful).
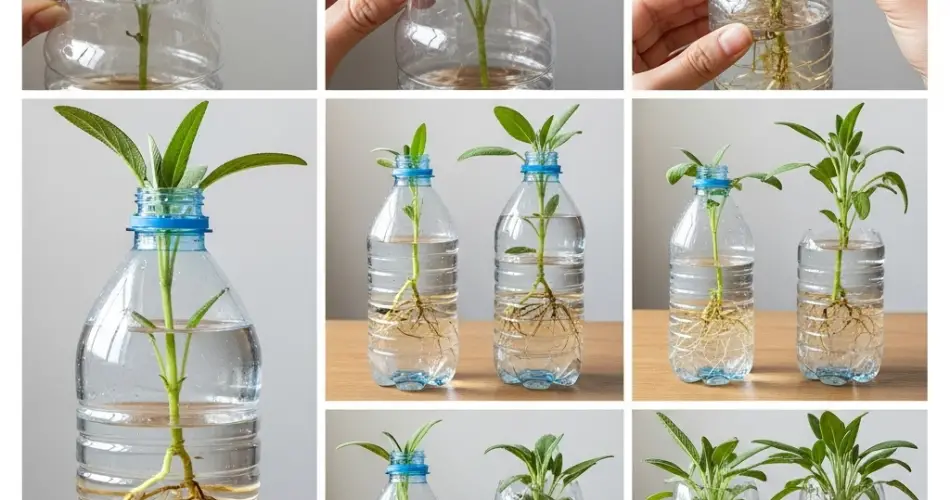
Step 2: Prepare the Plastic Bottle
Plastic bottles serve as mini greenhouses, offering a humid, controlled environment ideal for root development.
Water Propagation Method:
-
Cut the plastic bottle in half.
-
Fill the bottom half with clean water.
-
Insert the sage cuttings into the water so that the bottom leaf nodes are submerged.
-
Invert the top half of the bottle and place it over the bottom as a dome to trap humidity. Leave the cap off for air circulation.
Change the water every two to three days to keep it fresh and prevent bacterial growth.
Soil Propagation Method:
-
Cut a window or the top off a bottle so you can plant your cutting inside.
-
Make small drainage holes at the bottom of the bottle.
-
Fill the bottle with moist, well-draining potting soil.
-
Use a pencil to poke a hole in the soil, then insert the cutting.
-
Press the soil gently around the stem and mist lightly.
Cover the bottle with a clear plastic dome or use another bottle top to create a greenhouse effect if needed.
Step 3: Create the Ideal Environment
Place your plastic bottle containers in a location that gets bright, indirect light. Sage prefers temperatures between 18–24°C (65–75°F). Avoid direct sunlight at this stage, as it can dry out the cutting or overheat the small greenhouse setup.
Humidity is key. If you’re using the water method, keep an eye on the water level. For soil propagation, mist the interior of the bottle regularly to maintain moisture without making the soil soggy.
Step 4: Wait for Roots to Form
Roots usually begin to appear within 10 to 14 days. With the water method, you’ll see roots forming directly through the bottle. In the soil method, give the plant a gentle tug after two weeks—resistance is a sign that roots are developing.
Let the roots grow to at least 1–2 inches long before transplanting the cutting into a larger container or outdoor garden.
Step 5: Transplant and Care for New Sage Plants
Once your cuttings have rooted well, they’re ready to be moved to permanent containers or garden beds.
-
Use pots with good drainage and fill with quality potting soil.
-
Carefully transplant the cutting, keeping the delicate roots intact.
-
Water the plant thoroughly after transplanting.
-
Place the pot in a sunny area—sage loves at least 6 hours of direct sunlight per day.
Step 6: Ongoing Maintenance
Caring for sage is simple:
-
Watering: Sage prefers soil on the drier side. Water only when the top inch of soil is dry.
-
Pruning: Regular trimming encourages bushier growth and prevents flowering, which can affect leaf flavor.
-
Fertilizing: A light feeding every month during the growing season is sufficient.
Conclusion
Cloning sage plants using plastic bottles is a rewarding project that’s easy, eco-friendly, and ideal for both beginners and experienced gardeners. With a little patience and basic materials, you can expand your herb garden, share cuttings with friends, or ensure you always have fresh sage ready for the kitchen. Give it a try and enjoy the benefits of homegrown herbs with minimal effort.


