Chives are a must-have in any herb garden. Their delicate onion flavor enhances a wide variety of dishes, from soups and salads to scrambled eggs and dips. Plus, they’re incredibly easy to grow, maintain, and propagate. If you want a continuous supply of fresh chives right from your windowsill or balcony, propagating them in plastic bottles is a smart, space-saving solution.
This method is ideal for urban gardeners, those with limited space, or anyone who enjoys a sustainable, DIY approach to gardening. With just a few tools and some care, you can clone your existing chive plants and enjoy quick regrowth without needing to buy new seeds or seedlings.
Why Use Plastic Bottles for Propagation?
Recycling plastic bottles for plant propagation offers several benefits:
-
Cost-effective: No need to buy new pots or containers.
-
Eco-friendly: Reduces plastic waste.
-
Mini greenhouse: Bottles can create a humid, protective environment ideal for root growth.
-
Compact and mobile: Perfect for balconies, windowsills, and small garden corners.
What You’ll Need
Before you start, gather the following items:
-
Healthy, mature chive plant (for cuttings or division)
-
Clean plastic bottles (1 to 2-liter size recommended)
-
Scissors or pruning shears
-
Sharp knife (for splitting clumps, if dividing)
-
Water
-
Potting mix (well-draining)
-
Spray bottle (optional)
-
Small garden trowel or spoon
Method 1: Propagation by Division
Chives grow in clumps, which makes them ideal candidates for propagation by division—a method that offers immediate results.
Step 1: Prepare the Bottle
-
Take a clean plastic bottle and cut it horizontally about two-thirds of the way up.
-
Poke a few holes in the bottom for drainage.
-
Set aside the top part to use as a humidity dome if needed.
Step 2: Uproot and Divide the Chives
-
Gently remove the chive plant from its pot or garden bed.
-
Shake off excess soil and identify clumps with their own roots.
-
Use a sharp knife or your hands to separate the plant into smaller sections, making sure each has both roots and leaves.
Step 3: Plant in Bottle Base
-
Fill the bottom part of the bottle with well-draining potting mix.
-
Plant one or two clumps in the soil, firming it gently around the base.
-
Water lightly to help the soil settle.
Step 4: Create a Greenhouse (Optional)
-
Invert the top portion of the bottle and place it over the bottom part.
-
Leave the cap off to allow airflow.
-
This mini greenhouse keeps humidity high, promoting quick regrowth.
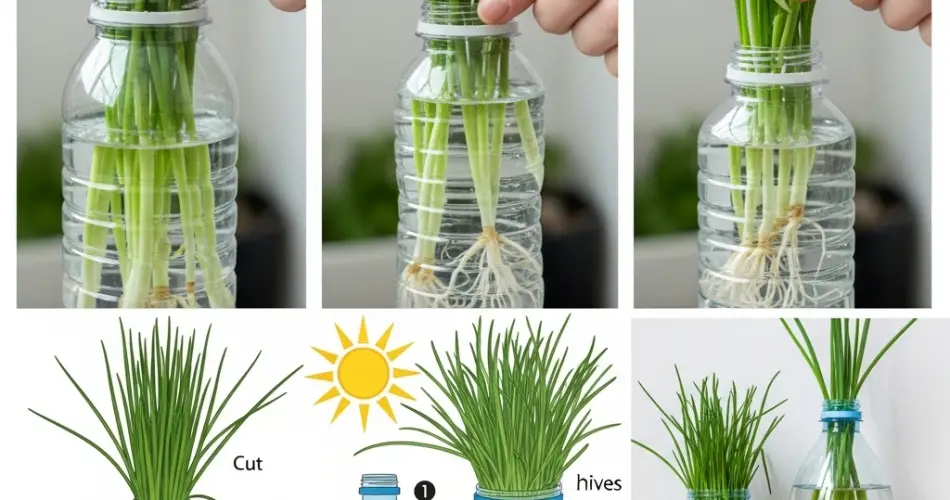
Method 2: Water Propagation (from Cuttings)
This method is less common with chives but can be used for fun experiments or if you don’t want to divide your main plant just yet.
Step 1: Cut Healthy Stems
-
Snip 3–4 inch long stems from a healthy chive plant.
-
Remove the bottom inch of leaves so that it’s just stem.
Step 2: Prepare the Bottle
-
Fill the bottom of a cut bottle with clean water.
-
Place the cut stems so that the bottom ends are submerged.
-
Set the bottle in a well-lit, warm spot, but not in direct sunlight.
Step 3: Wait for Roots
-
Replace the water every two days.
-
Roots should start appearing in about 7–10 days.
-
Once roots are about 1 inch long, transfer the cuttings into soil-filled bottles as described in the division method.
Caring for Your Propagated Chives
Once your new chives are settled in their plastic bottle homes, they’ll need basic care to thrive:
-
Light: Place in a sunny location—chives love full sun but will tolerate partial shade.
-
Watering: Keep the soil evenly moist but not soggy. Water when the top inch feels dry.
-
Fertilizing: Use a balanced liquid fertilizer once a month to promote healthy foliage.
-
Trimming: Regularly harvest the leaves by cutting them near the base. This encourages fresh growth and keeps the plant from becoming leggy.
-
Pest control: Chives are naturally pest-resistant due to their strong scent, but keep an eye out for aphids or fungal issues in humid conditions.
Harvesting Tips
Chives can be harvested as soon as they reach about 6 inches tall. Always use clean scissors and avoid cutting more than one-third of the plant at a time to ensure continued healthy regrowth. The more often you harvest (gently), the fuller and bushier your chive plant will become.
Final Thoughts
Propagating chives in plastic bottles is a clever and efficient way to grow herbs at home. Whether you use division for instant results or try rooting cuttings for fun, this technique makes it easy to enjoy fresh, flavorful chives year-round. With a few recycled materials and some basic care, you can fill your kitchen and garden with this delicious, versatile herb—all without spending a dime on new plants.


