Chives are one of the easiest herbs to grow at home. With their mild onion flavor and slender, vibrant green leaves, they make an excellent addition to everything from soups to scrambled eggs. While chives can be grown from seed, a quicker and more reliable method of multiplying your plants is by cloning—also known as propagating from divisions. And best of all, you can set up a simple and sustainable system using recycled plastic bottles.
This DIY approach is perfect for urban gardeners, apartment dwellers, or anyone interested in low-cost herb propagation. With just a few materials and a bit of care, you can expand your chive collection and enjoy a steady supply of fresh greens year-round.
Why Clone Chives?
Chives are perennials, meaning they come back year after year. Over time, they grow in tight clumps that can be divided into smaller sections—each capable of becoming a new, thriving plant. This makes chives ideal for cloning through root division.
By using recycled bottles, you create a compact and controlled environment for these divisions to re-establish. It’s a great way to reuse materials while expanding your garden sustainably.
Materials Needed
To get started with your DIY chive cloning setup, gather the following:
-
A mature chive plant (from your garden or store-bought with roots attached)
-
Clean plastic bottles (1–2 liters, preferably transparent)
-
Sharp scissors or a knife
-
Potting mix (light and well-draining)
-
Small tray or saucer (optional)
-
Spray bottle with water
If you’re dividing a garden clump, ensure the mother plant is healthy and disease-free. If using store-bought chives, make sure the roots are intact and fresh.
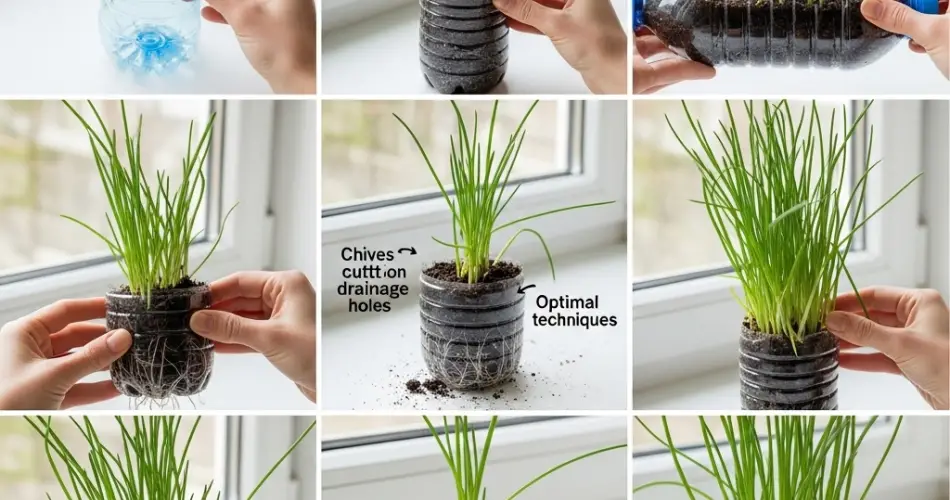
Step 1: Prepare the Bottles
Start by cutting each plastic bottle in half. The bottom half will be used as a planter. If possible, poke a few small drainage holes in the base using a heated needle or small knife. This helps prevent water buildup and root rot.
Reserve the top half of each bottle. These can be placed back over the base as mini greenhouses to help maintain humidity during the early stages of growth.
Step 2: Divide the Chive Plant
If you’re using a mature chive clump from your garden or a nursery pot:
-
Gently remove the plant from its pot or soil.
-
Rinse the roots carefully to loosen any compacted soil.
-
Use your fingers to gently separate the root ball into smaller sections. Each section should have several leaves and a good portion of roots.
This division process is simple and doesn’t harm the plant. In fact, it promotes stronger, bushier growth once replanted.
Step 3: Plant the Divisions
Fill the bottom half of each bottle with light potting mix. Moisten the soil slightly using a spray bottle or light watering.
Insert one chive division into each bottle planter, burying the roots and base of the shoots about 2–3 cm deep. Gently firm the soil around each clump to ensure it stays upright.
If needed, trim the chive leaves slightly to reduce stress on the plant and help the roots re-establish faster.
Step 4: Create a Humid Environment
Take the top half of the bottle and place it over the planted base, creating a dome-like cover. This helps retain moisture and warmth—similar to a greenhouse.
Set the bottle setups in a bright location with indirect sunlight. Avoid direct, intense sun during the first few days, as this can cause overheating or dehydration.
Vent the dome once daily for 1–2 hours to allow airflow and prevent mold.
Step 5: Ongoing Care
Check the soil regularly to ensure it stays lightly moist but not soggy. Water as needed, preferably with a spray bottle or gentle watering can.
Within 1–2 weeks, the chive divisions will begin to grow new shoots and roots. Once established, you can remove the bottle dome and allow the plants to grow in open air.
As the chives grow taller, begin harvesting by snipping the outer leaves with scissors, about 2 cm above the base. Regular cutting encourages fuller, healthier regrowth.
Transplanting and Expanding
Once your chive clones are well-established, you can transplant them into larger containers, garden beds, or balcony planters. Chives thrive in full sun and prefer slightly moist, well-draining soil.
They can also be kept in the bottle planters long-term if space is limited, but be sure to trim regularly and refresh the soil every few months for best results.
Final Tips
-
Use several bottles at once to clone multiple divisions.
-
Store-bought chives with roots can be treated the same way—just rinse and separate carefully.
-
Fertilize lightly every few weeks with a diluted organic fertilizer to boost growth.
-
If growing indoors, place chives near a sunny window or use a grow light for best results.
Conclusion
Cloning chives using recycled bottles is an easy and sustainable way to expand your herb garden. This DIY setup is ideal for beginners, requires minimal space, and helps reduce plastic waste. Whether you’re growing chives on a balcony, windowsill, or backyard patio, this method ensures a constant supply of fresh, flavorful greens ready to harvest at a moment’s notice.


