Aloe vera is one of the most popular and useful succulents grown indoors. Known for its medicinal properties and ability to thrive with minimal care, aloe vera makes an excellent addition to any home garden. One of the best things about this plant is how easily it can be propagated through its offsets, also known as “pups.” With a little creativity and a used plastic bottle, you can propagate aloe pups and grow them into healthy, independent plants—all while practicing sustainable gardening.
This guide walks you through the step-by-step process of propagating aloe pups in a recycled bottle garden, offering a budget-friendly and eco-conscious way to expand your indoor plant collection.
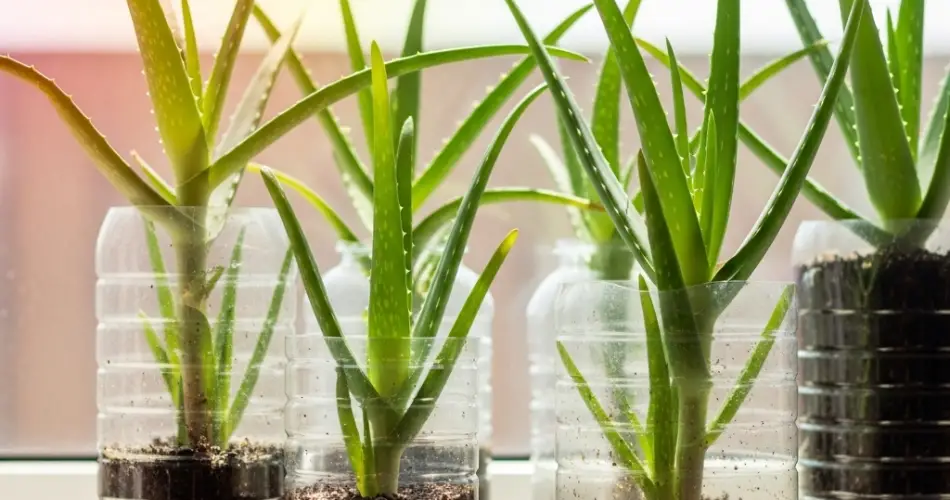
Why Use a Bottle Garden?
Plastic bottles are versatile, readily available, and ideal for small-scale gardening. Instead of buying new pots, you can turn discarded bottles into stylish and functional planters. This not only reduces plastic waste but also allows you to observe root development and moisture levels, which is especially helpful when propagating succulents like aloe vera.
Aloe pups do well in individual containers with good airflow and drainage, both of which can be achieved using a plastic bottle with a few modifications.
What Are Aloe Pups?
Aloe pups are small offshoots that grow around the base of the mother plant. These clones share the same genetic makeup as the parent and will eventually grow into full-sized aloe plants. Once they develop their own root systems, they can be separated and replanted. Propagating pups is one of the easiest and most effective methods to grow more aloe plants at home.
Materials You’ll Need
-
A 1.5- or 2-liter plastic bottle
-
Scissors or a utility knife
-
A healthy aloe vera plant with visible pups
-
Cactus or succulent potting mix
-
Small stones or gravel for drainage
-
A spoon or trowel
-
A small amount of activated charcoal (optional)
-
Gloves (aloe has sharp leaf edges)
Step-by-Step Guide
1. Prepare the Bottle
Clean the plastic bottle thoroughly, then cut it in half or at about one-third from the top. Use the bottom portion as your planter. If you prefer, punch a few holes in the bottom for drainage.
Alternatively, you can invert the top half into the bottom to create a self-watering planter. Just make sure the cap is removed, and place a piece of mesh or breathable fabric at the spout to prevent soil from falling through.
If desired, decorate the bottle with paint, twine, or fabric to make it more visually appealing.
2. Remove and Separate the Aloe Pups
Gently remove the mother aloe plant from its pot and brush away excess soil to expose the pups and their roots. Select pups that are at least 2–3 inches tall and have a few visible roots of their own. Use a clean, sharp knife if needed to separate them from the main root system.
Let the separated pups dry for 24–48 hours in a shaded area. This allows the cut surfaces to callous over, which helps prevent rot when planted.
3. Create a Drainage Layer
At the base of your bottle planter, add a layer of small stones or gravel to improve drainage. You can also add a thin layer of activated charcoal to help with odor control and moisture balance.
4. Add Potting Mix
Use a light, well-draining succulent mix made of sand, perlite, and organic material. Fill the bottle with soil, leaving enough room to plant the pup without burying it too deep. Aloe roots grow shallowly, so they don’t require a lot of depth.
5. Plant the Aloe Pup
Place the pup in the center of the bottle planter. Make a small hole in the soil and gently insert the roots, keeping the base of the pup above the soil line. Lightly press the soil around the plant to stabilize it.
Avoid watering immediately. Let the plant adjust to its new environment for 2–3 days to further reduce the risk of root rot.
Aftercare and Maintenance
-
Watering: Aloe is drought-tolerant and should only be watered when the soil is completely dry. When you do water, do so deeply, allowing excess water to drain out. Avoid letting the plant sit in water.
-
Light: Place your bottle garden in a bright spot with indirect sunlight. Aloe thrives with plenty of light but can be sunburned by intense, direct exposure for prolonged periods.
-
Humidity: Aloe prefers dry conditions. Keep it away from very humid rooms or areas with poor ventilation.
-
Growth Monitoring: Over time, your pup will establish itself and begin to grow. You may notice new leaves forming from the center. When the plant becomes too large for the bottle, you can transplant it to a larger container or garden bed.
Benefits of Aloe Bottle Gardens
-
Eco-Friendly: Reusing plastic bottles helps reduce household waste.
-
Space-Saving: Perfect for small apartments, windowsills, or desks.
-
Decorative: With a little creativity, bottle gardens can be stylish and personalized.
-
Practical: Aloe vera has many uses, including skin soothing and natural remedies.
Final Thoughts
Propagating aloe pups in plastic bottles is a rewarding and environmentally friendly way to grow your own aloe vera plants. With minimal tools and a little patience, you can create a sustainable indoor garden that’s both useful and beautiful. Whether you’re a beginner gardener or a seasoned plant lover, this DIY project adds charm, greenery, and purpose to any living space.


