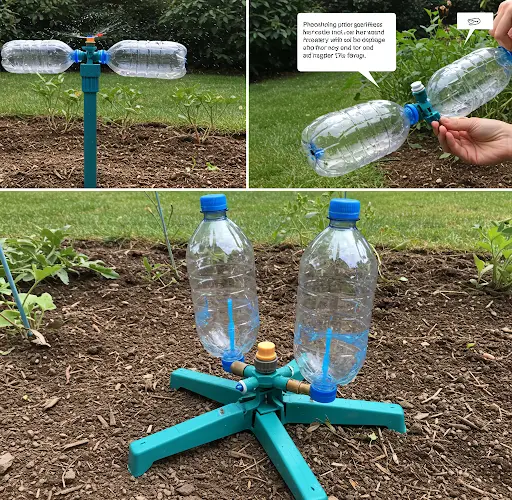
If you’re looking for an eco-friendly and cost-effective way to water your garden, a rotating water sprinkler made from recycled plastic bottles is a great DIY project. This simple sprinkler system can efficiently cover a wide area, ensuring your plants get a consistent and gentle watering. By using materials you already have at home, you can create a functioning sprinkler system that saves water, reduces waste, and promotes healthy plant growth.
In this article, we’ll guide you through the process of making your own rotating water sprinkler using only recycled plastic bottles.
materials you will need
To create a homemade rotating water sprinkler, you will need the following materials:
-
2 empty plastic bottles (2-liter soda bottles work well)
-
A small plastic tube or straw (about 6-8 inches long)
-
A pin, nail, or needle (for creating holes)
-
A utility knife or scissors
-
Strong tape or glue
-
A drill or heated nail (for making the center hole)
-
Water supply (hose or bucket)
step-by-step instructions
1. prepare the plastic bottles
Start by cleaning your plastic bottles thoroughly to remove any residue. Choose two 2-liter plastic bottles for best results, but you can use other sizes as long as they are sturdy and can hold water.
-
Bottle 1 (Main Sprinkler Body):
The first bottle will act as the main body of the sprinkler. Take the bottle and remove the label. Then, using a utility knife or scissors, carefully cut the bottom off, leaving just the neck and top part. This is where your water will flow from. -
Bottle 2 (Sprinkler Head):
The second bottle will act as the sprinkler head. You will need to cut it in half and create small holes to allow water to spray out.
2. create holes for water flow
Now that your bottles are cut, it’s time to make holes for the water to flow through.
-
Main Sprinkler Body:
Use a heated nail or drill to create a small hole at the bottom of the neck of the first bottle (the main sprinkler body). This hole will connect to the hose or water supply. Make sure the hole is just large enough to fit your plastic tube or straw snugly. -
Sprinkler Head (Second Bottle):
In the second bottle, use a pin or nail to make several small holes around the top of the bottle (the part that was originally the bottom). The holes should be evenly spaced and small enough that they will create a fine mist when the water flows through. You can adjust the size of the holes later to control the flow of water.
3. attach the sprinkler head to the main body
-
Connecting the Bottles:
Take the second bottle (the sprinkler head) and fit it over the neck of the first bottle (the main sprinkler body). You will likely need to trim the edges of the neck to make the fit secure. -
Secure the Bottles Together:
Once the two bottles are fitted together, use strong tape or glue to secure them. This will prevent any water from leaking out between the two bottles. If you use glue, make sure it is waterproof and strong enough to hold the bottles together when the sprinkler is in use.
4. attach the water supply
-
Connecting the Hose or Tube:
Take your plastic tube or straw and insert it into the hole at the bottom of the neck of the first bottle. This tube will connect to your water supply, whether it’s a hose or a bucket. You may need to use tape or glue to secure the tube in place so that it doesn’t come loose during use. -
Connect the Hose to the Tube:
If you’re using a hose, attach the end of the hose to the plastic tube, ensuring it’s tightly secured. If you’re using a bucket, just dip the tube into the water, making sure the tube is long enough to reach the bottom of the bucket.
5. test the sprinkler system
With everything connected, it’s time to test your rotating water sprinkler. Turn on the water supply, either by turning on the hose or filling the bucket. Water should begin to flow into the main body of the sprinkler, passing through the tube and out of the holes in the second bottle (the sprinkler head).
-
Adjust the Holes:
If the water is spraying too much or too little, adjust the size of the holes in the sprinkler head. You can use a larger pin or drill to make the holes slightly bigger if you want more water flow, or use a smaller pin for a gentler spray. -
Rotation:
To make the sprinkler rotate, you can gently push the sprinkler system to start turning. The water pressure and the weight of the bottle will help it rotate, spraying water in a circular motion across your garden.
additional tips for success
-
Adjust the Water Flow:
Depending on your garden size and watering needs, you can adjust the size of the holes in the second bottle or the water pressure to control how much water is dispensed. -
Stabilize the Sprinkler:
To keep the sprinkler from tipping over, place the base of the first bottle firmly in the soil or place small stones around it to weigh it down. -
Experiment with Designs:
Feel free to try different bottle sizes and configurations for different spray patterns. You can even try adding more bottles to increase the sprinkler’s coverage area.
benefits of using a homemade rotating sprinkler
-
Low Cost:
By reusing plastic bottles, you’re saving money on expensive irrigation equipment. -
Eco-Friendly:
This project helps reduce plastic waste by repurposing bottles into something useful for your garden. -
Easy to Make:
The system is quick to assemble with common household items, making it perfect for gardeners of all experience levels. -
Efficient Watering:
The rotating feature ensures that the water is spread evenly across the area, promoting healthy growth for your plants.
final thoughts
A rotating water sprinkler made from recycled plastic bottles is a clever, easy-to-make solution for watering your garden. It’s cost-effective, environmentally friendly, and customizable to suit your garden’s size and water needs. Plus, it’s a fun DIY project that anyone can try. Start recycling and enjoy the benefits of a homemade sprinkler today!


