Keeping a garden well-watered is crucial for healthy, thriving plants. However, watering by hand can be time-consuming and inconsistent. A great solution is to build an automatic drip irrigation system using gravity and a 100-liter container. This method is simple, affordable, energy-efficient, and provides a steady supply of water directly to plant roots.
Here’s a detailed step-by-step guide to help you set up your own system at home.
Materials you will need
-
One 100-liter plastic barrel or tank
-
16mm or 20mm main irrigation tubing
-
4mm microtubing for branches
-
Adjustable drip emitters (1–4 liters/hour)
-
A faucet or spigot fitting for the barrel
-
Hose connectors, tees, elbows, and end caps
-
Filter (recommended for cleaner water)
-
A timer (optional for full automation)
-
Drill and drill bits
-
Waterproof tape or rubber gaskets
-
Strong stand or platform (about 1 meter high)
These items are commonly available at garden centers, hardware stores, or online.
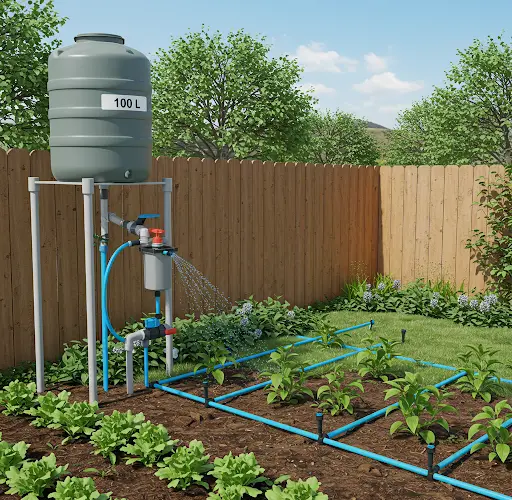
Step 1: prepare the 100-liter barrel
Start by thoroughly cleaning the barrel to remove any dirt or chemical residues. This step ensures that your plants will receive clean, safe water.
Next, drill a hole near the bottom of the barrel to install the faucet. Use waterproof tape or rubber gaskets to create a watertight seal. The faucet will control the water flow into your irrigation system.
Place the barrel on a sturdy elevated stand, at least one meter high. The height is important because gravity needs to create enough pressure to move water through the tubing.
Tip: make sure the stand is secure and strong enough to support the full weight of the barrel when filled with water.
Step 2: set up the main water line
Connect the main irrigation tubing to the faucet. This mainline will carry water across your garden beds or planting areas.
Lay out the tubing close to the rows of plants you want to irrigate. Use stakes or clips to keep the tubing in place. If your garden has a slope, use it to your advantage by placing the barrel at the highest point.
For best results, install a filter between the faucet and the mainline. This will prevent debris from clogging the emitters.
Step 3: create branch lines
Using a punch tool or sharp object, make small holes in the mainline where needed. Insert the 4mm microtubing into these holes.
Extend the microtubing toward the base of each plant. Secure the tubing using stakes to ensure it stays positioned at the roots, where the water is needed most.
Step 4: install the drip emitters
Attach adjustable drip emitters to the ends of each microtube. These emitters allow you to control the amount of water each plant receives.
Different plants have different watering needs:
-
Vegetables like tomatoes need deep, consistent watering.
-
Herbs and leafy greens prefer lighter, more frequent watering.
-
Fruit trees or shrubs need a slower, deeper soak.
By adjusting each emitter, you can customize the watering for each type of plant.
Step 5: test the system
Fill the barrel with water and open the faucet slightly to allow water into the tubing. Check for:
-
Even flow through the system
-
Steady dripping from each emitter
-
No leaks at connection points
Make adjustments as needed, such as tightening connections or repositioning emitters for better coverage.
If you added a timer, program it to open and close the valve at scheduled times. A timer can automate your watering completely, freeing you from daily checks.
Step 6: maintain your system
Maintenance is easy but important:
-
Check the filter regularly and clean it if needed.
-
Flush the mainline occasionally to remove sediment.
-
Inspect the emitters to make sure they are not clogged.
-
Monitor water levels in the barrel and refill it as necessary.
Regular maintenance ensures the system continues working efficiently and keeps your plants healthy.
benefits of a 100-liter gravity drip irrigation system
-
Water efficiency: delivers water directly to plant roots, minimizing waste.
-
Energy savings: no pumps or electricity required.
-
Cost-effective: much cheaper than commercial irrigation kits.
-
Healthy plants: steady moisture prevents stress and improves yields.
-
Simple scalability: easily expand the system by adding more lines and emitters.
Using a 100-liter gravity-fed system is ideal for small to medium gardens, home orchards, and raised beds. It’s especially helpful during dry seasons or for gardeners who want to save time and water.
final tips
-
Use rainwater to fill the barrel whenever possible for even more sustainable gardening.
-
Install additional barrels if you need to irrigate a larger area.
-
Protect the barrel from direct sun to reduce algae growth inside.
Setting up a homemade automatic drip irrigation system with a 100-liter container is a smart way to simplify your gardening routine and ensure your plants thrive with minimal effort.


