How to Make a Homemade and Automatic 200-Liter Gravity Drip Irrigation System
Efficient and consistent watering is essential for a productive garden. Whether you grow vegetables, fruits, or ornamental plants, a homemade 200-liter gravity drip irrigation system is a simple, cost-effective way to maintain healthy plants while saving time and water. This system uses gravity to deliver water directly to the roots, making it energy-efficient and easy to install.
Follow this guide to create your own automatic gravity-fed drip irrigation system at home.
Materials You Will Need
-
1 plastic 200-liter water barrel
-
Main irrigation tubing (16mm or 20mm diameter)
-
Microtubing (4mm diameter) for branch lines
-
Drip emitters (adjustable, 1–4 liters/hour)
-
Faucet or tap fitting for the barrel
-
Hose connectors, tees, elbows, and end caps
-
Filter (optional but recommended)
-
Timer (optional for full automation)
-
Drill and appropriate drill bits
-
Waterproof tape or rubber gaskets
-
Strong platform or stand (at least 1 meter high)
These materials are widely available at gardening centers, agricultural supply stores, and online retailers.
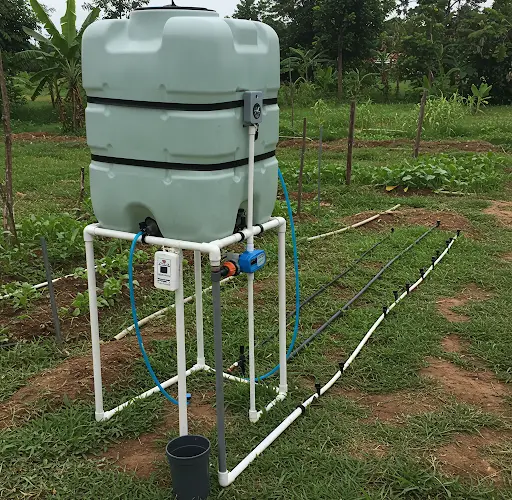
Step 1: Prepare the 200-Liter Barrel
Start by cleaning the barrel thoroughly to remove any residues. A clean water source ensures the longevity of your drip system and protects your plants from contamination.
Drill a hole near the bottom of the barrel to install a faucet or tap. Use a rubber gasket or sealant tape to make the connection watertight. The faucet will allow you to control the flow of water into your irrigation lines.
Next, elevate the barrel on a sturdy stand or platform, about one meter high. Elevating the barrel is essential for generating enough pressure to distribute water through the system.
Tip: Ensure the stand is strong enough to support the full weight of the barrel, which can be over 200 kilograms when filled with water.
Step 2: Set Up the Main Water Line
Attach the main irrigation tubing (16mm or 20mm) to the faucet on the barrel. This mainline will transport water from the barrel across your garden.
Lay out the tubing along your garden beds or near the rows of plants you intend to irrigate. Use clamps or stakes to secure the tubing in place and maintain a gentle slope to encourage smooth water flow.
If you are using a filter, install it between the faucet and the mainline to prevent clogging from debris.
Step 3: Create Branch Lines
Using a punch tool or a sharp object, make holes in the mainline where you need to branch off water to individual plants or groups of plants. Insert 4mm microtubing into each hole.
Direct the microtubing to the base of each plant. Stake it down if needed to ensure water is delivered directly to the roots, where it’s most effective.
Step 4: Attach the Drip Emitters
At the end of each piece of microtubing, install a drip emitter. Adjustable emitters are ideal because they allow you to customize the water output according to each plant’s needs.
For example:
-
Vegetable plants may need regular but moderate watering.
-
Fruit trees might require deep, less frequent watering.
-
Small garden plants may only need a low, steady drip.
Fine-tune each emitter to provide optimal water for every plant type in your garden.
Step 5: Test the System
Fill the barrel with water and open the faucet slowly. Observe the entire system to ensure:
-
Water flows evenly through the mainline and microtubing.
-
Each emitter drips water consistently.
-
There are no leaks or blockages.
Adjust the emitters or tubing placement as necessary to achieve uniform coverage across all plants.
Step 6: Automate With a Timer (Optional)
For maximum convenience, add a mechanical or battery-operated timer between the faucet and the mainline. This allows you to schedule watering sessions once or twice a day, depending on the needs of your plants and local weather conditions.
Automation is especially helpful during dry seasons or when you are away from home.
Step 7: Maintain the System
Routine maintenance ensures your irrigation system works efficiently over time:
-
Regularly clean or replace the filter.
-
Flush the mainline occasionally to remove sediment buildup.
-
Check emitters weekly for clogging or wear.
-
Inspect all tubing connections to make sure they remain secure and leak-free.
Keeping your system clean will extend its lifespan and ensure your plants continue receiving consistent water.
Benefits of a 200-Liter Gravity Drip Irrigation System
-
Water Efficiency: Direct water application minimizes waste and evaporation.
-
Energy Savings: No electricity or pumps are required.
-
Cost-Effective: Building the system at home is much cheaper than commercial setups.
-
Healthier Plants: Consistent watering improves plant health, boosts yields, and reduces disease risks.
-
Scalability: Easy to expand by adding more lines and emitters.
A homemade 200-liter gravity drip irrigation system is a practical investment for any home gardener, helping you grow healthier plants with less effort and conserving water at the same time.


