Peas are one of the easiest and most rewarding vegetables to grow at home. They don’t require much space, grow quickly, and produce sweet pods that are delicious fresh or cooked. With a bit of creativity, you can grow peas even in the smallest of spaces using hanging plastic bottles. This vertical garden method is perfect for balconies, patios, windowsills, or sunny walls—and it’s a fantastic way to reuse plastic bottles that would otherwise end up in the trash.
This guide will walk you through creating a hanging pea garden using recycled plastic bottles, allowing you to enjoy fresh produce while making the most of your space.
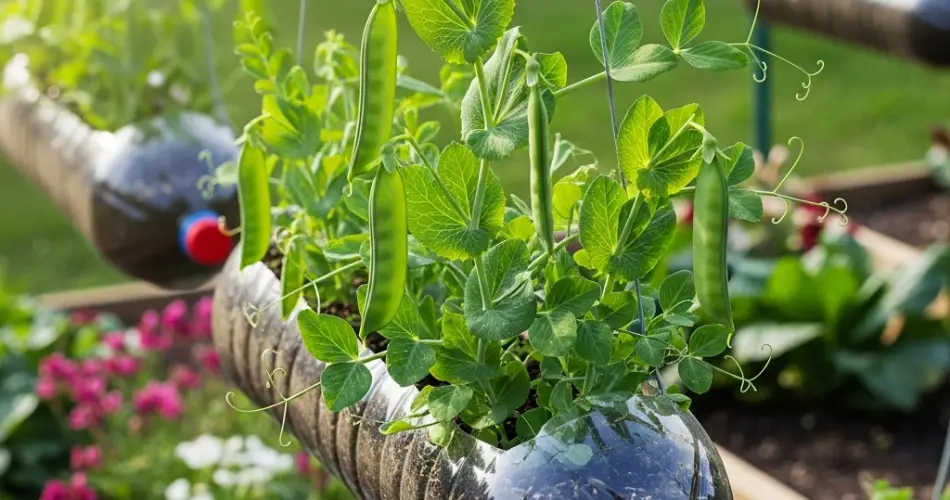
Why Use Bottles for Growing Peas?
Plastic bottles are lightweight, easy to handle, and readily available. When hung properly and prepared with drainage holes, they make excellent mini planters for peas and other lightweight vegetables. A hanging bottle setup not only saves floor space but also creates a vertical green curtain of vines that’s both functional and attractive.
Benefits include:
-
Minimal space required—ideal for urban gardening
-
Creative way to reuse plastic waste
-
Easy access for watering and harvesting
-
Better air circulation around plants
-
Decorative vertical greenery
What You’ll Need
-
Clean 1.5- or 2-liter plastic bottles
-
Scissors or a utility knife
-
Nail or screwdriver (for drainage holes)
-
Garden twine, rope, or wire for hanging
-
Potting soil mixed with compost
-
Pea seeds (sugar snap, snow, or dwarf shelling varieties)
-
A sunny location (at least 5–6 hours of light per day)
-
Optional: hooks or a wooden frame for hanging
Step-by-Step: Create Your Hanging Bottle Garden
1. Prepare the Bottles
Start by removing any labels and washing your bottles thoroughly. Let them dry before cutting.
-
Cut a large rectangular hole on one side of the bottle. This opening (around 4×6 inches) will serve as the planting area.
-
Use a heated nail or screwdriver to poke 4–6 small drainage holes in the bottom and lower sides of each bottle.
-
Poke two holes near the top on opposite sides to thread string or wire through for hanging.
2. Add Soil
Fill each bottle with potting soil mixed with compost. Leave about 1 inch of space from the top of the cut-out opening to prevent spills during watering. The soil should be light and well-draining to avoid waterlogging.
3. Sow the Seeds
Plant 2–3 pea seeds in each bottle, spaced a few inches apart. Press each seed about 1 inch deep and cover lightly with soil. Water gently to moisten the mix.
Hanging the Bottles
You can hang the bottles from a horizontal wooden rod, metal bar, wall brackets, or balcony railing. Ensure that the bottles hang securely and have enough space around them for airflow and sunlight.
Arrange the bottles in a staggered or vertical line so that plants in lower bottles still receive light. Leave enough space between bottles to allow pea vines to grow and spread.
Attach twine or garden netting to the setup so the vines have something to cling to as they grow. You can string lines from each bottle upward to a support beam or railing.
Caring for Your Hanging Pea Garden
-
Sunlight: Place your hanging garden in a spot that gets 5–6 hours of sunlight daily. Morning sun is ideal.
-
Watering: Water regularly, keeping the soil consistently moist but not soggy. Hanging bottles may dry out faster than ground containers, especially in warm weather.
-
Feeding: While peas don’t need heavy feeding, a light compost top-dressing or diluted organic liquid fertilizer once every few weeks can support healthy growth.
-
Supporting Vines: As the vines grow, help them find and attach to the nearest twine or trellis. Peas naturally cling with their tendrils but may need a gentle guide at first.
Flowering and Harvesting
Peas typically begin to flower within 4 to 6 weeks. Shortly after flowering, the pods will begin to form.
-
Snap Peas: Harvest when the pods are full but still tender and crisp.
-
Snow Peas: Pick while the pods are flat and just before the peas inside swell.
-
Shelling Peas: Wait until the pods are full and rounded, then shell and enjoy.
Use scissors or pinch the pods carefully to avoid damaging the plant. Frequent harvesting encourages more production.
Replanting and Maintenance
After the pea season ends:
-
Cut the vines at soil level to leave roots in the soil (they help fix nitrogen).
-
Remove old plant debris and compost it.
-
Refresh the soil with compost or potting mix before planting again.
-
Clean and inspect the bottles before reuse.
You can rotate with other compact crops like lettuce, radishes, or herbs to keep your vertical garden productive year-round.
Final Thoughts
Creating a hanging pea garden with bottles is a fun and sustainable way to grow fresh food in small spaces. Whether you live in an apartment, have a small balcony, or simply want to get creative with your gardening, this DIY approach is cost-effective, rewarding, and environmentally friendly. With just a few bottles and basic supplies, you can enjoy the taste of homegrown peas—right outside your window.


