Scallions, also known as green onions or spring onions, are a staple in many home kitchens. Their mild onion flavor enhances a variety of dishes, from soups and salads to stir-fries. One of the best things about scallions is how easy they are to grow—even without a garden. In fact, with just a few recycled plastic bottles, you can start a thriving scallion garden right on your balcony, windowsill, or backyard.
This guide will walk you through a simple and sustainable method for growing scallions in plastic bottles, turning household waste into a practical garden solution.
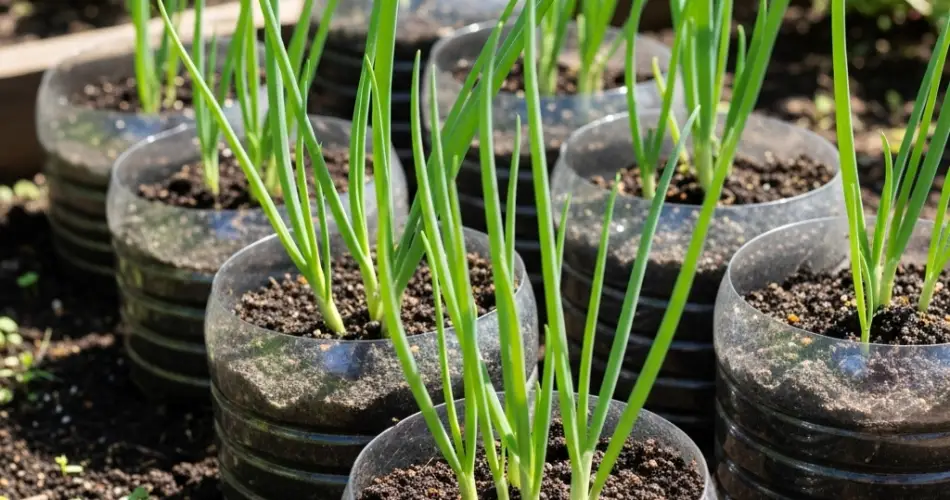
Why Grow Scallions in Plastic Bottles?
Reusing plastic bottles for planting is an eco-friendly way to reduce waste while creating compact garden setups. Scallions are perfect for this approach because they don’t require deep soil, and their slim structure makes them ideal for vertical or small-space gardening.
Benefits of this method include:
-
Space-saving design: Great for balconies, patios, or small homes.
-
Low cost: No need for expensive pots or raised beds.
-
Sustainable: Recycles bottles that would otherwise end up in the trash.
Materials You’ll Need
-
Empty plastic bottles (1.5L or 2L soda bottles work best)
-
Sharp scissors or a utility knife
-
A nail or screwdriver for poking holes
-
Potting soil or a mix of garden soil and compost
-
Scallion bulbs or leftover scallion roots from the kitchen
-
A tray or shallow container (to catch excess water if indoors)
Step-by-Step Instructions
1. Prepare the Bottles
Start by washing the plastic bottles thoroughly. Once dry, cut rectangular openings along the sides. These openings should be big enough to plant scallions and allow room for growth. If you plan to hang the bottles or stack them vertically, leave enough space between each opening.
Poke several small holes in the bottom of each bottle to allow drainage and prevent waterlogging.
2. Add Soil
Fill the bottles with a good-quality potting mix. A light, well-draining soil blend is ideal. You can enrich the mix with compost or a pinch of slow-release organic fertilizer to support healthy growth.
3. Plant the Scallions
If you have scallions with roots attached, you can regrow them easily. Simply trim off the green tops and place the white bulbous roots into the soil with the tip just barely visible. If using scallion sets or bulbs, space them out evenly and press them into the soil.
You can plant multiple scallions in a single bottle, spacing them about 2-3 cm apart to prevent overcrowding.
4. Water Gently
Moisten the soil immediately after planting. Use a spray bottle or watering can with a gentle spout to avoid disturbing the seedlings. Keep the soil consistently moist but not soggy.
If growing indoors, place a shallow container underneath to catch any excess water that drains out.
5. Provide Adequate Light
Scallions thrive in bright, indirect light. Place your bottle garden near a sunny window or on a balcony where it can receive at least 4–6 hours of light daily. If sunlight is limited, you can supplement with LED grow lights.
6. Watch Them Grow
In just a few days, you’ll notice fresh green shoots emerging from the soil. Scallions grow quickly and can be harvested within two to three weeks. For a continuous supply, stagger your planting every week or two.
Harvesting and Regrowing Tips
To harvest, use scissors to trim the green tops once they’re about 6–8 inches tall. Leave about an inch of the base intact so the plant can regrow. You can repeat this process several times before the plant’s growth slows down.
Keep the soil nourished and moist, and add a bit of organic liquid fertilizer every couple of weeks to keep your scallions vigorous.
Troubleshooting Common Issues
-
Yellowing leaves: Usually caused by overwatering or poor drainage. Ensure the bottle has proper holes at the bottom.
-
Slow growth: May indicate insufficient light or depleted nutrients. Move to a sunnier spot and add organic fertilizer.
-
Mold on soil surface: Improve airflow and reduce watering frequency.
Final Thoughts
This DIY scallion garden is a fantastic way to enjoy fresh herbs while recycling plastic waste. It’s a great project for beginners, children, or anyone wanting to grow their own food in a small space. With a few simple steps and minimal supplies, you can have a steady stream of scallions right at your fingertips.
Whether you add them to your favorite dishes or simply enjoy the satisfaction of homegrown produce, your plastic bottle scallion garden will bring a touch of green to your space—and your plate.


