Peas are one of the easiest vegetables to grow at home, and with a bit of creativity, you can cultivate them even in the smallest spaces. By using recycled plastic bottles, you can turn your balcony, window ledge, or patio into a productive mini garden. This method is not only space-saving and low-cost but also a great way to reduce plastic waste and bring more greenery into urban environments.
Whether you’re growing sugar snap, snow, or garden peas, plastic bottles provide a simple and efficient way to grow these tasty and nutritious pods from seed to harvest.
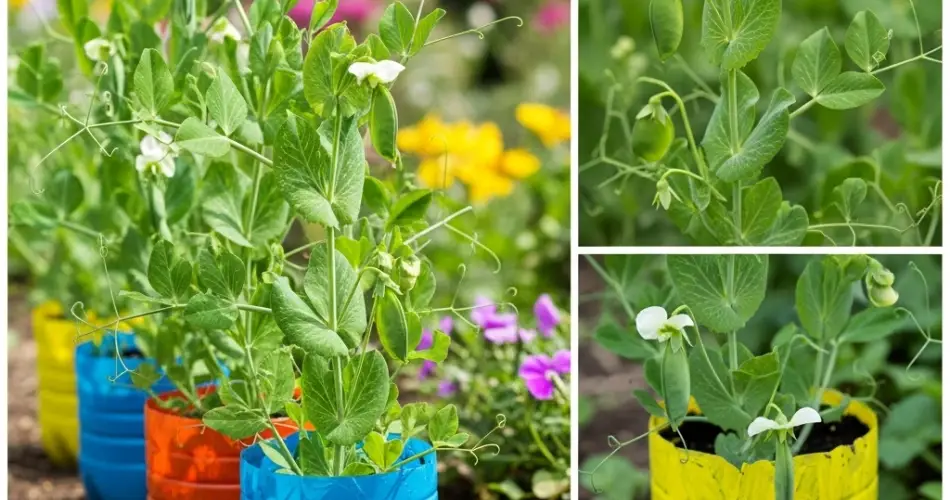
Why Use Plastic Bottles to Grow Peas?
Plastic bottles are abundant, lightweight, and easy to repurpose. They make great containers for vertical or horizontal growing setups, allowing you to plant without needing garden beds or large pots. Here are some key advantages:
-
Affordable and accessible: Most homes already have used bottles ready for reuse.
-
Compact: Ideal for tight spaces or vertical gardening.
-
Portable: Easy to move based on sunlight or weather conditions.
-
Eco-friendly: Recycles single-use plastics into functional garden tools.
This method is especially great for apartment dwellers or those looking to grow fresh produce without a traditional garden.
Materials You’ll Need
To grow peas in plastic bottles, gather the following:
-
1.5- to 2-liter plastic bottles (one per plant or per small group)
-
Sharp scissors or a utility knife
-
Heated nail or drill (for drainage holes)
-
Pea seeds (snap peas, snow peas, or shelling peas)
-
Potting soil or a homemade soil blend
-
Sticks, skewers, or twine for vine support
-
Rope or wire (if hanging)
-
A sunny location (4–6 hours of sunlight daily)
Preparing the Bottles
-
Clean the Bottles: Wash the bottles thoroughly and remove any labels or adhesive.
-
Cutting the Bottle: Depending on your space and preference, cut the bottle in one of the following ways:
-
Upright method: Cut off the top third to create a cup-like container.
-
Side-opening method: Cut a rectangular opening along one side of the bottle for horizontal use.
-
-
Drainage Holes: Poke 4–5 holes in the bottom of the bottle using a drill or a heated nail to allow for water drainage.
-
Hanging Option: If desired, make two holes near the top edge and attach string or wire for hanging.
-
Add Support: Insert a bamboo stick, wooden skewer, or wire trellis for climbing support if you’re growing pole pea varieties.
Choosing and Planting the Seeds
Peas grow best in cool weather, so choose your planting season carefully. Early spring and autumn are ideal in most climates.
-
Varieties:
-
Bush peas stay compact and don’t need much support.
-
Climbing or pole peas grow tall and need something to climb on.
-
Planting Steps:
-
Fill each bottle with potting mix, leaving about 2 inches from the top.
-
Sow 2–3 pea seeds about 1 inch deep into the soil. If using the side-opening method, evenly space the seeds across the length of the bottle.
-
Gently water to moisten the soil. Keep it consistently moist but not soggy during germination.
-
Place your containers in a sunny area—peas grow best with 4–6 hours of sunlight per day.
Caring for Your Peas
-
Watering: Check daily and water when the top inch of soil feels dry. In warm weather, bottle containers can dry out quickly.
-
Sunlight: Ensure your setup gets enough direct sunlight. Rotate containers if needed to maintain even light exposure.
-
Feeding: Use compost or a diluted organic fertilizer every 2–3 weeks once plants begin growing vigorously.
-
Supporting Vines: For pole peas, train the vines to climb by tying them gently to a stake or letting them wrap around nearby support.
-
Air Circulation: Avoid crowding your bottles. Good airflow helps prevent diseases like powdery mildew.
Pest Control
Keep an eye out for aphids and other pests. These can be controlled with homemade sprays like diluted neem oil or soapy water. Also, keep the surrounding area clean and remove any damaged leaves promptly.
Harvesting Peas
Peas are usually ready to harvest within 55–70 days, depending on the variety. Harvest when pods are full but still tender.
-
Snow peas: Pick when pods are flat but crisp.
-
Snap peas: Harvest when pods are swollen but still crisp.
-
Shelling peas: Wait until the peas inside have fully developed.
Use scissors or pinch gently with your fingers to avoid damaging the plant. Regular harvesting encourages more pod production.
Replanting and Rotation
After harvesting, remove spent plants and refresh the soil before planting a new batch. You can rotate with leafy greens or herbs to maintain soil balance in your container garden.
Final Thoughts
Growing peas in plastic bottles is a fun, sustainable, and space-efficient way to produce fresh vegetables at home. Whether you hang them from a balcony or line them up on a sunny shelf, these simple planters turn ordinary plastic waste into an extraordinary food-growing system.
With just a little care and the right setup, you’ll be harvesting sweet, crunchy peas in no time—no garden bed required.


