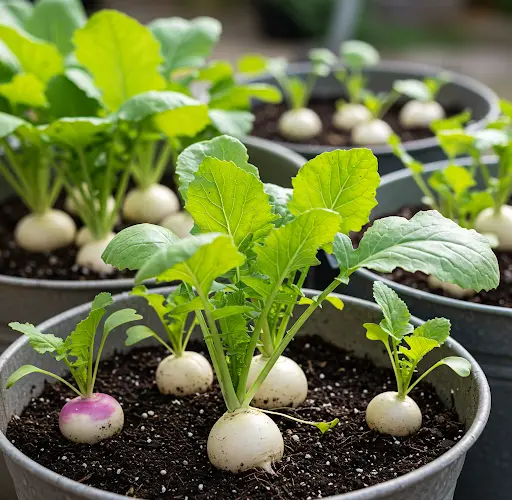
Turnips are a nutritious and versatile root vegetable, perfect for growing in containers, especially for those with limited garden space. Growing turnips from seed in containers such as planters or grow bags allows you to enjoy fresh, homegrown produce even if you don’t have a traditional garden. This guide will walk you through the process of growing turnips from seed, including tips on container gardening and care for these fast-growing vegetables.
Why Grow Turnips in Containers?
Growing turnips in containers has several benefits:
-
Space Efficiency – Turnips are ideal for small spaces such as balconies, patios, or terraces, and can be grown in various containers, including planters and grow bags.
-
Control over Soil Quality – Containers allow you to control the quality of the soil, ensuring your plants get the best possible nutrients.
-
Ease of Movement – Containers can be moved to follow the sun or to protect the plants from extreme weather conditions.
-
Faster Growth – Since containers tend to warm up faster than the ground, turnips can grow quickly and be ready to harvest in about 2–3 months.
What You’ll Need
Before getting started, gather the following supplies:
-
Turnip seeds (available at garden centers or online)
-
Containers (at least 12 inches in diameter and depth, such as planters or grow bags)
-
Well-draining potting mix
-
Compost (optional for added nutrients)
-
Fertilizer (optional)
-
Watering can or hose
-
A sunny location that receives at least 6 hours of direct sunlight per day
Step-by-Step Guide to Growing Turnips from Seed in Containers
1. Choose the Right Container
The key to growing turnips in containers is choosing the right size and type of container. Turnips have a relatively shallow root system, so a container that is at least 12 inches deep will provide enough space for root development.
-
Planters or grow bags are ideal for turnips. Choose a container that is wide enough to allow the plants to spread out and grow.
-
Ensure your container has drainage holes to allow excess water to escape, as standing water can lead to root rot.
2. Prepare the Soil
Turnips grow best in loamy, well-draining soil that is rich in nutrients. For container gardening, it’s best to use a good-quality potting mix that retains moisture but also drains well. You can enhance the potting mix by adding compost to provide extra nutrients.
-
Fill your container with the potting mix, leaving about 1 inch of space from the top to avoid water runoff during watering.
-
If desired, mix in a balanced fertilizer according to the instructions to give your turnips a healthy start.
3. Plant the Turnip Seeds
Turnips are easy to grow from seed, and they don’t require a lot of preparation:
-
Sow the seeds about 1/2 inch deep into the container. You can plant them in rows, spacing them about 2–4 inches apart. If you are using a smaller container, you may want to plant fewer seeds to avoid overcrowding.
-
After planting, gently cover the seeds with a thin layer of soil and water the container gently to settle the soil.
Turnip seeds will typically germinate in 7–10 days. Keep the soil consistently moist, but not soggy, during this period.
4. Provide Sunlight and Temperature
Turnips thrive in full sun and need at least 6 hours of sunlight per day to grow properly. Ensure your container is placed in a spot that gets plenty of natural light.
-
The ideal temperature for growing turnips is between 50–75°F. If you’re growing turnips in a warmer climate, try to plant them in the cooler months to avoid excessive heat, which can cause the plants to bolt (flower prematurely).
-
If growing indoors, place your container near a sunny window or under grow lights to provide adequate lighting.
5. Watering and Fertilizing
Consistent moisture is key to healthy turnip growth. Be sure to water your turnips regularly, keeping the soil moist but not soaked.
-
Water the plants deeply whenever the top of the soil feels dry to the touch. Be careful not to overwater, as too much moisture can cause the roots to rot.
-
Fertilize every 4–6 weeks using a balanced, water-soluble fertilizer or compost. This will help the plants grow strong and healthy, and it will encourage root development.
6. Thinning and Maintaining Your Turnip Plants
Once your turnip seedlings have grown large enough (about 2 inches tall), it’s time to thin them out. Thinning helps prevent overcrowding, allowing the remaining plants more space to grow large and healthy.
-
Thin the seedlings by cutting the weaker plants at the base, leaving about 4–6 inches between each plant. This will allow the roots to develop properly and result in larger, healthier turnips.
-
Regularly check your plants for pests like aphids or slugs, which can damage the leaves and roots. If you notice any pests, remove them by hand or use organic pest control methods.
7. Harvesting the Turnips
Turnips are generally ready to harvest about 2–3 months after planting, depending on the variety. You can harvest the turnips when the roots are about 2–4 inches in diameter, but larger roots can also be harvested.
-
To harvest, gently pull the turnips from the soil. Use a small hand fork or spade to loosen the soil around the roots if necessary.
-
If you leave turnips in the ground for too long, they may become tough or woody, so it’s important to harvest at the right time for the best flavor and texture.
Conclusion
Growing turnips from seed in containers, such as planters or grow bags, is a great way to enjoy this nutritious root vegetable at home. With the right container, soil, and care, turnips will thrive in small spaces, providing you with a bountiful harvest in just a few months. Follow these steps for planting, watering, thinning, and harvesting, and you’ll be enjoying fresh, homegrown turnips in no time.


