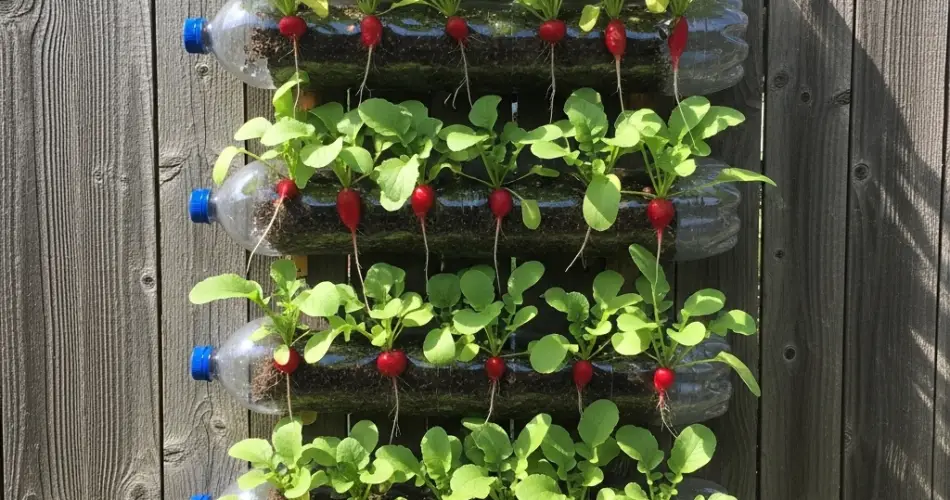
Radishes are among the fastest and easiest vegetables to grow, making them perfect for gardeners of all levels. What’s even better? They can be cultivated vertically using recycled plastic bottles. This space-saving technique is ideal for those with limited garden space, such as apartment dwellers or urban gardeners. By using plastic bottles mounted on walls or hung in vertical rows, you can grow crisp, colorful radishes in even the tiniest areas.
This guide will walk you through the process of growing radishes vertically—from preparing your bottles to harvesting fresh produce in as little as four weeks.
Why Grow Radishes Vertically?
Growing radishes in plastic bottles not only utilizes vertical space efficiently, but also offers several unique advantages:
-
Space-saving: Perfect for balconies, patios, or fences with no ground space.
-
Low cost: Uses recycled plastic bottles and minimal gardening materials.
-
Quick results: Radishes mature in as little as 25 to 30 days.
-
Cleaner roots: Elevated growth prevents soil-borne diseases and pest attacks.
-
Eco-friendly: Gives a second life to used plastic bottles, reducing household waste.
Because radishes have shallow roots and compact growth, they’re ideally suited for container and vertical gardening.
Materials Needed
To set up your vertical radish garden, you’ll need:
-
Clean plastic bottles (1.5L to 2L recommended)
-
Utility knife or scissors
-
Potting mix
-
Compost or organic fertilizer
-
Radish seeds
-
Rope, wire, or hooks for hanging
-
Nail or heated metal rod (for drainage holes)
Choose sturdy plastic bottles with enough space for the root to develop, as this will directly impact radish size and quality.
Preparing the Bottles
-
Clean and dry: Remove labels and rinse the bottles thoroughly.
-
Cut a planting window: Lay the bottle horizontally and cut a rectangular slit (about 4–5 inches long and 2–3 inches wide) on one side for sowing and growing the radish.
-
Make drainage holes: Poke several small holes at the bottom using a heated nail or rod to ensure proper drainage.
-
Create hanging holes: Puncture two holes on the top sides of the bottle (opposite the planting window) for threading rope or wire for hanging.
These bottles can be hung in rows on a wall, attached to a wooden board, or mounted on a fence for easy access and attractive presentation.
Soil Mix and Fertilizer
Radishes prefer loose, well-draining soil that allows roots to expand easily.
Recommended soil mix:
-
2 parts high-quality potting soil
-
1 part compost or well-rotted manure
-
Optional: Add a bit of sand or perlite to enhance aeration
Mix in a light dose of balanced, slow-release fertilizer (such as 10-10-10) to support healthy growth. Avoid high-nitrogen fertilizers, as these may encourage leafy growth over root development.
Sowing Radish Seeds
-
Fill each bottle with the prepared soil mix, leaving about 1 inch of space at the top.
-
Sow seeds directly into the soil, spacing them at least 1 to 1.5 inches apart.
-
Cover lightly with a thin layer of soil and gently water to settle.
-
Thin seedlings once they sprout, keeping the strongest one per hole or opening.
Radish seeds typically germinate within 3 to 7 days, depending on temperature and moisture levels.
Sunlight and Watering
Radishes thrive in full sun, so hang your bottles in a location that receives:
-
4–6 hours of direct sunlight daily
-
Partial shade in hotter climates to prevent early bolting
Keep the soil consistently moist, especially during the first two weeks. Avoid waterlogging, which can cause rot, and never let the soil completely dry out.
Because plastic bottles retain less moisture than ground beds, you may need to water more frequently—ideally once a day or every other day depending on the weather.
Maintenance Tips
-
Rotate positions every few days if your setup allows, to ensure even sunlight exposure.
-
Remove weeds or competing sprouts to allow each radish to grow to full size.
-
Watch for pests such as aphids or flea beetles. These are uncommon in bottle gardens but can be treated with neem oil or insecticidal soap if necessary.
-
Avoid overcrowding to ensure good airflow and prevent fungal issues.
Radishes grow quickly, so it’s essential to monitor their progress closely. If they stay in the soil too long after maturing, they can become woody or overly spicy.
Harvesting Radishes
Radishes are ready to harvest 3–5 weeks after sowing, depending on the variety. To check if they’re ready, gently feel the root through the planting window. If the bulb is about 1 inch in diameter and firm, it’s time to harvest.
To harvest:
-
Loosen the soil gently with your fingers.
-
Pull the plant out slowly by the base of the leaves.
-
Shake off excess soil and rinse the root before use.
You can enjoy radishes raw in salads, pickled, or lightly roasted. Even the green tops are edible—great for pestos and stir-fries.
Final Thoughts
Vertical gardening with plastic bottles is a clever, affordable way to grow radishes in compact spaces. It’s an excellent solution for gardeners without traditional beds or yards, and it’s a fun, sustainable project for families and schools. With minimal materials and fast-growing results, this method delivers crisp, homegrown radishes in under a month. Give it a try, and enjoy fresh harvests straight from your vertical wall garden.


