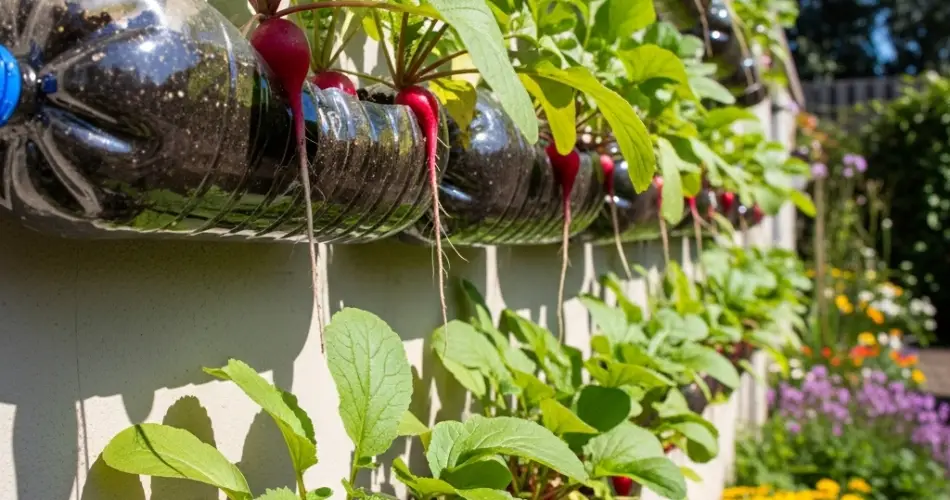
If you think root vegetables like radishes require deep soil beds, think again. With a little creativity, you can grow crisp, flavorful radishes in recycled plastic bottles mounted on a wall. This space-saving and sustainable gardening method is ideal for those with limited room or urban settings, and it transforms discarded plastic into functional, productive containers.
Fast-growing and easy to maintain, radishes are one of the best vegetables for beginners and experienced gardeners alike. In just a few weeks, you can go from seed to harvest—all from a vertical garden made of plastic bottles.
Why Grow Radishes in Bottles?
Growing radishes in wall-mounted bottles offers several practical and eco-friendly benefits:
-
Space-efficient – Perfect for balconies, fences, or walls in small spaces
-
Quick harvest – Most radish varieties mature in just 3–5 weeks
-
Low maintenance – Requires minimal fertilization and simple watering
-
Waste reduction – Recycles plastic bottles into productive garden tools
-
Kid-friendly – A fun and educational gardening project for families
-
Clean harvesting – No muddy garden beds to dig through
By growing radishes vertically, you make the most of your available space while producing healthy, homegrown food.
Choosing the Right Radish Varieties
Radishes come in many shapes, colors, and sizes. For bottle gardening, choose varieties that produce small to medium-sized roots and mature quickly. Ideal options include:
-
Cherry Belle – Classic round, red radish that matures in about 22 days
-
French Breakfast – Cylindrical, mild radish with pink and white coloring
-
White Icicle – Slender white roots with a crisp texture
-
Early Scarlet Globe – Round and tender with a peppery bite
-
Sparkler – Attractive red radish with white tips
Avoid large or long-rooted varieties like Daikon, which require deeper soil.
Materials Needed
Before starting, gather the following items:
-
1.5–2-liter plastic bottles (with caps)
-
A sharp knife or scissors
-
Lightweight potting mix (with compost and perlite)
-
Radish seeds
-
Watering can or spray bottle
-
Screws, string, or hooks for wall mounting
-
Optional: small stones for drainage
Step 1: Prepare the Bottles
-
Clean and cut: Wash each bottle thoroughly. Cut out a rectangular window on one side to create the planting area. Leave the rest of the bottle intact.
-
Drainage holes: Use a knife or nail to poke several small holes in the bottom and cap of the bottle to allow excess water to escape.
-
Mounting holes: Make small holes near the top and bottom of each bottle to hang or attach it to a wall or frame using string, wire, or screws.
-
Optional: Add a thin layer of pebbles or gravel at the bottom for extra drainage.
Step 2: Fill with Soil
Use a light, well-draining potting mix. A good blend includes compost for nutrients and perlite or coco coir to retain moisture and keep the soil loose for root development.
Fill each bottle up to just below the cut window.
Step 3: Plant the Radish Seeds
Sow 2–3 seeds in each bottle, spacing them about 2 inches apart. Plant seeds about ½ inch deep and cover lightly with soil.
Water gently to moisten the soil. Once the seedlings have developed their first set of true leaves, thin out the weaker ones, leaving the strongest seedling in each space to avoid overcrowding.
Step 4: Placement and Sunlight
Mount the bottles on a wall, wooden pallet, or metal frame in a location that receives 4–6 hours of sunlight daily. An east- or south-facing wall is ideal.
Ensure there is enough space between bottles to allow airflow and easy access for watering and harvesting.
Step 5: Watering and Feeding
Radishes grow quickly and need consistent moisture. Check the soil daily—if the top inch feels dry, it’s time to water. Avoid overwatering, as soggy soil can cause roots to rot.
Fertilizing is usually not necessary if compost is part of your soil mix. If desired, use a diluted organic liquid fertilizer once during the growing cycle.
Step 6: Harvesting
Radishes are ready to harvest 3–5 weeks after planting, depending on the variety. Check the size of the roots by gently feeling the top of the bulb just beneath the soil surface.
Harvest when roots are about 1 inch in diameter for the best texture and flavor. Pull them gently from the soil, clean them, and enjoy them fresh in salads, sandwiches, or as a crunchy snack.
Greens can also be eaten—add them to soups or stir-fries for extra nutrition.
Step 7: Replant for a Continuous Harvest
Once harvested, refresh the soil in your bottle or add a bit of compost, then sow a new batch of seeds. Radishes grow well in succession, so you can enjoy multiple harvests throughout the growing season.
Final Thoughts
Growing radishes in wall-mounted plastic bottles is an innovative and accessible way to enjoy fresh root vegetables, even in the smallest spaces. With minimal effort and just a few materials, you can turn your fence or wall into a productive vertical garden.
Whether you’re a beginner gardener, living in a compact apartment, or just looking for a creative, eco-conscious gardening project, radishes in bottles are a fast and satisfying way to grow your own food—one bottle at a time.


