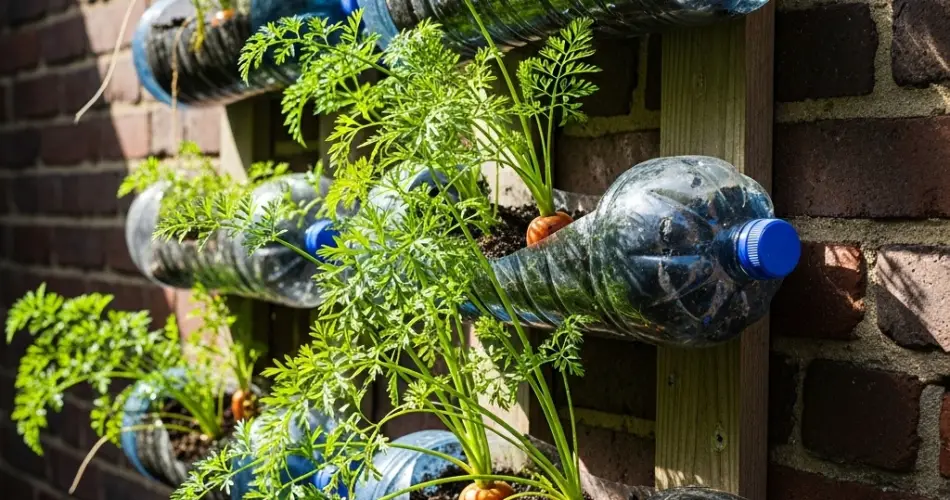
Carrots are typically associated with deep garden beds and rows of tilled soil, but they can actually thrive in a vertical setup using recycled plastic bottles. Growing carrots on a wall is a space-saving, sustainable gardening method perfect for urban environments, small patios, and balconies. With just a few tools and materials, you can create a productive vertical garden and enjoy fresh, crunchy carrots straight from your wall.
This method is especially effective for those looking to reduce waste and grow food in unconventional spaces. It also turns everyday plastic bottles into functional planters, combining practicality with eco-friendliness.
Why Grow Carrots Vertically in Bottles?
There are many reasons to grow carrots vertically using bottles:
-
Space-saving – Ideal for balconies, fences, and narrow spaces
-
Reuses waste – Gives plastic bottles a second life as planters
-
Clean and organized – Keeps your crops off the ground and easily accessible
-
Portable and modular – Move or expand your garden as needed
-
Reduced pests and weeds – Less exposure to soil-dwelling pests and weeds
-
Educational – A great way to teach kids about gardening and sustainability
With good planning and the right carrot variety, you’ll be harvesting fresh roots in no time.
Best Carrot Varieties for Bottle Gardening
Carrots come in many shapes and sizes. For bottle gardening, choose short or round varieties that don’t need deep soil. These include:
-
Parisian (Paris Market) – Small, round carrots perfect for shallow containers
-
Thumbelina – Golf-ball-sized, sweet carrots that grow quickly
-
Little Finger – Slim, 3- to 4-inch roots that are perfect for tighter spaces
-
Nantes – Cylindrical, blunt-tipped carrots that grow well in containers
-
Tonda di Parigi – A round, Italian heirloom variety that thrives in shallow soil
Avoid long-rooted types like Danvers or Imperator, as they need much deeper soil.
Materials Needed
Before you begin, gather the following supplies:
-
Clean 1.5- or 2-liter plastic bottles (with caps)
-
Sharp utility knife or scissors
-
Lightweight potting mix with compost
-
Perlite or coco coir (for drainage)
-
Carrot seeds
-
Wall or fence for mounting
-
Screws, nails, or string to hang bottles
-
Small stones or gravel (optional)
Step 1: Prepare the Bottles
-
Clean the bottles thoroughly and remove any labels.
-
Cut an opening on one side of the bottle—around 4–6 inches wide—to create a planting pocket.
-
Add drainage holes – Poke several small holes in the bottom and near the cap to allow excess water to escape.
-
Create mounting holes at the top and bottom of the bottle so you can string or screw the bottles to a wall, trellis, or wooden frame.
Optional: Add a few stones or gravel at the base of each bottle for added drainage.
Step 2: Add Soil and Plant Seeds
Fill each bottle with a well-draining potting mix that includes compost and either perlite or coco coir for aeration. Carrots need loose, non-compacted soil to grow straight and healthy.
Sow seeds about ¼ inch deep and 1 inch apart. You can plant 3–4 seeds per bottle, depending on the space available. Once seedlings appear and have developed true leaves, thin them out so the strongest one or two remain.
Step 3: Mount the Bottles on a Wall
Choose a sunny spot that gets at least 6 hours of sunlight per day. Use screws, hooks, or strong wire to attach your bottles vertically to a fence, pallet, or wall frame.
Leave enough space between bottles to allow air circulation and sunlight for each plant. You can arrange them in a vertical row, staggered pattern, or zigzag style—whatever works best for your available space.
Step 4: Watering and Care
Carrots need consistently moist soil to grow well, especially in small containers that dry out quickly. Check the moisture level daily and water when the top inch feels dry.
Be careful not to overwater—good drainage is essential. Avoid splashing water on leaves to reduce the risk of fungal diseases.
Fertilizing isn’t always necessary if you start with compost-rich soil, but you can feed the plants with a diluted organic liquid fertilizer once or twice during their growth period.
Step 5: Harvesting
Most small or round carrot varieties are ready to harvest in 60–75 days, depending on the type. Gently pull up a few carrots to check their size once the tops are about ½ to 1 inch wide.
Harvesting is easy in bottles—just tilt the container slightly, loosen the soil if needed, and pull the roots out by hand.
Don’t forget to use the carrot greens, which are edible and can be added to pesto, soups, or salads.
Step 6: Replant for a Continuous Supply
Once you harvest your carrots, you can reuse the same bottle planters. Refresh the soil by mixing in a bit of compost, then plant a new round of seeds. This staggered planting technique ensures a steady supply of fresh carrots throughout the season.
Final Thoughts
Growing carrots on a wall using plastic bottles is a smart and creative way to make use of vertical space. It’s an excellent option for city dwellers, balcony gardeners, or anyone looking to reduce waste and grow their own food in a compact area.
With a little care and the right setup, you can enjoy sweet, crunchy carrots grown entirely off the ground—proof that even root vegetables can thrive in a vertical garden.


