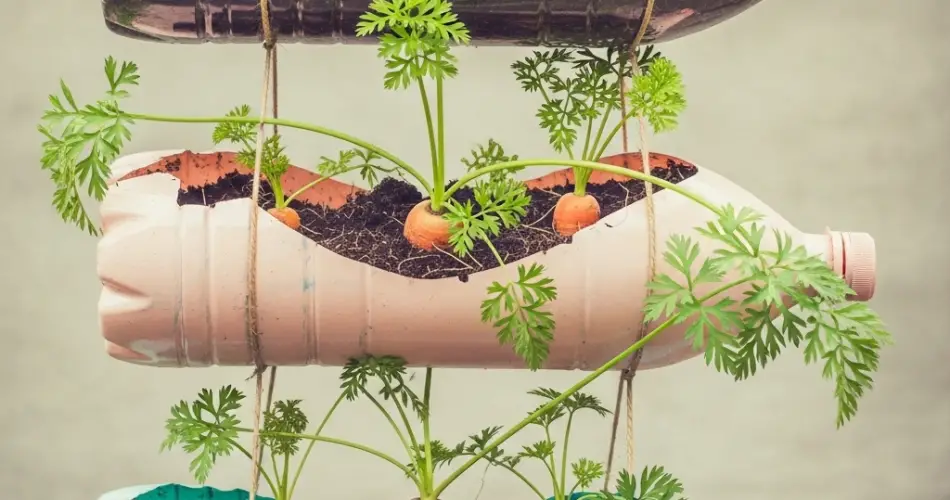
Carrots are one of the most rewarding root vegetables to grow at home, known for their sweet crunch and versatility in the kitchen. While many people assume they need deep garden beds to grow properly, carrots can actually thrive in hanging plastic bottles with the right setup. This innovative, space-saving method is ideal for urban gardeners, apartment dwellers, or anyone looking to maximize their growing area with minimal ground space.
With a few recycled plastic bottles, quality soil, and basic gardening care, you can harvest homegrown carrots straight from a vertical garden hanging on your wall or fence.
Why Grow Carrots in Hanging Bottles?
Using plastic bottles as vertical planters offers several advantages:
-
Space-efficient: Perfect for balconies, patios, or vertical walls.
-
Eco-friendly: Repurposes plastic waste into productive garden containers.
-
Cleaner crops: Elevated containers reduce soil splash and pests.
-
Improved drainage: Hanging bottles allow excess water to escape easily.
-
Accessibility: Great for small-scale gardening or educational projects.
Carrots, especially smaller or round varieties, are well-suited for container growing as long as they have the depth to develop their taproots.
What You’ll Need
To get started, gather the following materials:
-
1.5 to 2-liter plastic bottles (clear or colored)
-
Sharp scissors or a utility knife
-
High-quality potting mix
-
Compost or organic fertilizer
-
Carrot seeds (short or round varieties recommended)
-
Rope, twine, or hooks (for mounting or hanging)
-
A heated nail or tool to poke drainage holes
Choosing the Right Carrot Varieties
For best results in a hanging bottle garden, choose carrot types that are compact and fast-maturing.
Recommended varieties:
-
Parisian – Small, round carrots perfect for shallow containers.
-
Thumbelina – A miniature variety with a sweet taste and spherical shape.
-
Little Finger – Short and slim carrots that thrive in limited space.
-
Oxheart – Heart-shaped roots that do well in wide but shallow containers.
Avoid long-rooted varieties unless you’re working with extra-large, vertical containers.
Preparing the Bottles
-
Clean the bottles: Rinse thoroughly and remove labels.
-
Cut planting windows: Lay each bottle horizontally and cut a rectangular opening about 4 inches long and 2 inches wide on one side. This is where your carrots will grow.
-
Create drainage holes: Poke 4–6 holes in the bottom of each bottle using a heated nail or screwdriver.
-
Add hanging holes: Make two small holes near the bottle’s neck and base (opposite the planting slit) for attaching string, rope, or wire for hanging.
Mount bottles on a sunny wall, wooden frame, or metal rack using hooks or sturdy nails.
Soil and Fertilizer
Carrots need loose, well-draining soil free of stones or compact clumps. The smoother the soil, the straighter and more tender your carrots will be.
Ideal mix:
-
2 parts potting soil
-
1 part compost or aged manure
-
Optional: Add sand or perlite to improve drainage and texture
Avoid high-nitrogen fertilizers, which can promote excessive leaf growth and result in small or forked roots. Use a balanced organic fertilizer or compost mixed into the soil before sowing.
Planting Carrot Seeds
-
Fill each bottle with your prepared soil mix, leaving about 1 inch of space at the top.
-
Sow seeds directly into the planting window, spacing them about 1 inch apart.
-
Cover lightly with a thin layer of soil (no more than 1/4 inch deep).
-
Water gently, making sure the soil is moist but not waterlogged.
Carrot seeds can take 7–14 days to germinate. Keep the soil consistently moist during this period to ensure good sprouting.
Light and Water Requirements
-
Sunlight: Carrots need at least 6 hours of direct sunlight each day. South-facing walls are ideal for hanging gardens.
-
Watering: Keep the soil evenly moist, especially during early root formation. Water at the base of the bottle and avoid over-saturating.
-
Mulching: Add a thin layer of mulch (like dried leaves or straw) to retain moisture and prevent crusting.
Because plastic bottles can dry out quickly, especially when exposed to direct sun, check moisture levels daily and adjust watering as needed.
Care and Maintenance
-
Thin seedlings once they grow to about 2 inches tall. Leave about 1 to 1.5 inches between plants to give roots space to expand.
-
Check for pests like aphids or root maggots, although these are less common in bottle gardens.
-
Avoid disturbing roots as they develop. Once thinned, let the remaining carrots grow undisturbed until harvest.
Harvesting Carrots
Carrots are usually ready to harvest 60–75 days after planting, depending on the variety. You’ll know they’re ready when:
-
The shoulders of the carrots are visible at the soil surface.
-
The diameter is around 1/2 to 1 inch, depending on the type.
-
The roots feel firm and full.
To harvest, gently loosen the soil around each root and pull the carrot out by the base of the greens. Brush off the soil and rinse before storing or using.
Final Thoughts
Growing carrots in hanging plastic bottles is a practical, low-cost gardening method that works even in the smallest spaces. With just a few recycled materials, good soil, and sunlight, you can enjoy fresh, homegrown carrots that are crisp, sweet, and full of flavor. Whether you’re a beginner gardener or looking for a fun project, this vertical growing technique offers big results with a small footprint.


