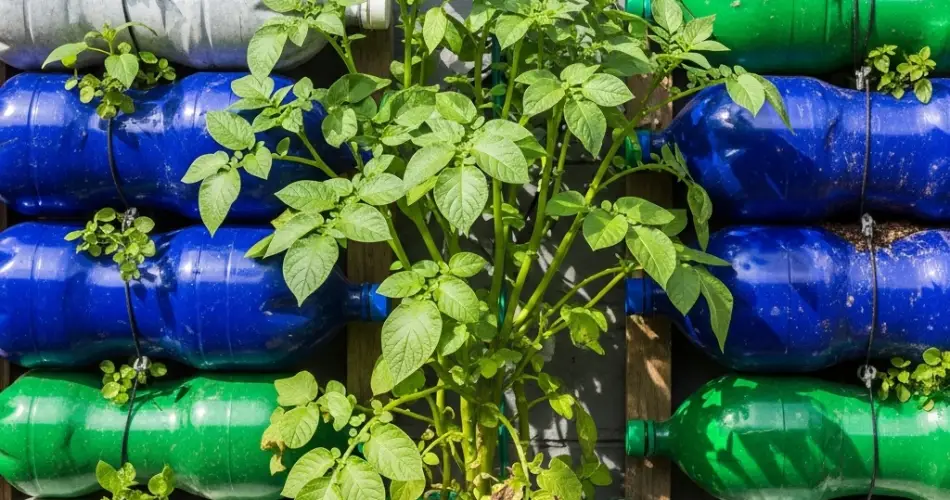
If you thought potatoes could only be grown in the ground or large containers, think again. With a bit of creativity, you can grow potatoes vertically using recycled plastic bottles mounted on a wall. This space-saving method transforms a bare wall into a productive mini potato garden—perfect for urban spaces, balconies, or anyone short on horizontal space.
Growing potatoes in wall-mounted bottles is not only possible, but also fun, educational, and sustainable. It makes use of items you’d otherwise throw away, and it provides fresh, homegrown potatoes even if you don’t have a backyard.
Why Grow Potatoes in Bottles on a Wall?
This vertical method of growing potatoes has many benefits:
-
Maximizes vertical space – Great for urban living or compact patios
-
Eco-friendly – Reuses plastic bottles that would otherwise end up as waste
-
Portable and modular – Easily move or expand your vertical potato garden
-
Reduces soil-borne issues – Less exposure to pests and rot compared to in-ground planting
-
Visual appeal – Turns a blank wall into a living, productive feature
-
Fun for kids and beginners – Easy to set up and rewarding to harvest
Though potatoes typically grow underground, they’re surprisingly adaptable to creative setups like vertical bottle gardening.
What Kind of Potatoes Can You Grow?
Small or early-maturing varieties work best in vertical bottle systems. Look for types that produce compact tubers and don’t require deep soil. Some ideal varieties include:
-
Yukon Gold – A favorite for its buttery flavor and early harvest
-
Red Pontiac – Small red potatoes that grow well in containers
-
Fingerlings – Slender and perfect for shallow growing spaces
-
Norland – Early red-skinned variety, well-suited for small setups
-
Charlotte or other salad potatoes – Small, tender, and quick to harvest
Avoid large, late-season varieties that need deep root zones.
Materials You’ll Need
To get started, gather the following supplies:
-
1.5–2-liter plastic bottles (with caps)
-
A sharp knife or scissors
-
Quality potting mix with compost
-
Small seed potatoes (cut into pieces with at least one “eye” each)
-
Wall, trellis, or pallet for mounting
-
String, wire, or screws for attaching bottles
-
Optional: straw or shredded leaves for mulching
Step 1: Prepare the Bottles
-
Clean each bottle thoroughly and remove the label.
-
Cut an opening on one side, approximately 4–6 inches wide. This will be your planting pocket.
-
Poke drainage holes in the bottom and near the cap to prevent waterlogging.
-
Make holes for mounting at the top and bottom, allowing you to hang or secure the bottle to a wall or frame.
Optionally, add a handful of gravel at the bottom of each bottle to improve drainage.
Step 2: Planting Your Seed Potatoes
Fill the bottom of the bottle with 2–3 inches of soil mix. Add a piece of seed potato with the eye facing upward, then cover with more soil, leaving about 2 inches of space at the top.
As the potato grows, you can gently mound more soil around the base of the plant to encourage tuber formation along the stem—though the limited bottle depth means you may only mound once.
Each bottle can typically support one plant. For continuous harvesting, stagger your plantings every 2–3 weeks.
Step 3: Mount the Bottles
Attach the prepared bottles to a wall, fence, wooden panel, or even a balcony railing. Make sure the structure can support the weight of the filled bottles.
Choose a location that gets at least 6 hours of sunlight daily. Potatoes love full sun and warm soil.
Arrange the bottles vertically or in staggered rows to allow light and airflow to reach each plant.
Step 4: Watering and Feeding
Bottles dry out faster than ground soil, so monitor moisture levels frequently. Water when the top inch of soil feels dry, and ensure excess water drains out completely.
Feed with a balanced or low-nitrogen fertilizer once the plants reach about 6 inches tall. Avoid overfeeding with nitrogen, which causes lush leaves but fewer tubers.
Step 5: Monitor Growth and Mulch
As your potato plants grow, gently add a layer of soil or mulch (like straw or coco coir) to protect developing tubers from sunlight, which can turn them green and toxic.
You may see the plant’s green shoots and flowers before harvest time. Let the leaves grow, as this helps photosynthesis and overall growth.
Step 6: Harvesting Your Wall-Grown Potatoes
Potatoes are usually ready to harvest 70–90 days after planting, depending on the variety. When the leaves begin to yellow and die back, it’s a sign that tubers have matured.
To harvest, gently tilt or unfasten the bottle, remove the soil, and pull out your homegrown potatoes. You may be surprised how many can grow in a single container!
Wash and store in a cool, dry place—or cook them fresh for unbeatable flavor.
Final Thoughts
Yes, you absolutely can grow potatoes in plastic bottles on a wall—and it’s more practical than it sounds. This technique combines vertical gardening with upcycled materials for a sustainable and efficient way to grow food at home.
Whether you’re limited by space or just love the idea of turning your walls into a mini farm, wall-mounted bottle gardens are a smart and productive choice. With care and patience, you’ll soon be harvesting your own batch of delicious potatoes—no traditional garden needed.


