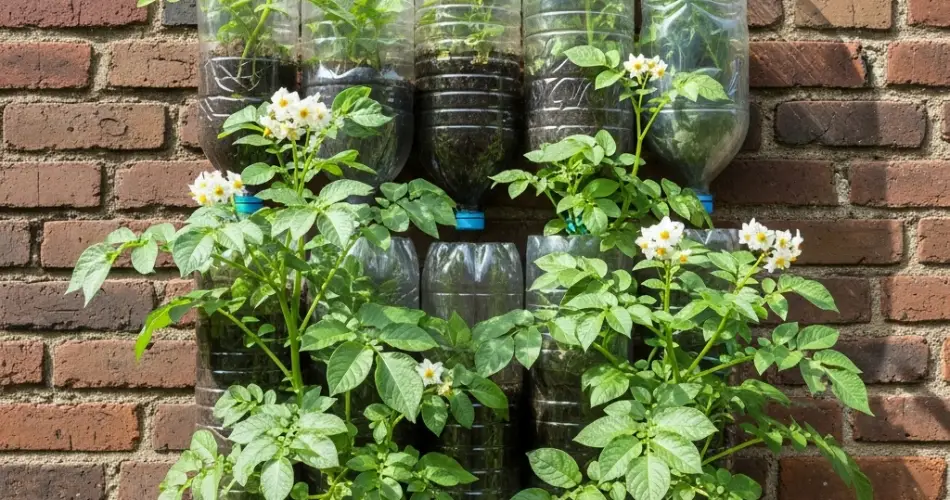
Potatoes are a staple crop in many homes and kitchens, loved for their versatility and hearty nature. Traditionally grown in mounds or barrels, potatoes can also thrive in a compact vertical system—right on a wall using recycled plastic bottles. This innovative and eco-friendly approach is ideal for gardeners with limited space, offering a sustainable way to grow fresh potatoes in urban environments, balconies, patios, or small backyards.
Recycling plastic bottles into vertical planters makes the most of otherwise unused vertical surfaces while reducing household waste. With proper setup, good soil, and regular care, you can enjoy fresh, homegrown potatoes from your wall-mounted garden.
Why Grow Potatoes in Wall-Mounted Bottles?
Wall-mounted potato gardens may seem unconventional, but they come with several key advantages:
-
Space-saving: Ideal for small spaces with no ground area for traditional garden beds.
-
Eco-conscious: Reuses discarded plastic bottles, reducing plastic waste.
-
Improved drainage: Elevating plants prevents waterlogging and encourages healthy root growth.
-
Clean and manageable: Easier to monitor plant health and harvest.
-
Modular design: Easily expand your setup by adding more bottles to the wall.
This method works especially well with smaller potato varieties and early-harvest types.
What You’ll Need
Before getting started, gather the following items:
-
1.5–2-liter plastic bottles (washed and label-free)
-
A sharp utility knife or scissors
-
Potting soil
-
Compost or organic fertilizer
-
Seed potatoes (small or early-maturing varieties)
-
Hooks, screws, wire, or strong twine (for mounting)
-
A drill or heated nail (for creating drainage holes)
Choose bottles that are strong enough to hold moist soil and allow for proper aeration and drainage.
Selecting Potato Varieties
Not all potatoes are equally suited to vertical gardening. Opt for compact or early-producing varieties that mature quickly and require less soil depth.
Recommended types:
-
Yukon Gold – Creamy, medium-sized tubers ideal for small spaces.
-
Red Norland – Early-season variety with red skin and smooth texture.
-
Fingerling potatoes – Small, narrow potatoes that grow well in confined areas.
-
Charlotte or other salad varieties – Great for shallow containers and vertical setups.
Avoid large, late-maturing types that need more soil depth and growing time.
Preparing the Bottles
-
Clean the bottles thoroughly with water and remove all labels.
-
Cut an access window on one side of each bottle—about 4–5 inches wide. This opening will allow you to plant and eventually harvest the potatoes.
-
Add drainage holes at the bottom using a drill or heated nail.
-
Punch holes near the top of the bottle (above the window) for hanging with wire or string.
You can mount bottles directly onto a wooden pallet, fence, wall frame, or vertical support using nails, brackets, or hooks.
Soil and Fertilizer
Potatoes thrive in well-draining, loose soil rich in organic matter. A light, crumbly mix encourages tuber expansion and prevents rot.
Ideal soil mix:
-
2 parts potting soil
-
1 part compost or aged manure
-
Optional: A small amount of sand or perlite for better drainage
Add a slow-release organic fertilizer or a balanced vegetable feed (such as 10-10-10) before planting.
Planting Potatoes in Bottles
-
Cut seed potatoes into chunks, ensuring each piece has at least one eye (sprout). Let them dry for a day or two to prevent rot.
-
Fill each bottle about one-third with soil.
-
Place one seed potato piece inside the bottle, sprout facing upward.
-
Cover with soil until the bottle is about two-thirds full.
-
Add more soil gradually as the plant grows, mimicking the “hilling” process used in ground cultivation.
This encourages additional tuber growth along the stem and helps support the plant.
Sunlight, Water, and Care
-
Sunlight: Potatoes need 6–8 hours of sunlight daily. Hang bottles on a wall that receives plenty of direct light.
-
Watering: Keep the soil evenly moist, but never soggy. Bottles can dry out quickly, so monitor regularly, especially in hot weather.
-
Mulching: Add a thin layer of mulch to help retain moisture and regulate soil temperature.
Watch for pests such as aphids and beetles. Use natural remedies like neem oil or insecticidal soap as needed.
Harvesting Wall-Grown Potatoes
Potatoes are generally ready to harvest 10–12 weeks after planting (for early varieties). Signs of maturity include yellowing foliage and a decrease in new leaf growth.
To harvest:
-
Open the access window in the bottle.
-
Gently dig around with your fingers to pull out the tubers.
-
Remove only mature potatoes if you want to continue growing smaller ones inside.
Alternatively, you can remove the entire plant when the foliage has fully died back.
Wash and dry the harvested potatoes thoroughly before storing them in a cool, dry place.
Final Thoughts
Growing potatoes in wall-mounted recycled bottles is a practical, eco-conscious solution for gardeners with limited space. It transforms everyday waste into productive planting containers and produces delicious results. Whether you’re working with a patio wall or a wooden trellis, this vertical gardening method gives you access to fresh, homegrown potatoes without needing a traditional garden bed. With some planning, care, and creativity, you’ll be enjoying your own DIY wall potato garden in no time.


