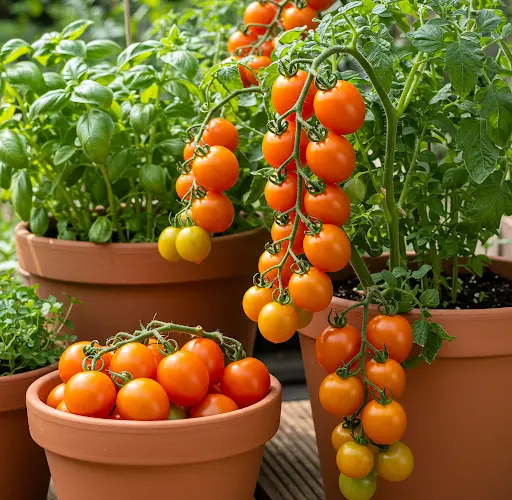
If you’re looking to grow flavorful, low-acid tomatoes perfect for sauces and canning, the Orange Roma tomato, also known as Sunrise Sauce tomato, is an excellent choice. These compact, paste-style tomatoes offer a sweet, rich flavor with a vibrant orange hue, and they’re ideal for container gardening.
Growing tomatoes in pots allows even those with limited space—like balconies, patios, or small yards—to enjoy a fresh harvest. This guide walks you through everything you need to know to successfully grow Orange Roma tomatoes from seed in pots.
Why Choose Orange Roma (Sunrise Sauce) Tomatoes?
The Sunrise Sauce tomato is a determinate, hybrid variety that produces high yields of plum-shaped orange fruit. These tomatoes are:
-
Thick-walled and meaty, perfect for sauces, roasting, or fresh eating
-
Low in acidity, making them easier on the stomach
-
Compact in size, which makes them perfect for growing in containers
-
Fast maturing, often ready to harvest in just 55–65 days after transplanting
Their manageable size and reliable productivity make them a favorite among home gardeners.
Step 1: Choosing the Right Container
Tomatoes have deep roots and require space to grow well. Select a container with these features:
-
Size: At least 5 gallons in volume (a 12–14 inch diameter and depth is ideal)
-
Material: Plastic, fabric grow bags, or ceramic pots all work well
-
Drainage: Must have multiple holes at the bottom to prevent waterlogging
Larger pots will retain moisture better and support more vigorous plant growth.
Step 2: Starting Seeds Indoors
Tomato seeds need a warm environment to germinate and grow strong before transplanting.
-
Start seeds 6–8 weeks before your last expected frost.
-
Fill seed-starting trays or small pots with a seed-starting mix.
-
Sow seeds 1/4 inch deep and cover lightly with soil.
-
Mist the surface and place in a warm spot (70–80°F or 21–27°C).
-
Keep the soil consistently moist until germination (usually 5–10 days).
Once seedlings emerge, place them under grow lights or a sunny window for 12–16 hours a day.
Step 3: Transplanting into Pots
Once seedlings have developed 2–3 sets of true leaves and nighttime temperatures are consistently above 50°F (10°C), they’re ready to be transplanted outdoors.
-
Harden off your seedlings by gradually introducing them to outdoor conditions over 7–10 days.
-
Fill your container with high-quality potting mix blended with compost or slow-release organic fertilizer.
-
Transplant the seedling deeper than it was growing before—bury about two-thirds of the stem. Tomato plants develop roots along buried stems, which encourages a stronger root system.
-
Water deeply after transplanting.
Step 4: Sunlight and Placement
Tomatoes need at least 6–8 hours of full sun per day, but more is better for fruit production. Place your container in the sunniest spot available, whether that’s a south-facing patio, balcony, or rooftop garden.
If growing indoors or in a greenhouse, use strong grow lights for best results.
Step 5: Watering and Feeding
Tomatoes in pots dry out faster than those in the ground, so consistent watering is essential.
-
Water deeply when the top inch of soil feels dry.
-
Avoid getting the leaves wet to reduce the risk of fungal diseases.
-
Use mulch (straw, bark chips, or compost) to help retain moisture.
Feed with a balanced liquid fertilizer every two weeks during early growth. Once flowering and fruiting begin, switch to a fertilizer that’s higher in potassium and phosphorus to support fruit development.
Step 6: Supporting the Plant
Although the Orange Roma tomato is a determinate variety (meaning it grows to a fixed size), it can still benefit from light support:
-
Use a tomato cage, stake, or trellis to keep the plant upright.
-
Support prevents stems from breaking under the weight of fruit and helps with air circulation.
Tie the plant gently with soft garden ties or twine as it grows.
Step 7: Pollination and Flowering
Outdoor tomato plants are typically pollinated by wind or bees, but if you’re growing in a sheltered space or indoors, you may need to assist pollination.
-
Gently shake the flowering branches or use a soft paintbrush to transfer pollen between flowers.
-
Good airflow also helps improve pollination and reduces disease risk.
Step 8: Harvesting Orange Roma Tomatoes
Orange Roma tomatoes are typically ready for harvest 55–65 days after transplanting, depending on growing conditions.
-
Harvest when tomatoes are deep orange, firm, and slightly glossy.
-
Pick them gently to avoid damaging the plant.
-
Harvesting regularly encourages continued production.
Since they are determinate, most of the fruit will ripen around the same time—perfect for preserving or making a large batch of sauce.
Bonus Tips for Success
-
Rotate containers annually to reduce soil-borne disease buildup.
-
Clean your containers before planting to prevent contamination.
-
Prune lower leaves to prevent soil splash and improve airflow.
-
If disease does appear, treat early with organic sprays like neem oil or baking soda solutions.
Conclusion
Growing Orange Roma (Sunrise Sauce) tomatoes from seed in pots is a practical and rewarding way to enjoy homegrown tomatoes even in small spaces. With their compact growth habit, rich flavor, and early harvest, they’re a perfect choice for container gardeners who love making sauces, salsas, or just enjoying a sweet, low-acid tomato fresh off the vine.
With the right care and setup, you’ll be harvesting your own golden-orange tomatoes in no time.


