Rubber plants (Ficus elastica) are popular indoor plants known for their large, shiny leaves and strong, upright growth. While they look impressive in large floor pots, you can easily grow new rubber plants at home by propagating cuttings—and one of the most effective and visually satisfying methods is water propagation using recycled plastic bottles. This approach is perfect for beginners and experienced plant lovers alike, offering a sustainable and affordable way to expand your plant collection.
In this guide, you’ll learn exactly how to bottle-propagate rubber plants step-by-step, using basic tools and a plastic bottle to create a thriving new plant.
Why Propagate Rubber Plants in Bottles?
Rubber plants are fairly easy to propagate, and using a bottle as your propagation vessel offers multiple benefits:
-
Visibility: You can monitor root development and water levels at a glance.
-
Recycling: It gives plastic bottles a second life, reducing household waste.
-
Control: It’s easy to keep the environment clean and adjust light or placement.
-
Decoration: The propagation process itself can become a beautiful display.
Water propagation is also gentler on young roots, which makes it easier for the plant to transition when moved into soil.
Materials You’ll Need
-
A healthy rubber plant (Ficus elastica) for cuttings
-
Clean pruning shears or scissors
-
A 1- to 1.5-liter clear plastic bottle
-
Room-temperature, filtered water
-
Optional: rooting hormone powder
-
Decorative materials (fabric, twine, paint)
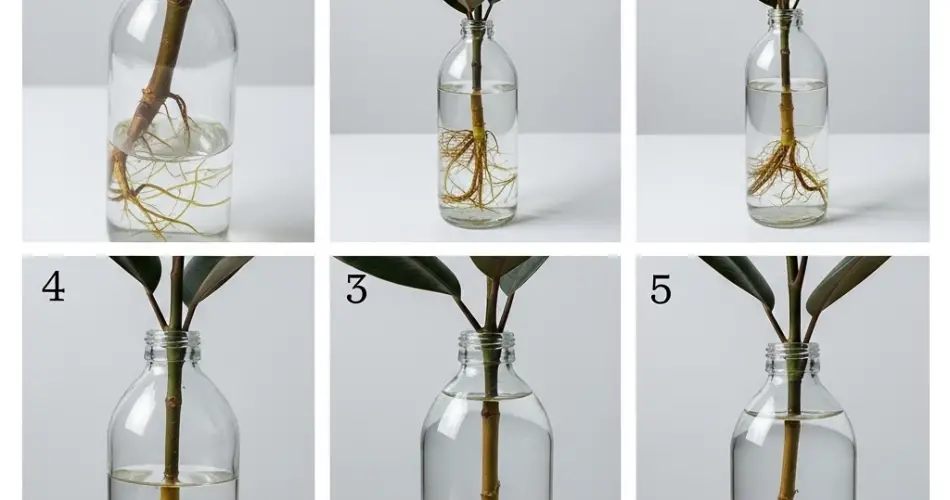
Step 1: Take a Healthy Cutting
Start by selecting a healthy, mature stem from your rubber plant. Look for a section that has at least one leaf and a visible node (a small bump on the stem where leaves emerge). This is where roots will grow.
-
Use sterilized scissors or shears to make a clean cut about ¼ inch below a node.
-
Remove the bottom leaf to leave a clean stem section that can sit in water without decay.
-
If desired, dip the cut end in rooting hormone to help speed up root formation.
-
Allow the cutting to sit for 30–60 minutes to let the latex sap dry and seal slightly.
Step 2: Prepare the Bottle
Take your clean plastic bottle and cut off the top third to create a cup-like container. If the bottle has a narrow neck, you can keep it as-is and insert the cutting through the top.
-
Fill the bottom portion with enough room-temperature water to cover the node.
-
Make sure no leaves touch the water—only the bare stem with the node should be submerged.
If using a clear bottle, consider wrapping it with paper, fabric, or twine to block excess light and reduce algae growth. This also adds a decorative touch.
Step 3: Place the Cutting and Position the Bottle
Place the cutting into the water, ensuring that the submerged node is sitting well below the water line. If the cutting doesn’t stay upright, you can prop it with a small stick or place it in a narrow-neck bottle for support.
Set the bottle in a bright spot that receives indirect light, such as a north- or east-facing windowsill. Avoid placing it in direct sunlight, as heat buildup can damage the cutting or cause algae growth in the water.
Rubber plant cuttings need warmth and humidity, so keep the surrounding air stable. A room temperature between 20–27°C (68–80°F) is ideal.
Step 4: Maintain and Monitor
Check your bottle every few days to ensure the water is clean and the cutting is healthy.
-
Change the water every 5–7 days to prevent bacterial buildup and maintain oxygen levels.
-
Rinse the bottle and the base of the cutting when changing the water.
-
Watch for signs of rot, such as dark, mushy stems—if this occurs, trim the damaged part and start again.
Root development can take 4–6 weeks or longer, so be patient. Once roots reach about 2–3 inches in length, the cutting is ready for transplanting into soil.
Step 5: Transplant into Soil
When the roots are long and healthy, prepare a small pot with drainage holes and a well-aerated soil mix. Rubber plants do well in standard indoor potting soil mixed with perlite or coarse sand for added drainage.
-
Remove the cutting from water and gently pat the roots dry.
-
Plant it in soil just deep enough to cover the roots and base of the stem.
-
Water lightly and place the pot in a location with bright, indirect light.
-
Allow the soil to dry slightly between waterings to avoid overwatering.
Optional: Keep the Cutting in Water
If you prefer to grow your rubber plant in water long-term, you can keep it in the bottle or transfer it to a glass container for display. Just be sure to add a drop of liquid houseplant fertilizer once a month and maintain water cleanliness.
A Stylish and Sustainable Propagation Method
Bottle-propagating rubber plants at home is a practical and eco-friendly way to grow new greenery from what you already have. It requires minimal equipment, reduces plastic waste, and offers a unique way to watch new life form—right before your eyes. Whether you transplant your rooted cutting into soil or enjoy it as a water-grown display, this method blends gardening creativity with sustainability. It’s an ideal project for plant lovers who enjoy hands-on, low-cost, and rewarding indoor gardening.


