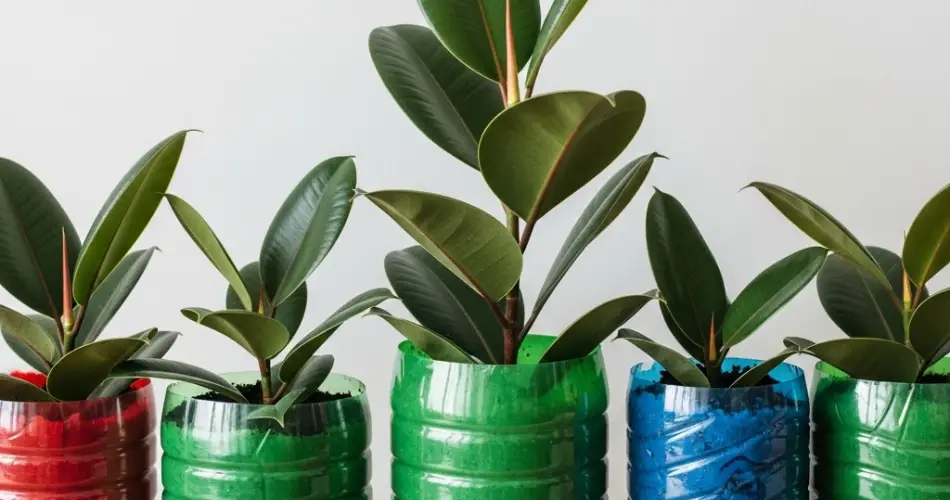
Looking for an eco-conscious way to bring greenery into your home? The rubber plant (Ficus elastica) offers lush foliage and air-purifying benefits, while plastic bottle planters offer a clever and sustainable alternative to traditional pots. Combining the two creates a functional and attractive form of indoor décor—without adding to waste.
This guide will show you how to grow a rubber plant using a reused plastic bottle. It’s simple, cost-effective, and ideal for anyone interested in sustainable living, indoor gardening, or low-maintenance houseplants.
Why Grow Rubber Plants in Reused Bottles?
Rubber plants are hardy, adaptable, and visually striking with their large, shiny leaves. While typically grown in soil, they can be propagated and nurtured in water before transferring to a planter. And what better container to start with than a plastic bottle destined for the recycling bin?
Here’s why this method works well:
-
Eco-friendly: Reduces waste by giving a new life to discarded materials.
-
Cost-saving: No need to buy propagation jars or planters.
-
Root visibility: Clear plastic bottles allow you to watch root development.
-
Compact and lightweight: Ideal for small spaces like desks, windowsills, or shelves.
-
Creative potential: Bottles can be cut, decorated, and arranged for a unique indoor garden.
What You’ll Need
-
A healthy rubber plant cutting
-
A clean plastic bottle (1–2 liters recommended)
-
Sharp scissors or a utility knife
-
Filtered or dechlorinated water
-
Optional: activated charcoal
-
Optional: materials for decoration (rope, fabric, paint, etc.)
Step 1: Select and Prepare Your Cutting
Begin by taking a cutting from a mature, healthy rubber plant:
-
Choose a stem with at least one visible node (the point where leaves grow).
-
Cut below the node using sterilized scissors or a sharp blade.
-
Remove lower leaves so none are submerged in water.
-
Let the cutting sit for an hour to allow the sap to seal the cut end and minimize the risk of rot in water.
Step 2: Upcycle Your Plastic Bottle
Clean the plastic bottle thoroughly to remove any labels, glue, or residue. Then:
-
Cut off the top third of the bottle using a knife or scissors.
-
Smooth rough edges with sandpaper or by melting slightly with a flame (carefully).
-
Rinse the inside again before use.
If you prefer to keep the bottle intact, you can make a vertical slit and insert the cutting through the neck, though this works better for smaller plants.
Optional: Wrap the bottle with twine, paint the outside, or cover with fabric to blend with your indoor decor.
Step 3: Fill with Water and Place the Cutting
Fill the bottle with room-temperature, filtered or dechlorinated water. Avoid using chlorinated tap water as it may inhibit root development.
-
Submerge the cutting so that the node is in the water.
-
Ensure no leaves touch the water—this can lead to bacterial growth or rot.
-
Add a small pinch of activated charcoal if available to help keep the water clear.
Step 4: Provide Ideal Growing Conditions
Rubber plants thrive in bright, indirect light, so place your bottle in a well-lit area away from direct sun. Near an east- or north-facing window is ideal.
Keep your environment warm and stable:
-
Temperature range: 65–80°F (18–27°C)
-
Avoid cold drafts or exposure to sudden temperature changes
Step 5: Monitor Growth and Maintain Cleanliness
Rubber plants grow slowly, especially in water. Here’s how to maintain your bottle planter:
-
Change the water every 7–10 days to prevent algae or bacteria.
-
Clean the bottle and rinse the cutting with each water change.
-
Top up the water as it evaporates, ensuring the node stays submerged.
After a few weeks, roots will begin forming. They’ll appear as small white bumps and gradually lengthen. Once roots reach about 2–3 inches, your plant is ready for optional transfer to soil—or you can continue growing it in water with proper care.
Step 6: Transitioning to Soil (Optional)
If you want to move your rooted cutting to a planter:
-
Choose a small container with drainage holes.
-
Use a well-draining potting mix, such as a blend of peat, perlite, and compost.
-
Plant the rooted cutting gently, water lightly, and place it in indirect light.
-
Avoid overwatering as the plant adapts to its new environment.
Eco-Friendly Decor Ideas
There’s no reason your upcycled planter can’t be stylish. Try these ideas:
-
Group several bottles on a tray or shelf for a mini garden display.
-
Hang bottle planters using macramé or wire holders.
-
Paint bottles in uniform colors for a minimalist design.
-
Use fabric scraps or rope to cover the bottle and match your room’s aesthetic.
Troubleshooting Common Issues
-
Leaves drooping or curling: May be due to low humidity, poor lighting, or inconsistent watering.
-
Rotting stem: Caused by submerged leaves or unclean water. Trim affected areas and restart the cutting in fresh water.
-
No root growth: Be patient; rubber plants root slowly. Ensure the node is submerged and light levels are adequate.
Final Thoughts
Creating an eco-friendly planter from a reused plastic bottle is not only practical but also a rewarding way to grow a new rubber plant. Whether you’re starting a propagation project or simply looking to add greenery to your home in a sustainable way, this method blends minimalism, creativity, and function.
With a little patience and care, your cutting will grow into a vibrant plant—all from a container you might have thrown away. It’s proof that beautiful indoor decor doesn’t have to cost the earth—literally or financially.


