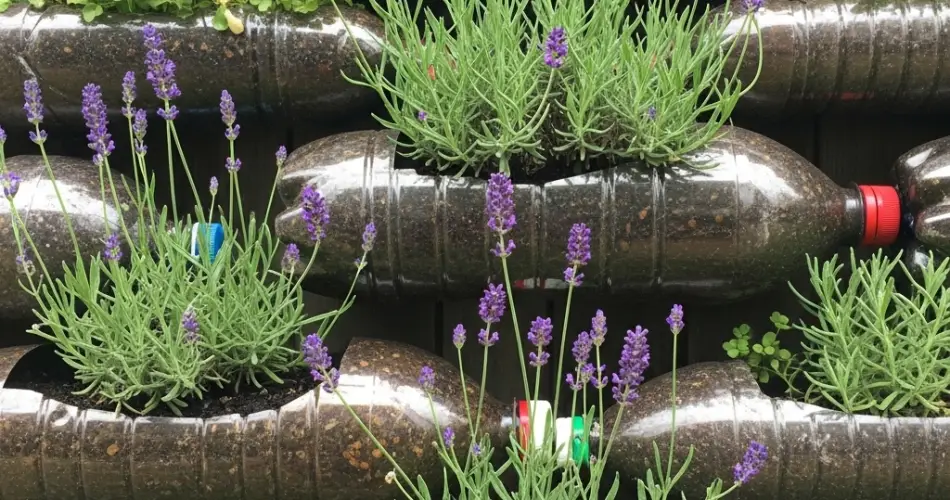
Lavender is a well-loved herb admired for its soothing fragrance, delicate purple flowers, and wide range of uses—from culinary to medicinal to ornamental. Though commonly associated with sprawling fields or cottage gardens, lavender can thrive even in compact spaces, including upcycled plastic bottles. This DIY bottle gardening method is not only space-saving but also environmentally conscious, allowing you to grow your own calming lavender plant while repurposing plastic waste.
Whether you’re living in a city apartment, managing a small balcony garden, or simply want a fragrant plant by your kitchen window, growing lavender in bottles offers an elegant and accessible solution. With proper preparation and care, your homemade lavender planter will be a fragrant delight year-round.
Why Grow Lavender in Plastic Bottles?
Lavender adapts well to container gardening, and using plastic bottles makes it even more accessible. These containers are inexpensive, easy to modify, and ideal for those with limited outdoor space. Plus, reusing plastic helps reduce household waste and supports sustainable living.
Benefits of growing lavender in bottles:
-
Recycles and repurposes plastic materials
-
Fits neatly on windowsills, desks, and balconies
-
Offers a low-maintenance, beginner-friendly setup
-
Adds natural fragrance indoors or outdoors
-
Produces flowers and foliage that can be harvested and dried
Bottle gardening combines functionality with beauty, making it a great project for both beginners and experienced plant lovers.
Materials You’ll Need
Before you start planting, gather the following:
-
1 clean plastic bottle (1.5 to 2 liters)
-
Scissors or a craft knife
-
Well-draining potting soil (cactus or herb mix works well)
-
Lavender seeds or a small lavender seedling
-
Small pebbles or mesh (optional, for drainage)
-
A watering can or spray bottle
-
A tray or saucer (to catch any excess water)
Preparing Your Bottle Planter
Lavender prefers deep containers with excellent drainage. For a vertical bottle planter, cut and prepare it as follows:
Steps:
-
Clean the bottle thoroughly and remove all labels.
-
Cut off the top third of the bottle to form a deep, open container.
-
Puncture drainage holes in the bottom using a hot nail or pointed tool.
-
Add a layer of pebbles or mesh to the bottom to help with drainage.
-
Fill with potting soil, leaving an inch of space at the top. Use a mix designed for herbs or succulents—lavender does not tolerate soggy roots.
Planting Lavender
You can start lavender from seeds or use a young transplant. Seeds require patience and consistent warmth, while seedlings offer quicker results.
-
If planting seeds: Sow 2–3 seeds just below the soil surface. Keep the soil lightly moist and warm. Germination may take 2–4 weeks.
-
If using a seedling: Dig a small hole in the center, place the root ball inside, and gently firm the soil around it.
Water lightly after planting and place the container in a sunny, well-ventilated area.
Light and Temperature Needs
Lavender thrives in full sun and warmth. It requires at least 6–8 hours of direct sunlight daily to flourish and develop strong stems and fragrant blooms.
Ideal placement:
-
A south- or west-facing window
-
A sunny balcony or windowsill
-
Under a grow light if adequate sunlight isn’t available indoors
Rotate the container regularly to promote even growth and prevent leaning.
Watering Guidelines
Lavender prefers slightly dry soil and is highly sensitive to overwatering.
Watering tips:
-
Let the top inch of soil dry out between waterings.
-
Water thoroughly but ensure any excess drains quickly.
-
Use a bottle with good drainage holes to avoid soggy roots.
-
Reduce watering during cooler months or dormant periods.
Once established, lavender is drought-tolerant and requires less frequent watering.
Fertilizing and Maintenance
Lavender doesn’t need heavy feeding and can thrive in moderately nutrient-rich soil.
-
Apply a diluted liquid fertilizer once every 4–6 weeks during the growing season.
-
Avoid nitrogen-rich fertilizers, which can promote leafy growth over flowers.
-
Prune lightly after flowering to keep the plant bushy and compact.
-
Remove faded flowers to encourage new blooms and prevent seeding.
Over time, lavender may become woody. Pruning encourages new, tender growth and helps maintain the plant’s shape.
Harvesting and Using Lavender
Once your lavender blooms, you can begin harvesting for use in crafts, teas, or aromatherapy.
To harvest:
-
Cut flower stems just as the buds begin to open.
-
Bundle and hang them upside down in a cool, dry place to preserve the fragrance.
-
Dried flowers can be stored in sachets, made into oils, or brewed as calming tea.
Troubleshooting Common Issues
-
Wilting or root rot: Usually due to overwatering. Let soil dry thoroughly between watering.
-
Lack of flowers: Could be due to insufficient sunlight or excess nitrogen in the soil.
-
Leggy growth: Indicates the plant isn’t getting enough direct light. Move it to a sunnier spot.
Conclusion
Growing lavender in recycled plastic bottles is a sustainable and aromatic way to enjoy this beloved herb at home. With the right setup, proper sunlight, and minimal care, your bottle-grown lavender will reward you with soothing fragrance, vibrant foliage, and delicate blooms. Whether you’re creating a calming corner in your kitchen or brightening up your balcony, this DIY project proves that even a small container can deliver beauty and wellness straight from nature.


